Ruan Bekker's Blog

From a Curious mind to Posts on Github

Setup Hashicorp Vault Server on Docker and a Getting Started CLI Guide

Vault is one of Hashicorp’s awesome services, which enables you to centrally store, access and distribute dynamic secrets such as tokens, passwords, certificates and encryption keys.

What will we be doing today

We will setup a Vault Server on Docker and demonstrate a getting started guide with the Vault CLI to Initialize the Vault, Create / Use and Manage Secrets.

For related posts:

Setting up the Vault Server

Create the directory structure:

1
2
$ touch docker-compose.yml
$ mkdir -p volumes/{config,file,logs}

Populate the vault config vault.json. (As you can see the config is local, in the next couple of posts, I will show how to persist this config to Amazon S3)

1
2
3
4
5
6
7
8
9
10
11
12
13
14
15
16
$ cat > volumes/config/vault.json << EOF
{
  "backend": {
    "file": {
      "path": "/vault/file"
    }
  },
  "listener": {
    "tcp":{
      "address": "0.0.0.0:8200",
      "tls_disable": 1
    }
  },
  "ui": true
}
EOF

Populate the docker-compose.yml:

1
2
3
4
5
6
7
8
9
10
11
12
13
14
15
16
17
$ cat > docker-compose.yml << EOF
version: '2'
services:
  vault:
    image: vault
    container_name: vault
    ports:
      - "8200:8200"
    restart: always
    volumes:
      - ./volumes/logs:/vault/logs
      - ./volumes/file:/vault/file
      - ./volumes/config:/vault/config
    cap_add:
      - IPC_LOCK
    entrypoint: vault server -config=/vault/config/vault.json
EOF

Start the Vault Server:

1
$ docker-compose up

The UI is available at http://localhost:8200/ui and the api at http://localhost:8200

Interacting with the Vault CLI

I will demonstrate how to use the Vault CLI to interact with Vault. Let’s start by installing the vault cli tools, I am using mac, so I will be using brew:

1
$ brew install vault

Set environment variables:

1
$ export VAULT_ADDR='http://127.0.0.1:8200'

Initialize the Vault Cluster:

Initialize new vault cluster with 6 key shares:

1
2
3
4
5
6
7
8
9
10
11
12
13
14
15
16
17
18
19
20
$ vault operator init -key-shares=6 -key-threshold=3
Unseal Key 1: RntjR...DQv
Unseal Key 2: 7E1bG...0LL+
Unseal Key 3: AEuhl...A1NO
Unseal Key 4: bZU76...FMGl
Unseal Key 5: DmEjY...n7Hk
Unseal Key 6: pC4pK...XbKb

Initial Root Token: s.F0JGq..98s2U

Vault initialized with 10 key shares and a key threshold of 3. Please
securely distribute the key shares printed above. When the Vault is re-sealed,
restarted, or stopped, you must supply at least 3 of these keys to unseal it
before it can start servicing requests.

Vault does not store the generated master key. Without at least 3 key to
reconstruct the master key, Vault will remain permanently sealed!

It is possible to generate new unseal keys, provided you have a quorum of
existing unseal keys shares. See "vault operator rekey" for more information.

In order to unseal the vault cluster, we need to supply it with 3 key shares:

1
2
3
$ vault operator unseal RntjR...DQv
$ vault operator unseal bZU76...FMGl
$ vault operator unseal pC4pK...XbKb

Ensure the vault is unsealed:

1
2
3
4
5
6
7
8
9
10
11
12
13
14
15
$ vault status -format=json
{
  "type": "shamir",
  "initialized": true,
  "sealed": false,
  "t": 3,
  "n": 5,
  "progress": 0,
  "nonce": "",
  "version": "1.1.0",
  "migration": false,
  "cluster_name": "vault-cluster-dca2b572",
  "cluster_id": "469c2f1d-xx-xx-xx-03bfc497c883",
  "recovery_seal": false
}

Authenticate against the vault:

1
2
3
4
$ vault login s.tdlEqsfzGbePVlke5hTpr9Um
Success! You are now authenticated. The token information displayed below
is already stored in the token helper. You do NOT need to run "vault login"
again. Future Vault requests will automatically use this token.

Using the cli your auth token will be saved locally at ~/.vault-token.

Enable the secret kv engine:

1
$ vault secrets enable -version=1 -path=secret kv

Create and Read Secrets

Write a secret to the path enabled above:

1
$ vault kv put secret/my-app/password password=123

List your secrets:

1
2
3
4
$ vault kv list secret/
Keys
----
my-app/

Read the secret (defaults in table format):

1
2
3
4
5
$ vault kv get secret/my-app/password
Key                 Value
---                 -----
refresh_interval    768h
password            123

Read the secret in json format:

1
2
3
4
5
6
7
8
9
10
11
$ vault kv get --format=json secret/my-app/password
{
  "request_id": "0249c878-7432-9555-835a-89b275fca32o",
  "lease_id": "",
  "lease_duration": 2764800,
  "renewable": false,
  "data": {
    "password": "123"
  },
  "warnings": null
}

Read only the password value in the secret:

1
2
$ vault kv get -field=password secret/my-app/password
123

Key with Multiple Secrets

Create a key with multiple secrets:

1
$ vault kv put secret/reminders/app db_username=db.ruanbekker.com username=root password=secret

Read all the secrets:

1
2
3
4
5
6
7
8
9
10
11
12
13
$ vault kv get --format=json secret/reminders/app
{
  "request_id": "0144c878-7532-9555-835a-8cb275fca3dd",
  "lease_id": "",
  "lease_duration": 2764800,
  "renewable": false,
  "data": {
    "db_username": "db.ruanbekker.com",
    "password": "secret",
    "username": "root"
  },
  "warnings": null
}

Read only the username field in the key:

1
2
$ vault kv get -field=username secret/reminders/app
root

Delete the secret:

1
$ vault kv delete secret/reminders

Versioning

Create a key and set the metadata to max of 5 versions:

1
$ vault kv metadata put -max-versions=5 secret/fooapp/appname

Get the metadata of the key:

1
2
3
4
5
6
7
8
9
10
$ vault kv metadata get secret/fooapp/appname
======= Metadata =======
Key                Value
---                -----
cas_required       false
created_time       2019-04-07T12:35:54.355411Z
current_version    0
max_versions       5
oldest_version     0
updated_time       2019-04-07T12:35:54.355411Z

Write a secret appname to our key: secret/fooapp/appname:

1
2
3
4
5
6
7
$ vault kv put secret/fooapp/appname appname=app1
Key              Value
---              -----
created_time     2019-04-07T12:36:41.7577102Z
deletion_time    n/a
destroyed        false
version          1

Overwrite the key with a couple of requests:

1
2
$ vault kv put secret/fooapp/appname appname=app2
$ vault kv put secret/fooapp/appname appname=app3

Read the current value:

1
2
$ vault kv get -field=appname secret/fooapp/appname
app3

Get the version=2 value of this file:

1
2
$ vault kv get -field=appname -version=2 secret/fooapp/appname
app2

Thanks

Thanks for reading, hope this was informative. Have a look at Hashicorp’s Vault Documentation for more information on the project. I will post more posts on Vault under the #vault category.

Using Concourse CI to Deploy to Docker Swarm

In this tutorial we will use Concourse to Deploy our application to Docker Swarm.

The Flow

  • Our application code resides on Github
  • The pipeline triggers when a commit is pushed to the master branch
  • The pipeline will automatically deploy to the staging environment
  • The pipeline requires a manual trigger to deploy to prod
  • Note: Staging and Prod on the same swarm for demonstration

The code for this tutorial is available on my github repository

Application Structure

The application structure for our code looks like this:

Pipeline Walktrough

Our ci/pipeline.yml

1
2
3
4
5
6
7
8
9
10
11
12
13
14
15
16
17
18
19
20
21
22
23
24
25
26
27
28
29
30
31
32
33
34
35
36
37
38
39
40
41
42
43
44
45
46
47
48
49
50
51
52
53
54
55
56
57
58
59
60
61
62
63
64
65
66
67
68
69
70
71
72
73
74
75
76
77
78
79
80
81
82
83
84
85
86
87
88
89
90
91
92
93
94
95
96
97
98
99
100
101
102
103
104
105
106
107
108
109
110
111
112
113
114
115
116
117
118
119
120
121
122
123
124
125
126
127
128
129
130
131
132
133
134
135
136
137
138
139
140
141
142
143
144
145
146
147
148
149
150
151
152
153
154
155
156
157
158
159
160
161
162
163
164
165
166
167
168
169
170
171
172
173
174
175
176
177
178
179
180
181
182
183
184
185
186
187
188
189
190
191
192
193
resources:
  - name: main-repo
    type: git
    source:
      uri: git@github.com:ruanbekker/concourse-swarm-app-demo.git
      branch: master
      private_key: ((github_private_key))

  - name: main-repo-staging
    type: git
    source:
      uri: git@github.com:ruanbekker/concourse-swarm-app-demo.git
      branch: master
      private_key: ((github_private_key))
      paths:
        - config/staging/*

  - name: main-repo-prod
    type: git
    source:
      uri: git@github.com:ruanbekker/concourse-swarm-app-demo.git
      branch: master
      private_key: ((github_private_key))
      paths:
        - config/prod/*

  - name: slack-alert
    type: slack-notification
    source:
      url: ((slack_notification_url))

  - name: version-staging
    type: semver
    source:
      driver: git
      uri: git@github.com:ruanbekker/concourse-swarm-app-demo.git
      private_key: ((github_private_key))
      file: version-staging
      branch: version-staging

  - name: version-prod
    type: semver
    source:
      driver: git
      uri: git@github.com:ruanbekker/concourse-swarm-app-demo.git
      private_key: ((github_private_key))
      file: version-prod
      branch: version-prod

resource_types:
  - name: slack-notification
    type: docker-image
    source:
      repository: cfcommunity/slack-notification-resource
      tag: v1.3.0

jobs:
  - name: bump-staging-version
    plan:
    - get: main-repo-staging
      trigger: true
    - get: version-staging
    - put: version-staging
      params:
        bump: major

  - name: bump-prod-version
    plan:
    - get: main-repo-prod
      trigger: true
    - get: version-prod
    - put: version-prod
      params:
        bump: major

  - name: deploy-staging
    plan:
    - get: main-repo-staging
    - get: main-repo
    - get: version-staging
      passed:
      - bump-staging-version
      trigger: true
    - task: deploy-staging
      params:
        DOCKER_SWARM_HOSTNAME: ((docker_swarm_staging_host))
        DOCKER_SWARM_KEY: ((docker_swarm_key))
        DOCKER_HUB_USER: ((docker_hub_user))
        DOCKER_HUB_PASSWORD: ((docker_hub_password))
        SERVICE_NAME: app-staging
        SWARM: staging
        ENVIRONMENT: staging
        AWS_ACCESS_KEY_ID: ((aws_access_key_id))
        AWS_SECRET_ACCESS_KEY: ((aws_secret_access_key))
        AWS_DEFAULT_REGION: ((aws_region))
      config:
        platform: linux
        image_resource:
          type: docker-image
          source:
            repository: rbekker87/build-tools
            tag: latest
            username: ((docker_hub_user))
            password: ((docker_hub_password))
        inputs:
        - name: main-repo-staging
        - name: main-repo
        - name: version-staging
        run:
          path: /bin/sh
          args:
            - -c
            - |
              ./main-repo/ci/scripts/deploy.sh
      on_failure:
        put: slack-alert
        params:
          channel: '#system_events'
          username: 'concourse'
          icon_emoji: ':concourse:'
          silent: true
          text: |
            *$BUILD_PIPELINE_NAME/$BUILD_JOB_NAME* ($BUILD_NAME) FAILED :rage: - TestApp Deploy to staging-swarm failed
            http://ci.example.local/teams/$BUILD_TEAM_NAME/pipelines/$BUILD_PIPELINE_NAME/jobs/$BUILD_JOB_NAME/builds/$BUILD_NAME
      on_success:
        put: slack-alert
        params:
          channel: '#system_events'
          username: 'concourse'
          icon_emoji: ':concourse:'
          silent: true
          text: |
            *$BUILD_PIPELINE_NAME/$BUILD_JOB_NAME* ($BUILD_NAME) SUCCESS :aww_yeah: - TestApp Deploy to staging-swarm succeeded
            http://ci.example.local/teams/$BUILD_TEAM_NAME/pipelines/$BUILD_PIPELINE_NAME/jobs/$BUILD_JOB_NAME/builds/$BUILD_NAME

  - name: deploy-prod
    plan:
    - get: main-repo-prod
    - get: main-repo
    - get: version-prod
      passed:
      - bump-prod-version
    - task: deploy-prod
      params:
        DOCKER_SWARM_HOSTNAME: ((docker_swarm_prod_host))
        DOCKER_SWARM_KEY: ((docker_swarm_key))
        DOCKER_HUB_USER: ((docker_hub_user))
        DOCKER_HUB_PASSWORD: ((docker_hub_password))
        SERVICE_NAME: app-prod
        SWARM: prod
        ENVIRONMENT: production
        AWS_ACCESS_KEY_ID: ((aws_access_key_id))
        AWS_SECRET_ACCESS_KEY: ((aws_secret_access_key))
        AWS_DEFAULT_REGION: ((aws_region))
      config:
        platform: linux
        image_resource:
          type: docker-image
          source:
            repository: rbekker87/build-tools
            tag: latest
            username: ((docker_hub_user))
            password: ((docker_hub_password))
        inputs:
        - name: main-repo-prod
        - name: main-repo
        - name: version-prod
        run:
          path: /bin/sh
          args:
            - -c
            - |
              ./main-repo/ci/scripts/deploy.sh
      on_failure:
        put: slack-alert
        params:
          channel: '#system_events'
          username: 'concourse'
          icon_emoji: ':concourse:'
          silent: true
          text: |
            *$BUILD_PIPELINE_NAME/$BUILD_JOB_NAME* ($BUILD_NAME) FAILED :rage: - TestApp Deploy to prod-swarm failed
            http://ci.example.local/teams/$BUILD_TEAM_NAME/pipelines/$BUILD_PIPELINE_NAME/jobs/$BUILD_JOB_NAME/builds/$BUILD_NAME
      on_success:
        put: slack-alert
        params:
          channel: '#system_events'
          username: 'concourse'
          icon_emoji: ':concourse:'
          silent: true
          text: |
            *$BUILD_PIPELINE_NAME/$BUILD_JOB_NAME* ($BUILD_NAME) SUCCESS :aww_yeah: - TestApp Deploy to prod-swarm succeeded
            http://ci.example.local/teams/$BUILD_TEAM_NAME/pipelines/$BUILD_PIPELINE_NAME/jobs/$BUILD_JOB_NAME/builds/$BUILD_NAME

Our ci/credentials.yml which will hold all our secret info, which will remain local:

1
2
3
4
username: yourdockerusername
password: yourdockerpassword
docker_swarm_prod_host: 10.20.30.40
...

The first step of our deploy will invoke a shell script that will establish a ssh tunnel to the docker host, mounting the docker socket to a tcp local port, then exporting the docker host port to the tunneled port, ci/scripts/deploy.sh:

1
2
3
4
5
6
7
8
9
10
11
12
13
14
15
16
17
18
19
20
21
22
23
24
25
#!/usr/bin/env sh

export DOCKER_HOST="localhost:2376"

echo "${DOCKER_SWARM_KEY}" | sed -e 's/\(KEY-----\)\s/\1\n/g; s/\s\(-----END\)/\n\1/g' | sed -e '2s/\s\+/\n/g' > key.pem
chmod 600 key.pem

screen -S \
  sshtunnel -m -d sh -c \
  "ssh -oStrictHostKeyChecking=no -oUserKnownHostsFile=/dev/null -i ./key.pem -NL localhost:2376:/var/run/docker.sock root@$DOCKER_SWARM_HOSTNAME"

sleep 5
docker login -u "${DOCKER_HUB_USER}" -p "${DOCKER_HUB_PASSWORD}"
docker stack deploy --prune -c ./main-repo/ci/docker/docker-compose.${ENVIRONMENT}.yml $SERVICE_NAME --with-registry-auth

if [ $? != "0" ]
  then
    echo "deploy failure for: $SERVICE_NAME"
    screen -S sshtunnel -X quit
    exit 1
  else
    set -x
    echo "deploy success for: $SERVICE_NAME"
    screen -S sshtunnel -X quit
fi

The deploy script references the docker-compose files, first our ci/docker/docker-compose.staging.yml:

1
2
3
4
5
6
7
8
9
10
11
12
13
14
15
16
17
version: "3.4"

services:
  web:
    image: ruanbekker/web-center-name
    environment:
      - APP_ENVIRONMENT=Staging
    ports:
      - 81:5000
    networks:
      - web_net
    deploy:
      mode: replicated
      replicas: 2

networks:
  web_net: {}

Also, our docker-compose for production, ci/docker/docker-compose.production.yml:

1
2
3
4
5
6
7
8
9
10
11
12
13
14
15
16
17
version: "3.4"

services:
  web:
    image: ruanbekker/web-center-name
    environment:
      - APP_ENVIRONMENT=Production
    ports:
      - 80:5000
    networks:
      - web_net
    deploy:
      mode: replicated
      replicas: 10

networks:
  web_net: {}

Set the Pipeline in Concourse

Create 2 branches in your github repository for versioning: version-staging and version-prod, then logon to concourse and save the target:

1
$ fly -t ci login -n main -c http://<concourse-ip>

Set the pipeline, point the config, local variables definition and name the pipeline:

1
$ fly -t ci sp -n main -c ci/pipeline.yml -p <pipeline-name> -l ci/<variables>.yml

You will find that the pipeline will look like below and that it will be in a paused state:

Unpause the pipeline:

1
$ fly -t ci up -p swarm-demo

The pipeline should kick-off automatically due to the trigger that is set to true:

Deployed automatically to staging, prod is a manual trigger:

Testing our Application

For demonstration purposes we have deployed staging on port 81 and production on port 80.

Testing Staging on http://:81/

Testing Production on http://:80/

Using MongoDB Inside Drone CI Services for Unit Testing

Another nice thing about Drone CI is the “Services” configuration within your pipeline. At times your unit or integration testing steps might be dependent of a database such as MongoDB, MySQL etc.

Drone allows you to spin up a ephemeral database service such as MongoDB using a Docker container as the fist step within your pipeline, defined in the services section. This step will always run first.

The service container will be reachable via the configured container name as its hostname. Keep note that if you run multiple paralel jobs that the service container will only be reachable from the container where the mongodb container is running.

What are we doing today

We will setup a really basic (and a bit useless) pipeline that will spin up a mongodb service container, use a step to write random data to mongodb and a step that reads data from mongodb.

For demonstration purposes, the data is really random but more focused on the service section.

All the source code for this demonstration is available on my github repository

Our Drone Pipeline

First we define our service, mongodb. Once the mongodb service is running, we will have our build step, our step that runs the mongodb version against our database, write data into our mongodb database, then read the data from mongodb, then the last step running a shell command with the date.

Our .drone.yml pipeline definition:

1
2
3
4
5
6
7
8
9
10
11
12
13
14
15
16
17
18
19
20
21
22
23
24
25
26
27
28
29
30
31
32
33
34
35
36
37
38
39
---
kind: pipeline
name: mongotests

services:
- name: mongo
  image: mongo:4
  command: [ --smallfiles ]
  ports:
  - 27017

steps:
- name: build-step
  image: alpine
  commands:
  - echo "this should be a step that does something"

- name: mongodb-return-version
  image: mongo:4
  commands:
  - date
  - mongo --host mongo --eval "db.version()"

- name: mongodb-test-writes
  image: mongo:4
  commands:
  - date
  - sh scripts/write_mongo.sh

- name: mongodb-test-reads
  image: mongo:4
  commands:
  - date
  - sh scripts/read_mongo.sh

- name: last-step
  image: alpine
  commands:
  - echo "completed at $(date)"

Our scripts referenced in our steps:

The first will be our script that write random data into mongodb, scripts/write_mongo.sh:

1
2
3
4
5
#!/bin/sh
set -ex
echo "start writing"
mongo mongo:27017/mydb scripts/write.js
echo "done writing"

We are referencing a scripts/write.js file which is a function that randomizes data and generates a 1000 documents to write to mongodb:

1
2
3
4
5
6
7
8
9
10
11
12
13
14
var txs = []
for (var x = 0; x < 1000 ; x++) {
 var transaction_types = ["credit card", "cash", "account"];
 var store_names = ["edgards", "cna", "makro", "picknpay", "checkers"];
 var random_transaction_type = Math.floor(Math.random() * (2 - 0 + 1)) + 0;
 var random_store_name = Math.floor(Math.random() * (4 - 0 + 1)) + 0;
 txs.push({
   transaction: 'tx_' + x,
   transaction_price: Math.round(Math.random()*1000),
   transaction_type: transaction_types[random_transaction_type],
   store_name: store_names[random_store_name]
   });
}
db.mycollection.insert(txs)

Our script that will read data from mongodb, scripts/read_mongo.sh:

1
2
3
4
5
6
7
8
#!/bin/sh
set -ex
echo "start reading"
mongo mongo:27017/mydb <<EOF
db.mycollection.find().count();
db.mycollection.find({transaction_price: { \$gt: 990}}).forEach( printjson );
EOF
echo "done reading"

The README.md to include the build status:

1
## project-name ![](https://cloud.drone.io/api/badges/<user-name>/<project-name>/status.svg?branch=master)

Once your source code is set in github, enable the repository on drone and push to github to trigger the build.

Demo and Screenshots

After pushing to github to trigger the build, heading over to drone, I can see that mongodb is running and our step has completed that executes the db.version() against mongodb:

Next our step executes to write the random data into mongodb:

After the data has been written to mongodb, our next step will read the number of documents from mongodb, and also run a query for transaction prices more than 990:

Once that has completed, we will have a shell command returning the time when the last step completed:

Resources

Queries Failing via Beeline Due to Anonymous User

Beeline Error: FAILED: Execution Error, return code 1 from org.apache.hadoop.hive.ql.exec.tez.TezTask (state=08S01,code=1)

Issue:

Some time ago, I assisted a customer who was trying to do a select count(*) via beeline and failed with:

1
2
3
[hadoop@ip-10-10-9-226 ~]$ beeline -u jdbc:hive2://nn-emr.sysint.dxone.local:10000/default --silent=true --outputformat=csv2 -e "select count(*) from basetables_rms.rms_site"
19/04/26 06:41:15 [main]: WARN jdbc.HiveConnection: Request to set autoCommit to false; Hive does not support autoCommit=false.
Error: Error while processing statement: FAILED: Execution Error, return code 1 from org.apache.hadoop.hive.ql.exec.tez.TezTask (state=08S01,code=1)

When reproducing this I found a jira: https://issues.apache.org/jira/browse/HIVE-14631 which related to the same issue and the workaround was to switch your execution engine to mapreduce. By doing that, it worked, but wanted a better resolution for the customer.

Debugging:

When setting enabling debugging, I found that the error is related to permissions:

1
2
3
4
5
6
7
8
$ beeline  -u jdbc:hive2://172.31.31.247:10000/default --silent=false --outputformat=csv2 -e "select count(*) from testdb.users"
Connecting to jdbc:hive2://172.31.31.247:10000/default
Connected to: Apache Hive (version 2.1.1-amzn-0)
Driver: Hive JDBC (version 2.1.1-amzn-0)
19/04/26 10:24:01 [main]: WARN jdbc.HiveConnection: Request to set autoCommit to false; Hive does not support autoCommit=false.
...
ERROR : Failed to execute tez graph.
org.apache.hadoop.security.AccessControlException: Permission denied: user=anonymous, access=WRITE, inode="/user/anonymous":hdfs:hadoop:drwxr-xr-x

So it seems that when the client (anonymous) is trying to copy the hive execution jar to is home path in HDFS, in this case (/home/anonymous/.hiveJars/) it fails due to permissions.

Resolution:

By passing the hadoop user, I was able to get the expected results:

1
2
3
4
5
6
$ beeline -n hadoop -u jdbc:hive2://172.31.31.247:10000/default --silent=false --outputformat=csv2 -e "select count(*) from testdb.users"
INFO  : Completed executing command(queryId=hive_20190426103246_33253d86-3ebc-462f-a5a1-f01877dd00a8); Time taken: 17.08 seconds
INFO  : OK
c0
1
1 row selected (17.282 seconds)

Listing the mentioned jar:

1
2
3
$ hdfs dfs -ls /user/hadoop/.hiveJars/
Found 1 items
-rw-r--r--   1 hadoop hadoop   32447131 2019-04-26 09:51 /user/hadoop/.hiveJars/hive-exec-2.1.1-amzn-0-ac46be4721493d9e62fd1b132ecee3d20fd283680edbc0cfa9809c656a493469.jar

Hope this might help someone facing the same issue

Using Drone CI to Build a Jekyll Site and Deploy to Docker Swarm

image

CICD Pipelines! <3

In this post I will show you how to setup a cicd pipeline using drone to build a jekyll site and deploy to docker swarm.

Environment Overview

Jekyll’s Codebase: Our code will be hosted on Github (I will demonstrate how to set it up from scratch)

Secret Store: Our secrets such as ssh key, swarm host address etc will be stored in drones secrets manager

Docker Swarm: Docker Swarm has Traefik as a HTTP Loadbalancer

Drone Server and Agent: If you dont have drone, you can setup drone server and agent on docker or have a look at cloud.drone.io

Workflow:

1
2
3
4
5
* Whenever a push to master is receive on github, the pipeline will be triggered
* The content from our github repository will be cloned to the agent on a container
* Jekyll will build and the output will be transferred to docker swarm using rsync
* The docker-compose.yml will be transferred to the docker swarm host using scp
* A docker stack deploy is ran via ssh

Install Jekyll Locally

Install Jekyll locally, as we will use it to create the initial site. I am using a mac, so I will be using brew. For other operating systems, have a look at this post.

I will be demonstrating with a weightloss blog as an example.

Install jekyll:

1
$ brew install jekyll

Go ahead and create a new site which will host the data for your jekyll site:

1
$ jekyll new blog-weightloss

Create a Github Repository

First we need to create an empty github repository, in my example it was github.com/ruanbekker/blog-weightloss.git. Once you create the repo change into the directory created by the jekyll new command:

1
$ cd blog-weightloss

Now initialize git, set the remote, add the jekyll data and push to github:

1
2
3
4
5
$ git init
$ git remote add origin git@github.com:ruanbekker/blog-weightloss.git # <== change to your repository
$ git add .
$ git commit -m "first commit"
$ git push origin master

You should see your data on your github repository.

Create Secrets on Drone

Logon to the Drone UI, sync repositories, activate the new repository and head over to settings where you will find the secrets section.

Add the following secrets:

1
2
3
4
5
6
7
8
Secret Name: swarm_host
Secret Value: ip address of your swarm

Secret Name: swarm_key
Secret Value: contents of your private ssh key

Secret Name: swarm_user
Secret Value: the user that is allowed to ssh

You should see the following:

image

Add the Drone Config

Drone looks from a .drone.yml file in the root directory for instructions on how to do its tasks. Lets go ahead and declare our pipeline:

1
$ vim .drone.yml

And populate the drone config:

1
2
3
4
5
6
7
8
9
10
11
12
13
14
15
16
17
18
19
20
21
22
23
24
25
26
27
28
29
30
31
32
33
34
35
36
37
38
39
40
41
42
43
44
45
46
47
48
49
50
51
52
53
54
55
56
57
pipeline:
  jekyll-build:
    image: jekyll/jekyll:latest
    commands:
      - touch Gemfile.lock
      - chmod a+w Gemfile.lock
      - chown -R jekyll:jekyll /drone
      - gem update --system
      - gem install bundler
      - bundle install
      - bundle exec jekyll build

  transfer-build:
    image: drillster/drone-rsync
    hosts:
      from_secret: swarm_host
    key:
      from_secret: swarm_key
    user:
      from_secret: swarm_user
    source: ./*
    target: ~/my-weightloss-blog.com
    recursive: true
    delete: true
    when:
      branch: [master]
      event: [push]

  transfer-compose:
    image: appleboy/drone-scp
    host:
      from_secret: swarm_host
    username:
      from_secret: swarm_user
    key:
      from_secret: swarm_key
    target: /root/my-weightloss-blog.com
    source:
      - docker-compose.yml
    when:
      branch: [master]
      event: [push]

  deploy-jekyll-to-swarm:
    image: appleboy/drone-ssh
    host:
      from_secret: swarm_host
    username:
      from_secret: swarm_user
    key:
      from_secret: swarm_key
    port: 22
    script:
      - docker stack deploy --prune -c /root/my-weightloss-blog.com/docker-compose.yml apps
    when:
      branch: [master]
      event: [push]

Notifications?

If you want to be notified about your builds, you can add a slack notification step as the last step.

To do that, create a new webhook integration, you can follow this post for a step by step guide. After you have the webhook, go to secrets and create a slack_webhook secret.

Then apply the notification step as shown below:

1
2
3
4
5
6
7
8
9
10
11
12
13
14
  notify-via-slack:
    image: plugins/slack
    webhook:
      from_secret: slack_webhook
    channel: system_events
    template: >
      
        [DRONE CI]: ** : /
        ( -  | )

      
        [DRONE CI]: ** : /
        ( -  | )
      

Based on the status, you should get a notification similar like this:

image

Add the Docker Compose

Next we need to declare our docker compose file which is needed to deploy our jekyll service to the swarm:

1
$ vim docker-compose.yml

And populate this info (just change the values for your own environment/settings):

1
2
3
4
5
6
7
8
9
10
11
12
13
14
15
16
17
18
19
20
21
22
23
24
25
26
27
28
29
30
31
32
33
version: '3.5'

services:
  myweightlossblog:
    image: ruanbekker/jekyll:contrast
    command: jekyll serve --watch --force_polling --verbose
    networks:
      - appnet
    volumes:
      - /root/my-weightloss-blog.com:/srv/jekyll
    deploy:
      mode: replicated
      replicas: 1
      labels:
        - "traefik.backend.loadbalancer.sticky=false"
        - "traefik.backend.loadbalancer.swarm=true"
        - "traefik.backend=myweightlossblog"
        - "traefik.docker.network=appnet"
        - "traefik.entrypoints=https"
        - "traefik.frontend.passHostHeader=true"
        - "traefik.frontend.rule=Host:www.my-weightloss-blog.com,my-weightloss-blog.com"
        - "traefik.port=4000"
      update_config:
        parallelism: 2
        delay: 10s
      restart_policy:
        condition: on-failure
      placement:
        constraints:
          - node.role == manager
networks:
  appnet:
    external: true

Push to Github

Now we need to push our .drone.yml and docker-compose.yml to github. Since the repository is activated on drone, any push to master will trigger the pipeline, so after this push we should go to drone to look at our pipeline running.

Add the untracked files and push to github:

1
2
3
4
$ git add .drone.yml
$ git add docker-compose.yml
$ git commit -m "add drone and docker config"
$ git push origin master

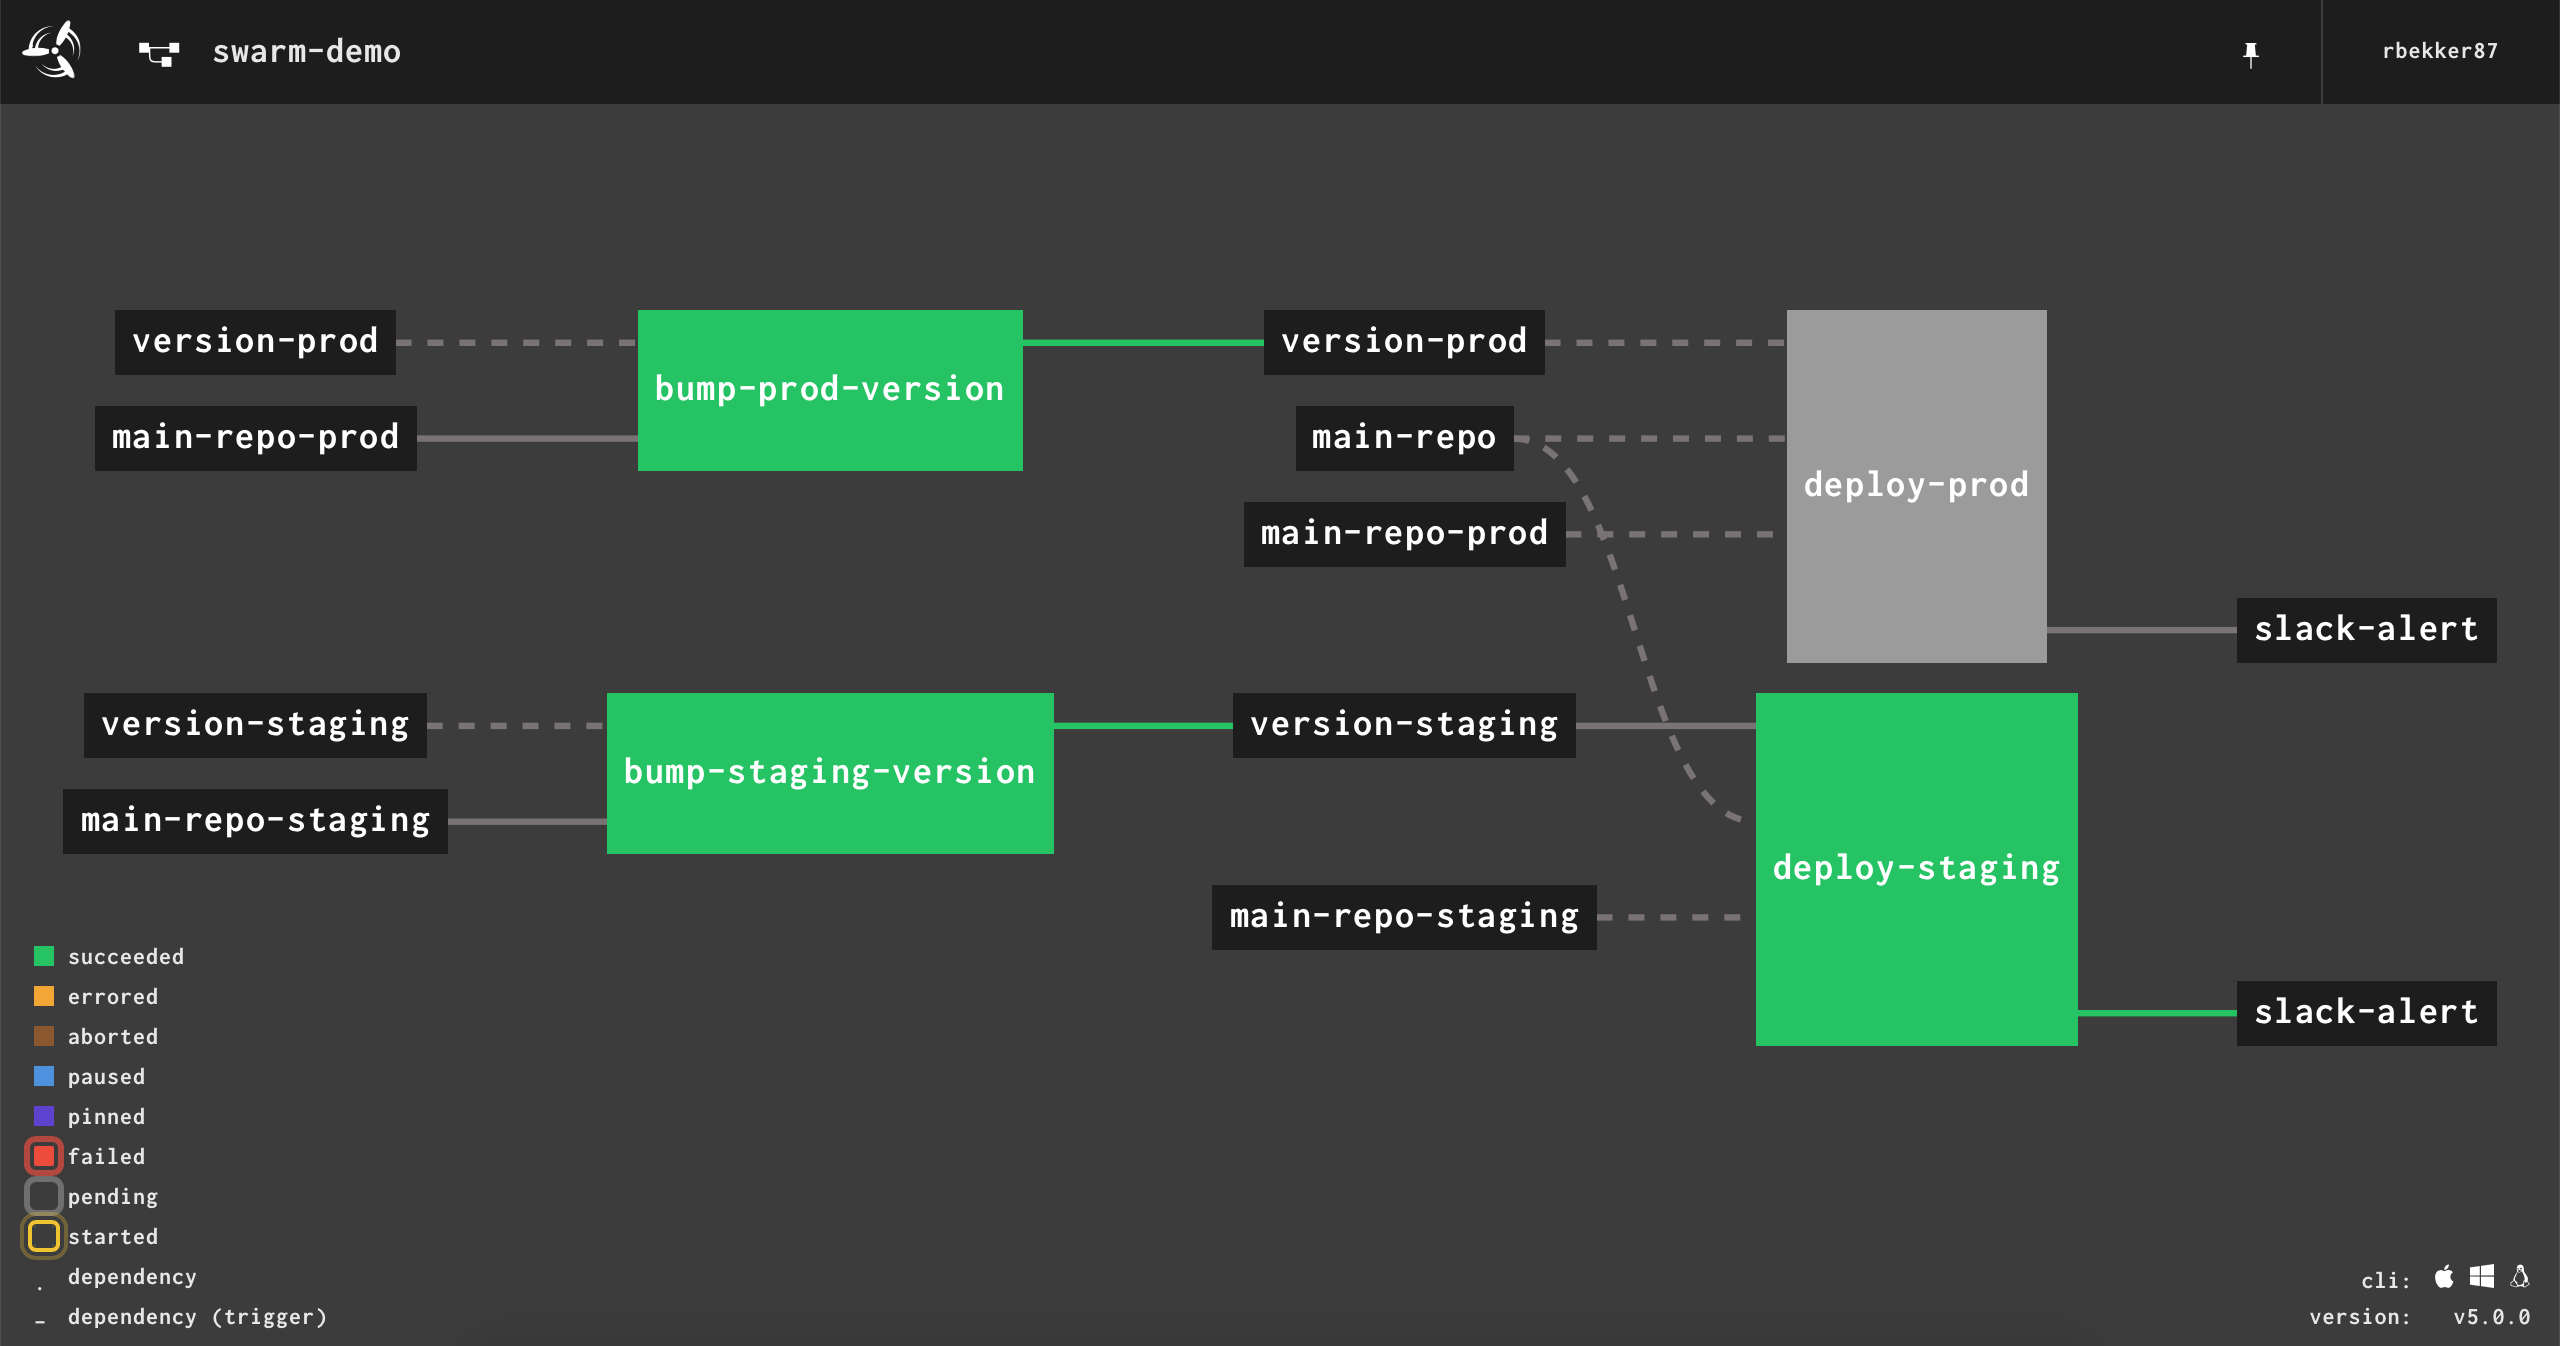
As you head over to your drone ui, you should see your pipeline output which will look more or less like this (just look how pretty it is! :D )

image

Test Jekyll

If your deployment has completed you should be able to access your application on the configured domain. A screenshot of my response when accessing Jekyll:

image

Absolutely Amazingness! I really love drone!

Setup a Blog With Hugo

image

In this post we will setup a blog on hugo and using the theme pickles.

What is Hugo

Hugo is a Open-Source Static Site Generator which runs on Golang.

Installing Hugo

Im using a mac so I will be installing hugo with brew, for other operating systems, you can have a look at their documentation

1
$ brew install hugo

Create your new site:

1
$ hugo new site myblog

Install a Theme

We will use a 3rd party theme, go ahead and install the pickles theme:

1
$ git clone -b release https://github.com/mismith0227/hugo_theme_pickles themes/pickles

Custom Syntax Highlighting

Generate syntax highlight css, for a list of other styles see this post

1
2
$ mkdir -p static/css
$ hugo gen chromastyles --style=colorful > static/css/syntax.css

Append this below style.css in themes/pickles/layouts/partials/head.html

1
<link rel="stylesheet" href="/css/syntax.css"/>

set pygments settings in config.toml:

1
2
3
4
5
baseURL = "http://example.org/"
languageCode = "en-us"
pygmentsCodeFences = true
pygmentsUseClasses = true
title = "My Hugo Site"

Create your First Blogpost

Create your first post:

1
2
$ hugo new posts/my-first-post.md
/Users/ruan/myblog/content/posts/my-first-post.md created

Populate your page with some data:

1
2
3
4
5
6
7
8
9
10
11
12
13
14
15
16
17
18
19
20
21
22
23
24
25
26
27
28
29
30
31
32
33
34
35
36
37
38
39
40
41
42
43
44
45
46
47
48
49
50
51
52
53
54
55
56
57
58
59
60
61
62
63
64
65
66
67
68
69
70
71
72
73
74
75
76
77
78
79
80
81
82
83
84
85
86
87
88
89
90
---
title: "My First Post"
date: 2019-04-23T09:39:23+02:00
description: This is an introduction post to showcase Hugo.
slug: hello-world-my-first-post
categories:
- hugo
- blog
tags:
- helloworld
- hugo
- blog
draft: false
---

![](https://hugo-simple-blog.work/images/uploads/gopher_hugo.png)

Hello world and welcome to my first post

## New Beginning

This is a new beginning on my blog on hugo and this seems pretty cool so im adding random text here because I dont know **what** to add here. So im adding a lot more random text here.

This is another test.

## Code

This is python code:


from random import randint
from faker import Fake
randint(1, 2)

destFile = "largedataset-" + timestart + ".txt"
file_object = open(destFile,"a")
file_object.write("uuid" + "," + "username" + "," + "name" + "," + "country" + "\n")

def create_names(fake):
    for x in range(numberRuns):
        genUname = fake.slug()
        genName =  fake.first_name()
        genCountry = fake.country()
file_object.write(genUname + "," + genName + "," + genCountry + "\n")
..


This is bash code:


#!/usr/bin/env bash
var="ruan"
echo "Hello, ${var}"


## Tweets

This is one of my tweets, see [configuration](https://gohugo.io/content-management/shortcodes/#highlight) for more shortcodes:


## Tables

This is a table:

|**id**    |**name**|**surname**|**age**| **city**     |
|----------|--------|-----------|-------|--------------|
|20-1232091|ruan    |bekker     |32     |cape town     |
|20-2531020|stefan  |bester     |32     |kroonstad     |
|20-4835056|michael |le roux    |35     |port elizabeth|

## Lists

This is a list:

* one
* two
* [three](https://example.com)

This is another list:

1. one
2. two
3. [three](https://example.com)

## Images

This is an embedded photo:

![](https://images.pexels.com/photos/248797/pexels-photo-248797.jpeg?auto=compress&cs=tinysrgb&dpr=1&w=500)

Run the Server

You can set the flags in your main config as well. Go ahead and run the server:

1
2
3
4
5
$ hugo server \
  --baseURL "http://localhost/" \
  --themesDir=themes --theme=pickles \
  --bind=0.0.0.0 --port=8080 --appendPort=true \
  --buildDrafts --watch --environment production

Screenshots

When you access your blog on port 8080 you should see your post. Some screenshots below:

image

image

image

image

References:

Setup a Drone CICD Environment on Docker With Letsencrypt

drone-ci

What is Drone?

Drone is a self-service continuous delivery platform which can be used for CICD pipelines, devopsy stuff which is really awesome.

With Configuration as Code, Pipelines are configured with a simple, easy‑to‑read file that you commit to your git repository such as github, gitlab, gogs, gitea etc.

Each Pipeline step is executed inside an isolated Docker container that is automatically downloaded at runtime, if not found in cache.

Show me pipelines!

A pipeline can look as easy as:

1
2
3
4
5
6
7
8
9
10
11
12
kind: pipeline
steps:
- name: test
  image: node
  commands:
  - npm install
  - npm test
services:
- name: database
  image: mysql
  ports:
  - 3306

Open for Testing!

I have enabled public access, so please go ahead and launch your cicd pipelines on my drone setup as I want to test the stability of it:

==> https://drone.rbkr.xyz/

What are we doing?

We will deploy a drone server which is responsible for the actual server and 2 drone agents which will receive instructions from the server whenever steps need to be executed. Steps run on agents.

Deploy the Servers

I’m using VULTR to deploy 3 nodes on coreos, 1 drone server and 2 drone agents as seen below:

image

Documentation: https://docs.drone.io/installation/github/multi-machine/ https://github.com/settings/developers

We will use Github for version control and to delegate auth, therefore we need to register a new application on Github.

Register New Application on Github at https://github.com/settings/developer :

register-application

Get your Drone-Server Host Endpoint, and update the fields:

image

You will receive a Github Client ID, Secret which we will need later, which will look like this:

1
2
3
4
Client ID:
xx
Client Secret:
yyy

Generate the shared secret which will be used on the server and agent:

1
2
$ openssl rand -hex 16
eb83xxe19a3497f597f53044250df6yy

Create the Startup Script for Drone Server, which will just be a docker container running in detached mode. Note that you should use your own domain at SERVER_HOST and if you want to issue an certificate automatically keep DRONE_TLS_AUTOCERT to true.

1
2
3
4
5
6
7
8
9
10
11
12
13
14
15
16
17
18
19
20
21
22
23
24
25
26
27
28
29
30
$ cat > start_drone-server.sh << EOF
#!/usr/bin/env bash

set -ex

GITHUB_CLIENT_ID=xx
GITHUB_CLIENT_SECRET=yyy
SHARED_SECRET=eb83xxe19a3497f597f53044250df6yy
SERVER_HOST=drone.yourdomain.com
SERVER_PROTOCOL=https

docker run \
  --volume=/var/run/docker.sock:/var/run/docker.sock \
  --volume=/var/lib/drone:/data \
  --env=DRONE_GITHUB_SERVER=https://github.com \
  --env=DRONE_GITHUB_CLIENT_ID=${GITHUB_CLIENT_ID} \
  --env=DRONE_GITHUB_CLIENT_SECRET=${GITHUB_CLIENT_SECRET} \
  --env=DRONE_AGENTS_ENABLED=true \
  --env=DRONE_RPC_SECRET=${SHARED_SECRET} \
  --env=DRONE_SERVER_HOST=${SERVER_HOST} \
  --env=DRONE_SERVER_PROTO=${SERVER_PROTOCOL} \
  --env=DRONE_TLS_AUTOCERT=true \
  --env=DRONE_USER_CREATE=username:<your-github-username>,admin:true \
  --publish=80:80 \
  --publish=443:443 \
  --restart=always \
  --detach=true \
  --name=drone \
  drone/drone:1
EOF

Create the startup script for the drone agent, note that this script needs to be placed on the agent nodes:

1
2
3
4
5
6
7
8
9
10
11
12
13
14
15
16
17
18
19
20
$ cat > start_drone-agent.sh << EOF
#!/usr/bin/env bash

set -ex

SHARED_SECRET=eb83xxe19a3497f597f53044250df6yy
AGENT_SERVER_HOST=https://drone.yourdomain.com
SERVER_PROTOCOL=https

docker run \
  --volume=/var/run/docker.sock:/var/run/docker.sock \
  --env=DRONE_RPC_SERVER=${AGENT_SERVER_HOST} \
  --env=DRONE_RPC_SECRET=${SHARED_SECRET} \
  --env=DRONE_RUNNER_CAPACITY=2 \
  --env=DRONE_RUNNER_NAME=${HOSTNAME} \
  --restart=always \
  --detach=true \
  --name=drone-agent-02 \
  drone/agent:1
EOF

Logon to the server node and start the drone server:

1
$ bash start_drone-agent.sh

Login to the agent nodes and start the agents:

1
$ bash start_drone-agent.sh

The server should show that it’s listening on port 80 and 443:

1
2
3
$ docker ps
CONTAINER ID        IMAGE               COMMAND               CREATED             STATUS              PORTS                                      NAMES
8ea70fc7b967        drone/drone:1       "/bin/drone-server"   12 minutes ago      Up 12 minutes       0.0.0.0:80->80/tcp, 0.0.0.0:443->443/tcp   drone

Access Drone

Access your Drone instance on port 80 eg. http://drone.yourdomain.com you should be automatically redirected to port 443, which should direct you to a login page, which will look like this:

drone-authorize

Login with your github account and allow drone some time to sync your repositories:

image

Add drone config to your repository:

Clone this repository: https://github.com/ruanbekker/drone-ci-testing which will contain the .drone.yml config which drone gets its instructions from.

Select a repository to activate, (drone-ci-testing in this case) head over to settings:

image

Adding secret:

image

Add more secrets:

image

Your build list should be empty:

image

Trigger a Build

Edit any of the files in the clone repository and you should see your build running:

image

When your build has completed:

image

You can also find out where the step ran:

image

Run a couple of tests:

image

Get notified via slack:

image

Debugging

If your build fails, its most likely that you need the slack_webhook secret. You can remove the slack step which shouldhelp you get going with drone.

More on Drone

Have a look at this document for more examples or have a look at their documentation as well as their extensive list of plugins and their setup documentation to become familiar with their configuration.

Setup a Slack Webhook for Sending Messages From Applications

slack

Slack is amazing and I cant live without it.

We can also use custom webhook integrations to allow applications to notify us via slack in response of events.

What we will be doing

We will be configuring a custom slack webhook integration and test out the api to show you how easy it is to use it to inform us via slack, whenever something is happening.

Configuration

Head over to: - https://{your-team}.slack.com/apps/manage/custom-integrations

Select Incoming Webhooks:

Select Add Configuration:

Select the channel it should post to:

Select Add Incoming Webhook Integration.

Save the webhook url that will look like this:

1
https://hooks.slack.com/services/ABCDEFGHI/ZXCVBNMAS/AbCdEfGhJiKlOpRQwErTyUiO

You can then further configure the integration.

Sending Messages

1
curl -XPOST -d 'payload={"channel": "#system_events", "username": "My-WebhookBot", "text": "This is posted to #general and comes from a bot named <https://alert-system.com/alerts/1234|webhookbot> for details!", "icon_emoji": ":borat:"}' https://hooks.slack.com/services/xx/xx/xx

Will result in:

image

Message Attachment, Error:

1
curl -XPOST -d 'payload={"channel": "#system_events", "username": "My-WebhookBot", "text": "*Incoming Alert!*", "icon_emoji": ":borat:", "attachments":[{"fallback":"New open task [Urgent]: <http://url_to_task|Test out Slack message attachments>","pretext":"New open task [Urgent]: <http://url_to_task|Test out Slack message attachments>","color":"#D00000","fields":[{"title":"Notes","value":"This is much easier than I thought it would be.","short":false}]}]}}' https://hooks.slack.com/services/xx/xx/xx

Results in:

image

Message Attachment, OK:

1
curl -XPOST -d 'payload={"channel": "#system_events", "username": "My-WebhookBot", "text": "*Status Update:*", "icon_emoji": ":borat:", "attachments":[{"fallback":"New open task has been closed [OK]: <http://url_to_task|Test out Slack message attachments>","pretext":"Task has been closed [OK]: <http://url_to_task|Test out Slack message attachments>","color":"#28B463","fields":[{"title":"Notes","value":"The error has been resolved and the status is OK","short":false}]}]}}' https://hooks.slack.com/services/xx/xx/xx

Results in:

image

Join my Slack

If you want to join my slack workspace, use this invite link

Resources:

MongoDB Examples With Golang

While looking into working with mongodb using golang, I found it quite frustrating getting it up and running and decided to make a quick post about it.

ruanbekker-cheatsheets

What are we doing?

Examples using the golang driver for mongodb to connect, read, update and delete documents from mongodb.

Environment:

Provision a mongodb server in docker:

1
2
$ docker network create container-net
$ docker run -itd --name mongodb --network container-net -p 27017:27017 ruanbekker/mongodb

Drop into a golang environment using docker:

1
$ docker run -it golang:alpine sh

Get the dependencies:

1
$ apk add --no-cache git

Change to your project path:

1
2
$ mkdir $GOPATH/src/myapp
$ cd $GOPATH/src/myapp

Download the golang mongodb driver:

1
$ go get go.mongodb.org/mongo-driver

Connecting to MongoDB in Golang

First example will be to connect to your mongodb instance:

1
2
3
4
5
6
7
8
9
10
11
12
13
14
15
16
17
18
19
20
21
22
23
24
25
26
27
28
29
30
31
32
33
34
package main

import (
    "context"
    "fmt"
    "log"
    "go.mongodb.org/mongo-driver/mongo"
    "go.mongodb.org/mongo-driver/bson"
    "go.mongodb.org/mongo-driver/mongo/options"
)

type Person struct {
    Name string
    Age  int
    City string
}

func main() {
    clientOptions := options.Client().ApplyURI("mongodb://mongodb:27017")
    client, err := mongo.Connect(context.TODO(), clientOptions)

    if err != nil {
        log.Fatal(err)
    }

    err = client.Ping(context.TODO(), nil)

    if err != nil {
        log.Fatal(err)
    }

    fmt.Println("Connected to MongoDB!")

}

Running our app:

1
2
$ go run main.go
Connected to MongoDB!

Writing to MongoDB with Golang

Let’s insert a single document to MongoDB:

1
2
3
4
5
6
7
8
9
10
11
12
func main() {
    ..
    collection := client.Database("mydb").Collection("persons")

    ruan := Person{"Ruan", 34, "Cape Town"}

    insertResult, err := collection.InsertOne(context.TODO(), ruan)
    if err != nil {
        log.Fatal(err)
    }
    fmt.Println("Inserted a Single Document: ", insertResult.InsertedID)
}

Running it will produce:

1
2
3
$ go run main.go
Connected to MongoDB!
Inserted a single document:  ObjectID("5cb717dcf597b4411252341f")

Writing more than one document:

1
2
3
4
5
6
7
8
9
10
11
12
13
14
15
16
func main() {
    ..
    collection := client.Database("mydb").Collection("persons")

    ruan := Person{"Ruan", 34, "Cape Town"}
    james := Person{"James", 32, "Nairobi"}
    frankie := Person{"Frankie", 31, "Nairobi"}

    trainers := []interface{}{james, frankie}

    insertManyResult, err := collection.InsertMany(context.TODO(), trainers)
    if err != nil {
      log.Fatal(err)
  }
    fmt.Println("Inserted multiple documents: ", insertManyResult.InsertedIDs)
}

This will output in:

1
2
$ go run main.go
Inserted Multiple Documents:  [ObjectID("5cb717dcf597b44112523420") ObjectID("5cb717dcf597b44112523421")]

Updating Documents in MongoDB using Golang

Updating Frankie’s age:

1
2
3
4
5
6
7
8
9
10
11
12
13
14
15
func main() {
    ..
    filter := bson.D
    update := bson.D{
        {"$inc", bson.D{
            {"age", 1},
        }},
    }

    updateResult, err := collection.UpdateOne(context.TODO(), filter, update)
    if err != nil {
      log.Fatal(err)
  }
    fmt.Printf("Matched %v documents and updated %v documents.\n", updateResult.MatchedCount, updateResult.ModifiedCount)
}

Running that will update Frankie’s age:

1
2
$ go run main.go
Matched 1 documents and updated 1 documents.

Reading Data from MongoDB

Reading the data:

1
2
3
4
5
6
7
8
9
10
11
12
13
14
15
16
funct main() {
    ..
    filter := bson.D
    var result Trainer

  err = collection.FindOne(context.TODO(), filter).Decode(&result)
  if err != nil {
      log.Fatal(err)
  }

  fmt.Printf("Found a single document: %+v\n", result)

  findOptions := options.Find()
    findOptions.SetLimit(2)

}
1
2
$ go run main.go
Found a single document: {Name:Frankie Age:32 City:Nairobi}

Finding multiple documents and returning the cursor

1
2
3
4
5
6
7
8
9
10
11
12
13
14
15
16
17
18
19
20
21
22
23
24
25
func main() {
    ..
    var results []*Trainer
  cur, err := collection.Find(context.TODO(), bson.D, findOptions)
  if err != nil {
      log.Fatal(err)
  }

  for cur.Next(context.TODO()) {
      var elem Trainer
      err := cur.Decode(&elem)
      if err != nil {
          log.Fatal(err)
      }

      results = append(results, &elem)
  }

  if err := cur.Err(); err != nil {
      log.Fatal(err)
  }

  cur.Close(context.TODO())
    fmt.Printf("Found multiple documents (array of pointers): %+v\n", results)
}

Running the example:

1
2
$ go run main.go
Found multiple documents (array of pointers): [0xc0001215c0 0xc0001215f0]

Deleting Data from MongoDB:

Deleting our data and closing the connection:

1
2
3
4
5
6
7
8
9
10
11
12
13
14
15
16
17
func main(){
    ..
    deleteResult, err := collection.DeleteMany(context.TODO(), bson.D)
  if err != nil {
      log.Fatal(err)
  }

  fmt.Printf("Deleted %v documents in the trainers collection\n", deleteResult.DeletedCount)

  err = client.Disconnect(context.TODO())

  if err != nil {
      log.Fatal(err)
  } else {
      fmt.Println("Connection to MongoDB closed.")
  }
}

Running the example:

1
2
3
$ go run main.go
Deleted 3 documents in the trainers collection
Connection to MongoDB closed.

The code for this example can be found at github.com/ruanbekker/code-examples/mongodb/golang/examples.go

Resources:

SQL Inner Joins Examples With SQLite

sqlite

Overview

In this tutorial we will get started with sqlite and use inner joins to query data from multiple tables to answer specific use case needs.

Connecting to your Sqlite Database

Connecting to your database uses the argument to the target database. You can use additional flags to set the properties that you want to enable:

1
$ sqlite3 -header -column mydatabase.db

or you can specify the additional options to your config:

1
2
3
4
cat > ~/.sqliterc << EOF
.mode column
.headers on
EOF

Then connecting to your database:

1
2
3
4
5
$ sqlite3 mydatabase.db
-- Loading resources from /Users/ruan/.sqliterc
SQLite version 3.16.0 2016-11-04 19:09:39
Enter ".help" for usage hints.
sqlite>

Create the Tables

Create the users table:

1
2
3
4
sqlite> create table users (
   ...> id INT(20), name VARCHAR(20), surname VARCHAR(20), city VARCHAR(20),
   ...> age INT(2), credit_card_num VARCHAR(20), job_position VARCHAR(20)
   ...> );

Create the transactions table:

1
2
3
4
sqlite> create table transactions (
   ...> credit_card_num VARCHAR(20), transaction_id INT(20), shop_name VARCHAR(20),
   ...> product_name VARCHAR(20), spent_total DECIMAL(6,2), purchase_option VARCHAR(20)
   ...> );

You can view the tables using .tables:

1
2
sqlite> .tables
transactions  users

And view the schema of the tables using .schema <table-name>

1
2
3
4
5
sqlite> .schema users
CREATE TABLE users (
id INT(20), name VARCHAR(20), surname VARCHAR(20), city VARCHAR(20),
age INT(2), credit_card_num VARCHAR(20), job_position VARCHAR(20)
);

Write to Sqlite Database

Now we will populate data to our tables. Insert a record to our users table:

1
sqlite> insert into users values(1, 'ruan', 'bekker', 'cape town', 31, '2345-8970-6712-4352', 'devops');

Insert a record to our transactions table:

1
sqlite> insert into transactions values('2345-8970-6712-4352', 981623, 'spaza01', 'burger', 101.02, 'credit_card');

Read from the Sqlite Database

Read the data from the users table:

1
2
3
4
sqlite> select * from users;
id          name        surname     city        age         credit_card_num      job_position
----------  ----------  ----------  ----------  ----------  -------------------  ------------
1           ruan        bekker      cape town   31          2345-8970-6712-4352  devops

Read the data from the transactions table:

1
2
3
4
sqlite> select * from transactions;
credit_card_num      transaction_id  shop_name   product_name  spent_total  purchase_option
-------------------  --------------  ----------  ------------  -----------  ---------------
2345-8970-6712-4352  981623          spaza01     burger        101.02       credit_card

Inner Joins with Sqlite

This is where stuff gets interesting.

Let’s say you want to join data from 2 tables, in this example we have a table with our userdata and a table with transaction data.

Say we want to see the user’s name, transaction id, the product they purchased and the total amount spent, we will make use of inner joins.

Example looks like this:

1
2
3
4
5
6
7
8
sqlite> select a.name, b.transaction_id, b.product_name, b.spent_total
   ...> from users
   ...> as a inner join transactions
   ...> as b on a.credit_card_num = b.credit_card_num
   ...> where a.credit_card_num = '2345-8970-6712-4352';
name        transaction_id  product_name  spent_total
----------  --------------  ------------  -----------
ruan        981623          burger         101.02

Let’s say you dont know the credit_card number but you would like to do a lookup the credit card number via the user’s id, then pass the value to the where statement:

1
2
3
4
5
6
7
8
sqlite> select a.name, b.transaction_id, b.product_name, b.spent_total
   ...> from users
   ...> as a inner join transactions
   ...> as b on a.credit_card_num = b.credit_card_num
   ...> where a.credit_card_num = (select credit_card_num from users where id = 1);
name        transaction_id  product_name  spent_total
----------  --------------  ------------  -----------
ruan        981623          burger         101.02

Let’s create another table called products:

1
2
3
4
sqlite> create table products (
   ...> product_id INTEGER(18), product_name VARCHAR(20),
   ...> product_category VARCHAR(20), product_price DECIMAL(6,2)
   ...> );

Write a record with product data to the table:

1
sqlite> insert into products values(0231, 'burger', 'fast foods', 101.02);

Now, lets say the question will be that we need to display the users name, credit card number, product name as well as the product category and products price, by only giving you the credit card number

1
2
3
4
5
6
7
8
9
sqlite> select a.name, b.credit_card_num, c.product_name, c.product_category, c.product_price
   ...> from users
   ...> as a inner join transactions
   ...> as b on a.credit_card_num = b.credit_card_num inner join products
   ...> as c on b.product_name = c.product_name
   ...> where a.credit_card_num = '2345-8970-6712-4352' and c.product_name = 'burger';
name        credit_card_num      product_name  product_category   product_price
----------  -------------------  ------------  -----------------  -------------
ruan        2345-8970-6712-4352  burger        fast foods         101.02