In this tutorial we will setup a Matrix and Element Chat Server using Docker on Ubuntu.
What is Matrix?
Matrix is an open standard and communication protocol for secure, decentralised, real-time communication. For more information on Matrix, see their website
Install Docker
I will assume that docker and docker compose is installed, if not, follow this resource to install them:
- https://docs.docker.com/get-docker/
version:'3.8'services:element:image:vectorim/element-web:latestrestart:unless-stoppedvolumes:-./element-config.json:/app/config.jsonnetworks:default:ipv4_address:10.10.10.3synapse:image:matrixdotorg/synapse:latestrestart:unless-stoppednetworks:default:ipv4_address:10.10.10.4volumes:-./synapse:/datapostgres:image:postgres:11restart:unless-stoppednetworks:default:ipv4_address:10.10.10.2volumes:-./postgresdata:/var/lib/postgresql/dataenvironment:-POSTGRES_DB=synapse-POSTGRES_USER=synapse-POSTGRES_PASSWORD=STRONGPASSWORD-POSTGRES_INITDB_ARGS=--lc-collate C --lc-ctype C --encoding UTF8networks:default:external:name:matrix
In this quick tutorial we will demonstrate how to load additional environment variables from file into your python application.
It loads key value pairs from a file and append it to its current runtime environment variables, so your current environment is unaffected.
python-dotenv
We will make use of the package python-dotenv so we will need to install the python package with pip:
1
python3 -m pip install python-dotenv
The env file
I will create the .env in my current working directory with the content:
12
APPLICATION_NAME=foo
APPLICATION_OWNER=bar
The application
This is a basic demonstration of a python application which loads the additional environment variables from file, then we will use json.dumps(.., indent=2) so that we can get a pretty print of all our environment variables:
As we can see our two environment variables was added to the environment. If you would like to access your two environment variables, we can do the following:
In this tutorial we will run a basic api using flask-restful, it will only have two routes which will be a get and post method for the purpose of demonstration.
What is Flask Restful
Flask-RESTful is an extension for Flask that adds support for quickly building REST APIs. It is a lightweight abstraction that works with your existing ORM/libraries. Flask-RESTful encourages best practices with minimal setup.
importunittestimportappasapiclassTestFlaskApi(unittest.TestCase):defsetUp(self):self.app=api.app.test_client()deftest_get_method(self):response=self.app.get("/")self.assertEqual(response.get_json(),{"hello":"world"},)deftest_post_method(self):# request payloadpayload=json.dumps({"firstname":"ruan","lastname":"bekker"})# make requestresponse=self.app.post("/",data=payload,headers={"Content-Type":"application/json"})# assertself.assertEqual(str,type(response.json['lastname']))self.assertEqual(200,response.status_code)deftearDown(self):# delete if anything was createdpassif__name__=='__main__':unittest.main()
Then we can run our test with:
1
python -m unittest discover -p test_app.py -v
Since our first test is expecting {"hello": "world"} our test will pass, and our second test we are validating that our post request returns a 200 response code and that our lastname field is of string type.
The output of our tests will show something like this:
1234567
test_get_request (test_app.TestFlaskApi) ... ok
test_post_request (test_app.TestFlaskApi) ... ok

----------------------------------------------------------------------
Ran 2 tests in 0.009s

OK
More on Flask-Restful
This was a very basic example and their documentation provides a great tutorial on how to extend from this example. This is also a great blogpost on testing rest api’s.
Thank You
Thanks for reading, if you like my content, check out my website, read my newsletter or follow me at @ruanbekker on Twitter.
In this tutorial we will setup two containers, openldap and a openldap ui to manage our users on openldap.
What is OpenLDAP
OpenLDAP is an open source implementation of the Lightweight Directory Access Protocol, which makes it possible for organizations to use centralized authentication and directory access services over a network.
Configuration
This stack will boot a openldap and openldap-ui container container with the following docker-compose.yml:
In our main.tf, we are first using a data resource to query cloudflare for our domain rbkr.xyz and then access the attribute id which we will be using in our cloudflare_record resource so that it knows which domain to add the DNS record for.
Then we are going to create the A record foobar and provide the value of 127.0.0.1:
1234567891011
data "cloudflare_zone""this"{name="rbkr.xyz"}resource "cloudflare_record""foobar"{zone_id= data.cloudflare_zone.this.id
name="foobar"value="127.0.0.1"type="A"proxied=false}
Once our configuration code is in place we can run a init which will download the providers:
1
> terraform init
Once that is done, we can run a plan so we can see what will be deployed, but since our variables.tf has no default values, we will either have to define this in terraform.tfvars or use it in-line.
I will be using it in-line for this demonstration:
1
> terraform plan -var "cloudflare_email=$EMAIL" -var "cloudflare_api_token=$API_TOKEN"
Once you are happy, you can run a apply which will deploy the changes:
> terraform apply -var "cloudflare_email=$EMAIL" -var "cloudflare_api_token=$API_TOKEN"Terraform used the selected providers to generate the following execution plan. Resource actions are indicated with the following symbols:
+ create
Terraform will perform the following actions:
# cloudflare_record.foobar will be created + resource "cloudflare_record""foobar"{ + allow_overwrite=false + created_on=(known after apply) + hostname=(known after apply) + id=(known after apply) + metadata=(known after apply) + modified_on=(known after apply) + name="foobar" + proxiable=(known after apply) + proxied=false + ttl=(known after apply) + type="A" + value="127.0.0.1" + zone_id="xxxxxxxxxxxxxxxxxxxxxxxxxxxxxxxxx"}Plan: 1 to add, 0 to change, 0 to destroy.
Changes to Outputs:
+ metadata=(sensitive value) + record=(known after apply)Do you want to perform these actions?
Terraform will perform the actions described above.
Only 'yes' will be accepted to approve.
Enter a value: yes
cloudflare_record.foobar: Creating...
cloudflare_record.foobar: Creation complete after 4s [id=xxxxxxxxxxxxxxxxxxxxx]Apply complete! Resources: 1 added, 0 changed, 0 destroyed.
Outputs:
metadata= <sensitive>
record="foobar.rbkr.xyz"
Test DNS
We can now test if this is working as expected with a dns utility like dig:
In this tutorial, we will cover the basics of blockchain and why you would want to run a full-node such as bitcoin, ethereum, etc.
Blockchain Basics
Before we start setting up our bitcoin full-node, we first need to get through some blockchain basics, if you already aware of it, you can skip the the setup section of this post.
Block
Transaction data is permanently recorded into files called blocks. You can think of it as a transaction ledger. Blocks are organised into a linear sequence over time.
New transactions are constantly being processed by miners into new blocks which are added to the end of the chain. As blocks are buried deeper and deeper into the blockchain they become harder and harder to change or remove, this gives rise of Bitcoin’s Irreversible Transactions.
The first block added to the blockchain is referred to as the genesis block
Blockchain
A blockchain is a transaction database shared by all nodes participating in a system based on the bitcoin protocol. A full copy of a currency’s blockchain contains every transaction ever executed in the currency. With this information, one can find out how much value belonged to each address at any point in history.
Every block contains a hash of the previous block. This has the effect of creating a chain of blocks from the genesis block to the current block. Each block is guaranteed to come after the previous block chronologically because the previous block’s hash would otherwise not be known. Each block is also computationally impractical to modify once it has been in the chain for a while because every block after it would also have to be regenerated. These properties are what make bitcoins transactions irreversible. The blockchain is the main innovation of Bitcoin.
Mining
Mining is the process of adding transaction records to bitcoin’s public ledger of past transactions. The term “mining rig” is referred to where as a single computer system that performs the necessary computations for “mining”.
The blockchain serves to confirm transactions to the rest of the network as having taken place. Bitcoin nodes use the blockchain to distinguish legitimate Bitcoin transactions from attempts to re-spend coins that have already been spent elsewhere.
Node
Any computer that connects to the bitcoin network is called a node. Nodes that fully verify all of the rules of bitcoin are called full nodes. The most popular software implementation of full nodes is called bitcoin-core, its releases can be found on their github page
What is a Full Node
A full node is a node (computer system with bitcoin-core running on it) which downloads every block and transaction and check them against bitcoin’s consensus rules. which fully validates transactions and blocks. Almost all full nodes also help the network by accepting transactions and blocks from other full nodes, validating those transactions and blocks, and then relaying them to further full nodes.
Some examples of consensus rules:
Blocks may only create a certain number of bitcoins. (Currently 6.25 BTC per block.)
Transactions must have correct signatures for the bitcoins being spent.
Transactions/blocks must be in the correct data format.
Within a single blockchain, a transaction output cannot be double-spent.
At minimum, a full node must download every transaction that has ever taken place, all new transactions, and all block headers. Additionally, full nodes must store information about every unspent transaction output until it is spent.
By default full nodes are inefficient in that they download each new transaction at least twice, and they store the entire block chain (more than 165 GB as of 20180214) forever, even though only the unspent transaction outputs (<2 GB) are required. Performance can improved by enabling -blocksonly mode and enabling pruning
Archival Nodes
A subset of full nodes also accept incoming connections and upload old blocks to other peers on the network. This happens if the software is run with -listen=1 as is default.
Contrary to some popular misconceptions, being an archival node is not necessary to being a full node. If a user’s bandwidth is constrained then they can use -listen=0, if their disk space is constrained they can use pruning, all the while still being a fully-validating node that enforces bitcoin’s consensus rules and contributing to bitcoin’s overall security.
In this tutorial we will install the Geth implementation of Ethereum on Linux and we will be using the light sync mode which will get you up and running in minutes, which only downloads a couple of GBs.
Once we have our node setup we will be using the API and Web3 to interact with our ethereum node.
The values such as --whitelist can be retrieved from this issue or this post and extracted from the post:
“due to the London upgrade you’ll probably end up on the chain that isn’t tracked by Etherscan and Metamask. To ensure you only retrieve blocks from peers on that chain, include the following string in your geth start command”
Since we created a new systemd unit file, reload the systemd daemon:
We can then check our balance with eth_getbalance, where we pass the ethereum address which is in hex format, followed by the block number, but we will use “latest”:
As you can notice the value of our balance for our ethereum address is in hexadecimal format, we can convert it to decimal format:
12
echo$((0x429d069189e0000))300000000000000000
We can use python to convert to decimal using the int() function, by passing the hexadecimal value and pass its base to convert it into an integer, the base for hexadecimal is 16:
geth --datadir /blockchain/ethereum/data --keystore /blockchain/ethereum/data/keystore account new --password /tmp/.pass
Your new key was generated
Public address of the key: 0x5814D945EC909eb1307be4F133AaAB3dEF3572f0
Path of the secret key file: /blockchain/ethereum/data/keystore/UTC--2021-10-06T15-43-23.679655564Z--5814d945ec909eb1307be4f133aaab3def3572f0
- You can share your public address with anyone. Others need it to interact with you.
- You must NEVER share the secret key with anyone! The key controls access to your funds!
- You must BACKUP your key file! Without the key, it's impossible to access account funds!- You must REMEMBER your password! Without the password, it's impossible to decrypt the key!
Then when you attach your console session, you will be able to see the address that we created:
When we attempt to send 1ETH to the recipient address:
12345
> eth.sendTransaction({from: "0xd490fb53c0e7d3c80153112a4bd135e2cf897282", to: "0x2b1718cdf7dbcc381267ccf43d320c6e194d6aa8", value: "1000000000000000000"})Error: authentication needed: password or unlock
at web3.js:6357:37(47) at web3.js:5091:62(37) at <eval>:1:20(10)
You will notice that we need to unlock our account first:
Instantiate a client and connect to your geth node, [this documentation] provides different methods of connecting, but I will be using the HTTPProvider to connect over the network:
geth --datadir /blockchain/ethereum/data removedb
INFO [10-06|20:01:52.061] Maximum peer count ETH=50LES=0total=50
INFO [10-06|20:01:52.061] Smartcard socket not found, disabling err="stat /run/pcscd/pcscd.comm: no such file or directory"INFO [10-06|20:01:52.062] Set global gas cap cap=50,000,000
Remove full node state database (/blockchain/ethereum/data/geth/chaindata)? [y/n] y
Remove full node state database (/blockchain/ethereum/data/geth/chaindata)? [y/n] y
INFO [10-06|20:01:57.141] Database successfully deleted path=/blockchain/ethereum/data/geth/chaindata elapsed=2.482s
Remove full node ancient database (/blockchain/ethereum/data/geth/chaindata/ancient)? [y/n] y
Remove full node ancient database (/blockchain/ethereum/data/geth/chaindata/ancient)? [y/n] y
INFO [10-06|20:02:05.645] Database successfully deleted path=/blockchain/ethereum/data/geth/chaindata/ancient elapsed=589.737ms
INFO [10-06|20:02:05.645] Light node database missing path=/blockchain/ethereum/data/geth/lightchaindata
Now when we list the data directory, we can see the data was removed:
In this post I will demonstrate how to use the terraform docker_container resource from the docker provider to run two docker containers, traefik and nginx and use the random provider to generate a random url for us.
Terraform used the selected providers to generate the following execution plan. Resource actions are indicated with
the following symbols:
+ create
Terraform will perform the following actions:
# docker_container.nginx will be created
+ resource "docker_container" "nginx" {
+ attach = false
+ bridge = (known after apply)
+ command = (known after apply)
+ container_logs = (known after apply)
+ destroy_grace_seconds = 30
+ entrypoint = (known after apply)
+ env = [
+ "PGID=20",
+ "PUID=501",
]
+ exit_code = (known after apply)
+ gateway = (known after apply)
+ hostname = (known after apply)
+ id = (known after apply)
+ image = "nginx:stable-alpine"
+ init = (known after apply)
+ ip_address = (known after apply)
+ ip_prefix_length = (known after apply)
+ ipc_mode = (known after apply)
+ log_driver = "json-file"
+ logs = false
+ memory = 256
+ must_run = true
+ name = "nginx"
+ network_data = (known after apply)
+ read_only = false
+ remove_volumes = true
+ restart = "unless-stopped"
+ rm = false
+ security_opts = (known after apply)
+ shm_size = (known after apply)
+ start = true
+ stdin_open = false
+ tty = false
+ healthcheck {
+ interval = (known after apply)
+ retries = (known after apply)
+ start_period = (known after apply)
+ test = (known after apply)
+ timeout = (known after apply)
}
+ labels {
+ label = "traefik.docker.network"
+ value = "docknet"
}
+ labels {
+ label = "traefik.enable"
+ value = "true"
}
+ labels {
+ label = "traefik.frontend.rule"
+ value = (known after apply)
}
+ labels {
+ label = "traefik.port"
+ value = "80"
}
+ networks_advanced {
+ aliases = [
+ "docknet",
]
+ name = "docknet"
}
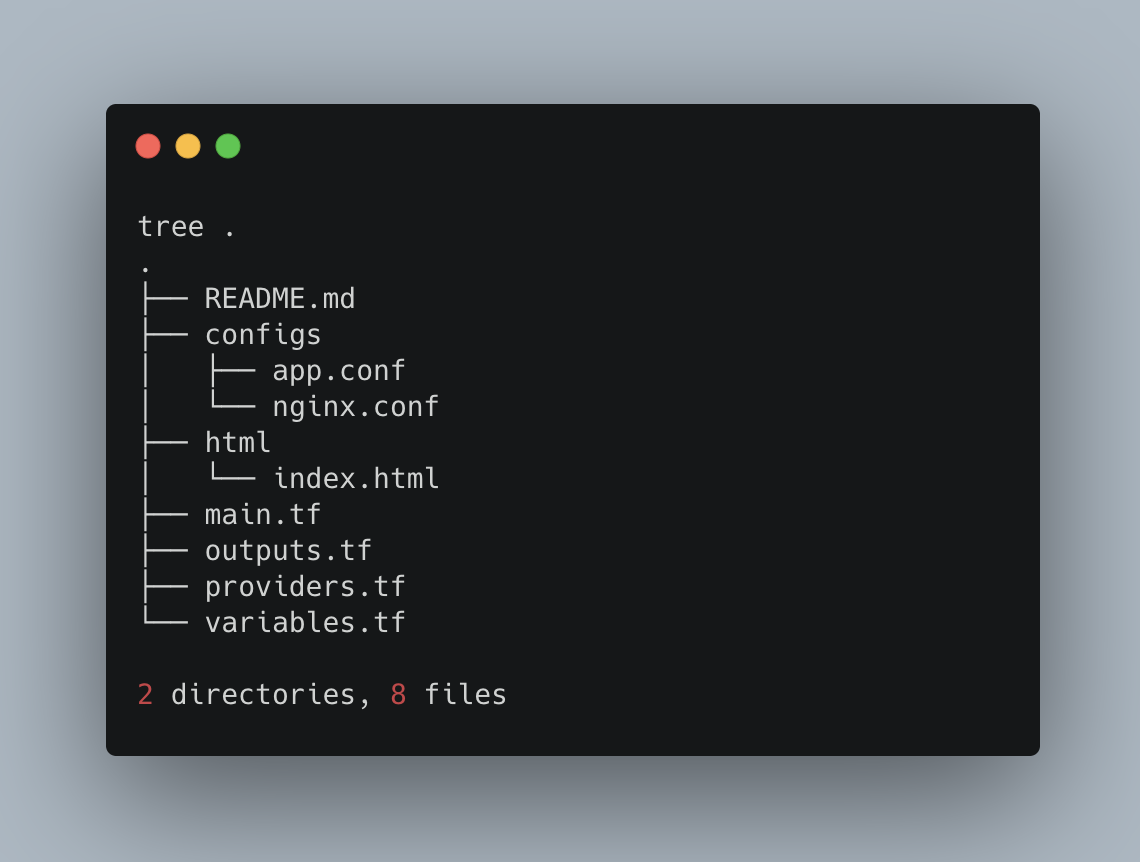
+ volumes {
+ container_path = "/etc/nginx/conf.d/app.conf"
+ host_path = "/Users/ruan/personal/terraform-playground/docker-containers/configs/app.conf"
}
+ volumes {
+ container_path = "/etc/nginx/nginx.conf"
+ host_path = "/Users/ruan/personal/terraform-playground/docker-containers/configs/nginx.conf"
}
+ volumes {
+ container_path = "/usr/share/nginx/html"
+ host_path = "/Users/ruan/personal/terraform-playground/docker-containers/html"
}
}
# docker_container.traefik will be created
+ resource "docker_container" "traefik" {
+ attach = false
+ bridge = (known after apply)
+ command = [
+ "--api",
+ "--docker",
+ "--docker.watch",
+ "--entrypoints=Name:http Address::80",
+ "--logLevel=INFO",
]
+ container_logs = (known after apply)
+ destroy_grace_seconds = 30
+ entrypoint = (known after apply)
+ env = (known after apply)
+ exit_code = (known after apply)
+ gateway = (known after apply)
+ hostname = (known after apply)
+ id = (known after apply)
+ image = "traefik:1.7.14"
+ init = (known after apply)
+ ip_address = (known after apply)
+ ip_prefix_length = (known after apply)
+ ipc_mode = (known after apply)
+ log_driver = "json-file"
+ logs = false
+ memory = 256
+ must_run = true
+ name = "traefik"
+ network_data = (known after apply)
+ read_only = false
+ remove_volumes = true
+ restart = "unless-stopped"
+ rm = false
+ security_opts = (known after apply)
+ shm_size = (known after apply)
+ start = true
+ stdin_open = false
+ tty = false
+ healthcheck {
+ interval = (known after apply)
+ retries = (known after apply)
+ start_period = (known after apply)
+ test = (known after apply)
+ timeout = (known after apply)
}
+ labels {
+ label = "traefik.docker.network"
+ value = "docknet"
}
+ labels {
+ label = "traefik.enable"
+ value = "true"
}
+ labels {
+ label = "traefik.frontend.rule"
+ value = "Host:traefik.localdns.xyz"
}
+ labels {
+ label = "traefik.port"
+ value = "8080"
}
+ networks_advanced {
+ aliases = [
+ "docknet",
]
+ name = "docknet"
}
+ ports {
+ external = 80
+ internal = 80
+ ip = "0.0.0.0"
+ protocol = "tcp"
}
+ volumes {
+ container_path = "/var/run/docker.sock"
+ host_path = "/var/run/docker.sock"
}
}
# docker_image.nginx will be created
+ resource "docker_image" "nginx" {
+ id = (known after apply)
+ latest = (known after apply)
+ name = "nginx:stable-alpine"
+ output = (known after apply)
+ repo_digest = (known after apply)
}
# docker_image.traefik will be created
+ resource "docker_image" "traefik" {
+ id = (known after apply)
+ latest = (known after apply)
+ name = "traefik:1.7.14"
+ output = (known after apply)
+ repo_digest = (known after apply)
}
# docker_network.nginx will be created
+ resource "docker_network" "nginx" {
+ driver = "bridge"
+ id = (known after apply)
+ internal = (known after apply)
+ ipam_driver = "default"
+ name = "docknet"
+ options = (known after apply)
+ scope = (known after apply)
+ ipam_config {
+ aux_address = (known after apply)
+ gateway = (known after apply)
+ ip_range = (known after apply)
+ subnet = (known after apply)
}
}
# random_string.nginx will be created
+ resource "random_string" "nginx" {
+ id = (known after apply)
+ length = 8
+ lower = true
+ min_lower = 0
+ min_numeric = 0
+ min_special = 0
+ min_upper = 0
+ number = true
+ result = (known after apply)
+ special = false
+ upper = false
}
Plan: 6 to add, 0 to change, 0 to destroy.
Changes to Outputs:
+ nginx_container_name = "nginx"
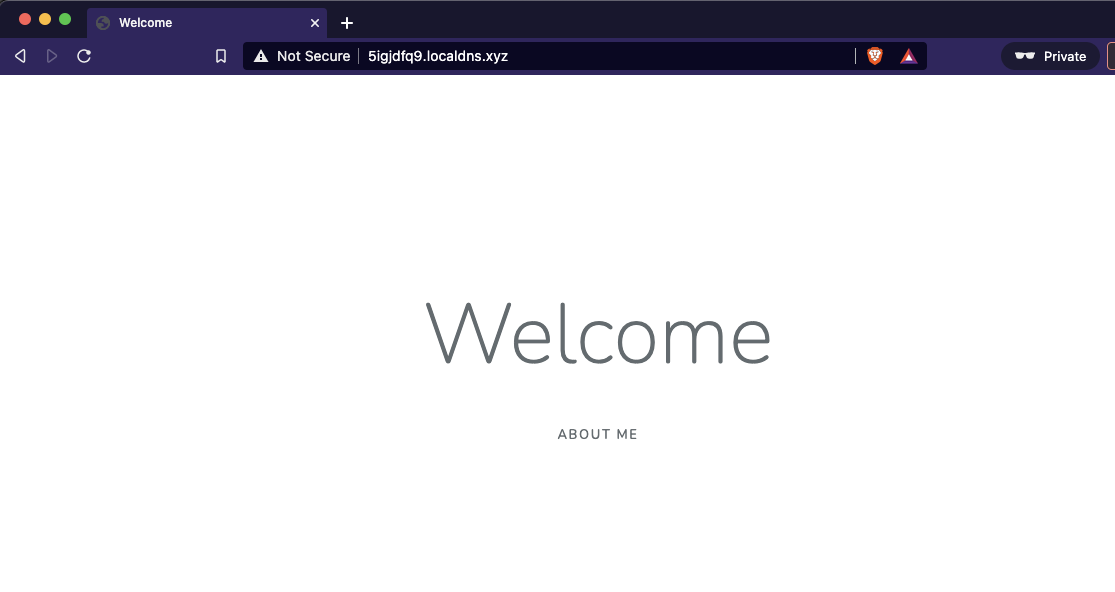
+ nginx_url = (known after apply)
+ traefik_container_name = "traefik"
+ traefik_url = "http://traefik.localdns.xyz/"
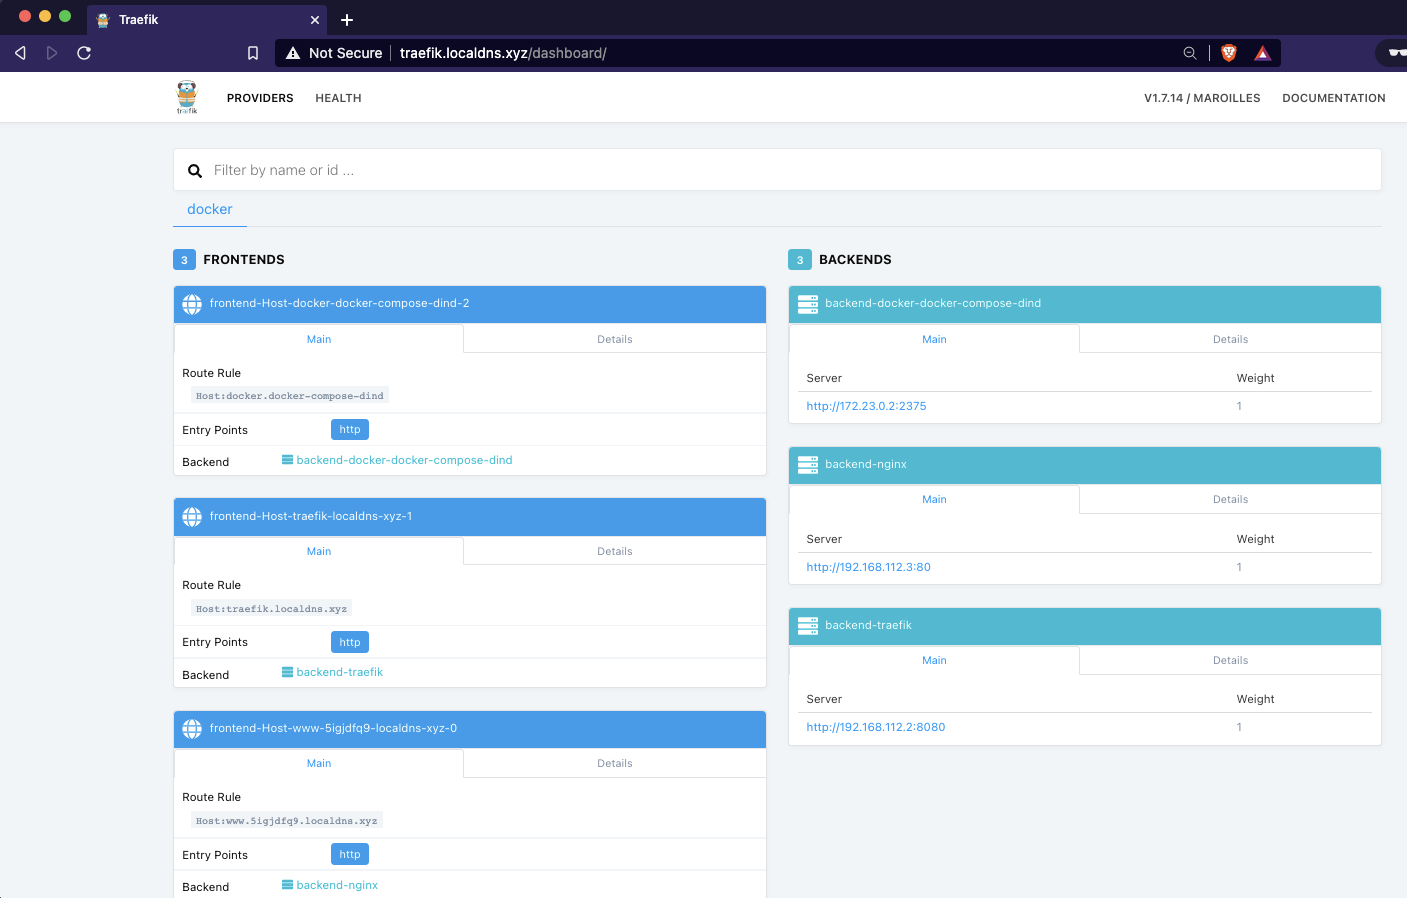
Which we can see will create 2 containers, traefik and then nginx, map the configs and html in place and also sets the traefik hostname in the labels for our respective containers so that we can reach them via the specific host headers.
The we can deploy our containers:
1
terraform apply -auto-approve
Which will provide us the output detail defined from our outputs.tf:
Running a docker ps will show our running containers:
1234
docker ps
CONTAINER ID   IMAGE                  COMMAND                  CREATED         STATUS                PORTS                NAMES
e45158ae8cba   nginx:stable-alpine    "/docker-entrypoint   3 minutes ago   Up 3 minutes          80/tcp               nginx
ebdbe42a0fcb   traefik:1.7.14         "/traefik --api       3 minutes ago   Up 3 minutes          0.0.0.0:80->80/tcp   traefik
Cleanup
We can delete our containers by running:
1
terraform destroy -auto-approve
Thank You
Thanks for reading, if you like my content, check out my website or follow me at @ruanbekker on Twitter.
In this tutorial we will be setting up Traefik v2 as our reverse proxy with port 80 and 443 enabled, and then hook up a example application behind the application load balancer, and route incoiming requests via host headers.
What is Traefik
Traefik is a modern HTTP reverse proxy and load balancer that makes deploying microservices super easy by making use of docker labels to route your traffic based on host headers, path prefixes etc. Please check out their website to find out more about them.
Use Case
In our example we want to route traefik from http://app.selfhosted.co.za to hit our proxy on port 80, then we want traefik to redirect port 80 to the 443 port configured on the proxy which is configured with letsencrypt and reverse proxy the connection to our application.
The application is being configured via docker labels, which we will get into later.
Our Environment
I will be using the domain selfhosted.co.za, so if you are following along, you can just replace this domain with yours.
For this demonstration I have spun up a VM at Civo as you can see below:
From the provided public IP address, we will be creating a DNS A record for our domain, and then create a wildcard entry to CNAME to our initial dns name:
You might not want to point all the subdomains to that entry, but to simplify things, every application that needs to be routed via traefik, I can manage from a traefik config level, since my dns is already pointing to the public ip where traefik is running on.
So if I spin up a new container, lets say bitwarden, I can just set bitwarden.selfhosted.co.za in the labels of that container and due to the dns already pointing to traefik, traefik will route the connection to the correct container.
Pre-Requisites
In order to follow along you will need docker and docker-compose to be installed, and can be validated using:
12345
docker -v
Docker version 20.10.7, build f0df350

docker-compose -v
docker-compose version 1.28.6, build 5db8d86f
Traefik on Docker
We will have one docker-compose.yml file which has the proxy and the example application. Be sure to change the following to suite your environment:
- traefik.http.routers.api.rule=Host()'
- --certificatesResolvers.letsencrypt.acme.email=youremail@yourdomain.net
The certificate process might take anything from 5-30s in my experience.
Test the Application
Now that our webapp container is running, make a http request using curl against the configured host rule, which is app.selfhosted.co.za on http so that we can validate if traefik is doing a redirect to https:
If we access our webapp service in our web browser, we will see the following:
We can also validate that the certificate is valid:
We can also access the traefik dashboard using the configured domain, in this case traefik.selfhosted.co.za, and you should see the pretty traefik dashboard:
Future Posts
In future posts I will be using this post as the base setup on getting traefik up and running, and future posts that uses traefik will be tagged under #traefik.
Thank You
Thanks for reading, if you like my content, check out my website or follow me at @ruanbekker on Twitter.
In this post we will install Nodejs using Node Version Manager (nvm), which allows you to install and use different versions of node via the command line.
I will be using a debian based linux distribution, so I first will be updating my package manager’s indexes:
1
$ apt update
Then I will install NVM using the instructions from their repository (always ensure that you are aware what you are installing when you curl, pipe, bash):
You can now log out and log back in for your path to be updated, or you can follow the instructions on your terminal to source your session so that your path to nvm is updated: