This morning my brother’s iMac gave some boot issues. The resolution to the issue was to drop into a terminal, rename the mrb_cache directory and reboot.
Steps to Resolution
When booting, the loading bar got stuck as seen below:
Starting to investigate, he ran cmd+s to logon to single user mode, and he noticed the error: crashed: opendlrectoryd. Toomay corpses being crashed, as seen from the screenshot below:
After some troubleshooting he had to hard reboot his mac, hit cmd+r repeatedly until he loaded his mac into recovery mode:
From thereon, from the top dropdown select Utilities -> Terminal, change into the directory where the cache folder needs to be moved:
1
$ cd /Volumes/Macintosh\ HD/var/db/caches/opendirectory
List to see if the cache directory is present:
12
$ ls -la | grep cache
-rw-------- root wheel 28655   Jan 3    22:22 mbr_cache
Rename the cache directory:
1
mv ./mbr_cache ./mbr_cache_old
Once that is done, reboot:
1
$ reboot
If you experienced the similar issue, you should be able to see the login screen after successful boot.
Thank You
Please feel free to show support by, sharing this post, making a donation, subscribing or reach out to me if you want me to demo and write up on any specific tech topic.
Today we will build a Restful API using Python Flask, SQLAlchemy using Postgres as our Database, testing using Python Unittest, a CI/CD Pipeline on Gitlab, and Deployment to Heroku.
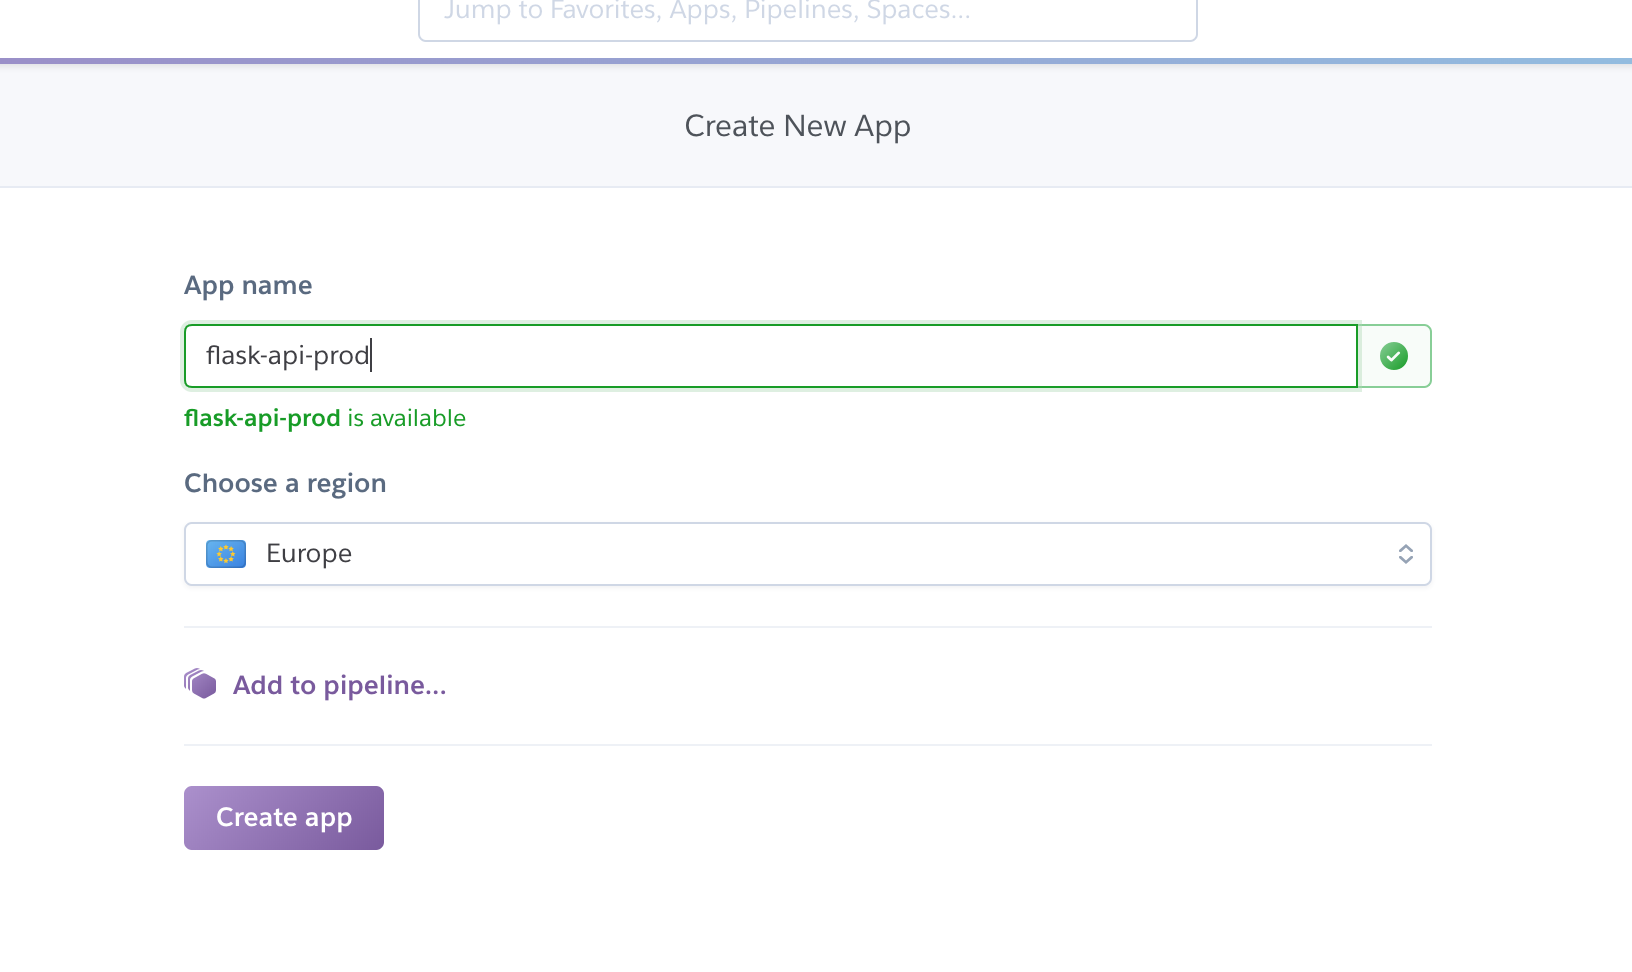
If you don’t have an account already, Heroku offer’s 5 free applications in their free tier account. Once you have created your account, create 2 applications. I named mine flask-api-staging and flask-api-prod.
You can create the applications via cli or the ui, from the ui it will look more or less like this:
Select an app name and check if the name is available then select create. Note down the name and config as we will use it in our .gitlab-ci.yml config:
Heroku API Key
To allow the deployment of applications to Heroku from Gitlab, we need to generate a API Key on Heroku and save the config in Gitlab.
Head over to your Heroku Dashboard, select Account Settings, scroll to the API Key section and generate a API Key.
Head over to your Gitlab Repository, select Settings, CI/CD, then select Variables enter the Key: HEROKU_API_KEY and the Secret of the API Key into the Value and select Save Variable.
We will reference this variable from our deploy steps.
Heroku Postgres Add-on
Heroku offers a free Postgres Add-On, to activate: Select your application, select Resources, search for the Add-on Heroku Postgres, select and select the Hobby Dev Free version and select provision.
Our Application Code
Clone your repository then let’s start by creating our Flask API. Note this is more on Gitlab CI/CD than going into detail into the Flask Application.
Note that we are using flask-heroku, with this package Heroku will automatically discover your configuration for your database using environment variables. So if you have a postgres add-on, you don’t need to specify the location of your database.
If you want to use sqlite, you can remove the heroku instantiation and uncomment the SQLALCHEMY_DATABASE_URI property in your config.cfg
fromflaskimportFlask,jsonify,requestfromflask_sqlalchemyimportSQLAlchemyfromflask_marshmallowimportMarshmallowfromflask_herokuimportHerokufrompasslib.hashimportsha256_cryptfromdatetimeimportdatetimeapp=Flask(__name__)app.config.from_pyfile('config.cfg')heroku=Heroku(app)db=SQLAlchemy(app)ma=Marshmallow(app)## --Database Models--classMember(db.Model):__tablename__='members'id=db.Column(db.Integer,primary_key=True,autoincrement=True)email=db.Column(db.String(255),unique=True,nullable=False)username=db.Column(db.String(50),unique=True)password_hash=db.Column(db.String(100))firstname=db.Column(db.String(50),unique=False)lastname=db.Column(db.String(50),unique=False)registered_on=db.Column(db.DateTime,nullable=False)classMemberSchema(ma.ModelSchema):classMeta:model=Memberfields=('id','username','email')member_schema=MemberSchema(strict=True,only=('id','username'))members_schema=MemberSchema(strict=True,many=True)## --Views--@app.route('/')defindex():returnjsonify({'message':'ok'}),200# list users@app.route('/api/user',methods=['GET'])deflist_users():all_users=Member.query.all()result=members_schema.dump(all_users)returnjsonify(result.data)# get user@app.route('/api/user/<int:id>',methods=['GET'])defget_user(id):user=Member.query.get(id)result=member_schema.dump(user)returnjsonify(result.data)# add user@app.route('/api/user',methods=['POST'])defadd_user():email=request.json['email']username=request.json['username']password_hash=sha256_crypt.encrypt(request.json['password'])firstname=request.json['firstname']lastname=request.json['lastname']new_user=Member(email=email,username=username,password_hash=password_hash,firstname=firstname,lastname=lastname,registered_on=datetime.utcnow())try:db.session.add(new_user)db.session.commit()result=member_schema.dump(Member.query.get(new_user.id))returnjsonify({'member':result.data})except:db.session.rollback()result={'message':'error'}returnjsonify(result)# update user@app.route('/api/user/<int:id>',methods=['PUT'])defupdate_user(id):user=Member.query.get(id)username=request.json['username']email=request.json['email']user.email=emailuser.username=usernamedb.session.commit()returnmember_schema.jsonify(user)# delete user@app.route('/api/user/<int:id>',methods=['DELETE'])defdelete_user(id):user=Member.query.get(id)db.session.delete(user)db.session.commit()returnjsonify({'message':'{} has been deleted'.format(user.username)})if__name__=='__main__':app.run()
And lastly, our gitlab-ci configuration which will include our build, test and deploy steps. As soon as a commit to master is received the pipeline will be acticated. Note that our production deploy step is a manual trigger.
Our config for .gitlab-ci.yml. Note to replace your Heroku app names.
Once the code has been pushed to master, gitlab will pick it up and trigger the pipeline to run.
Gitlab Pipelines
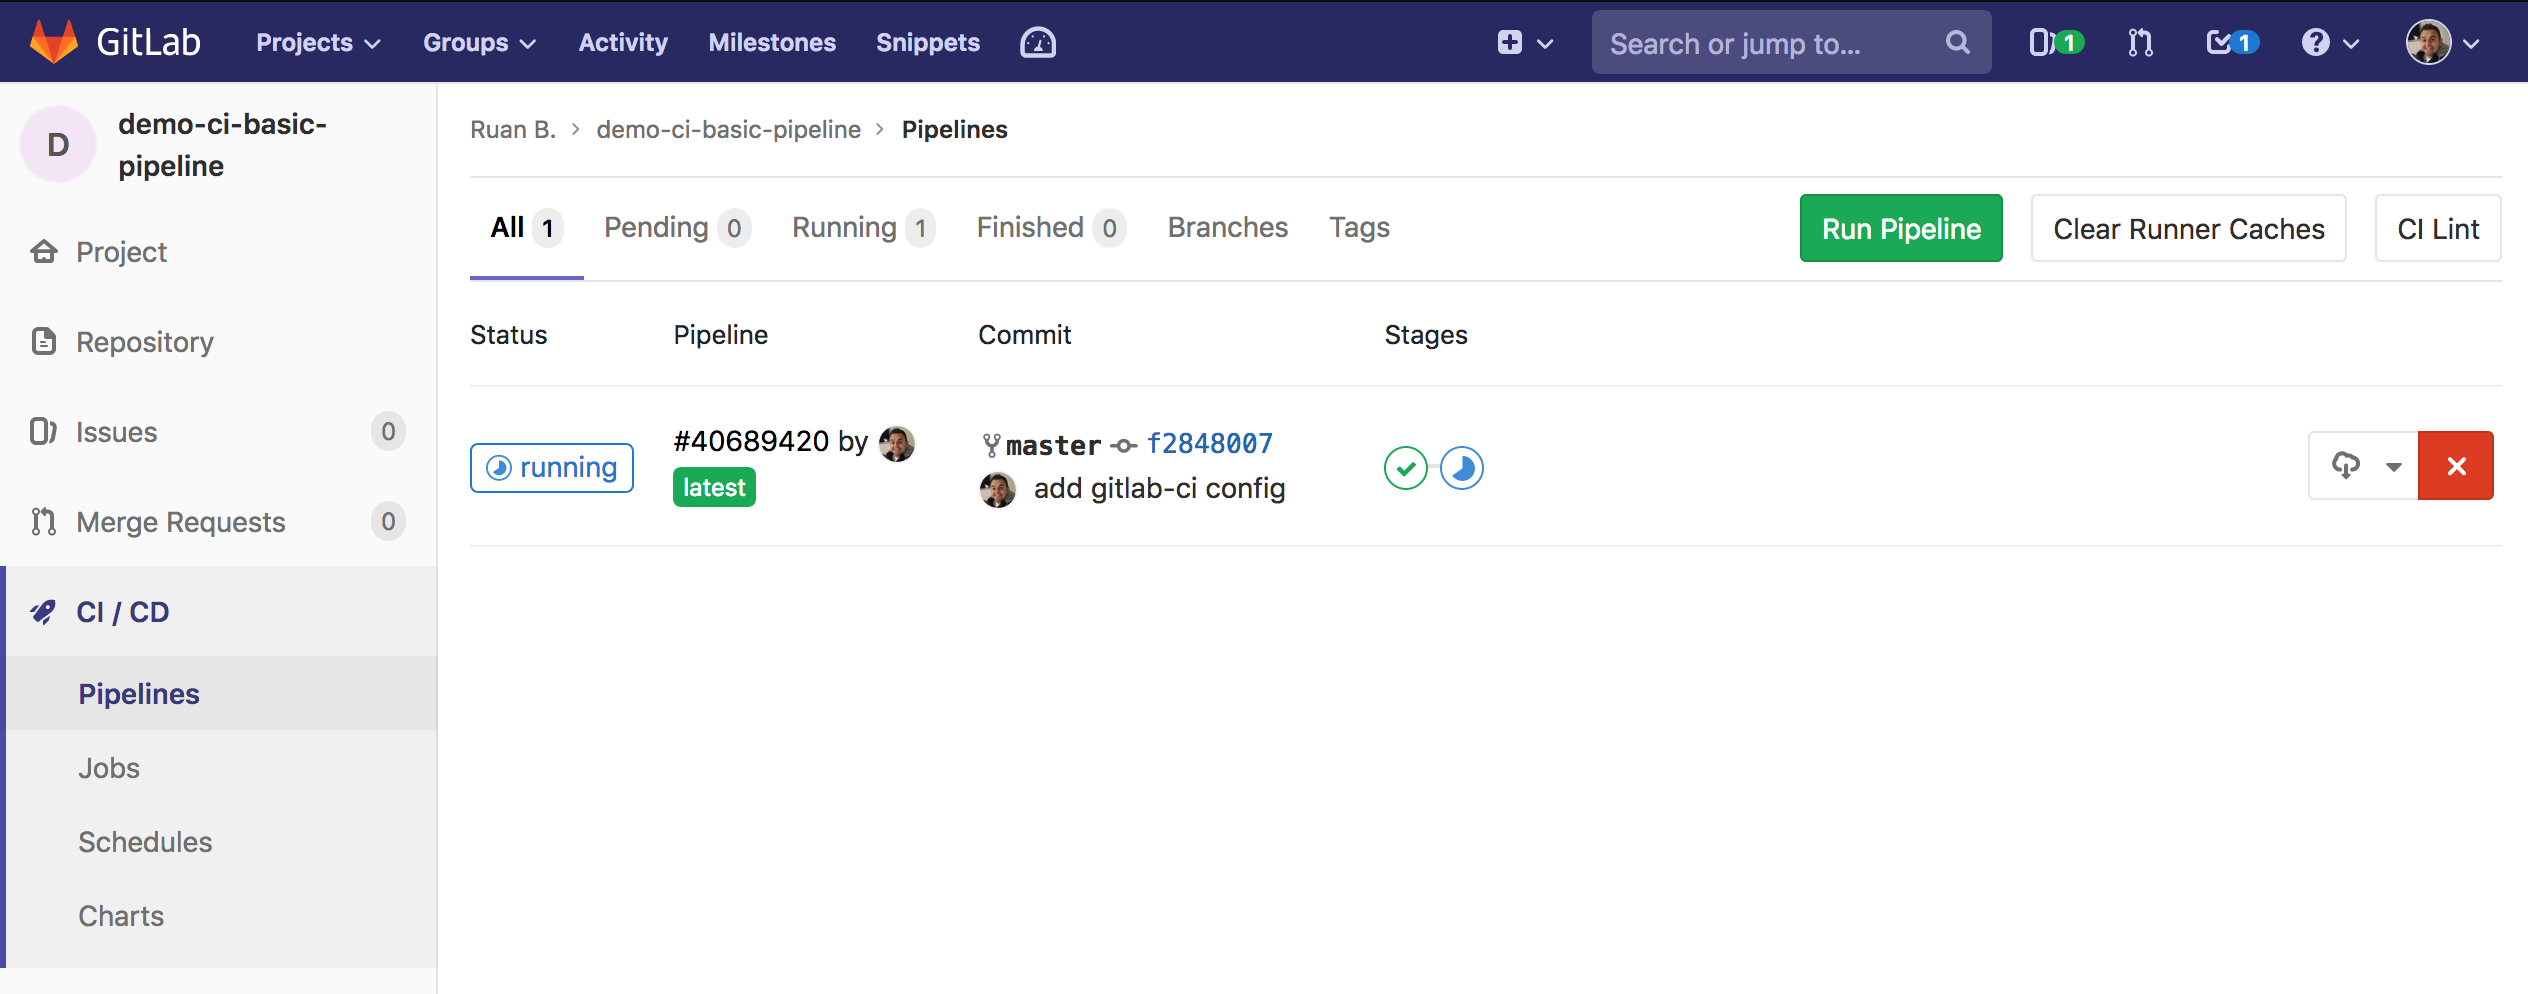
Head over to Gitlab, select CI/CD -> Pipelines, you should see a running pipeline, select it, then you should see the overview of all your jobs:
If everything has passed you should see the Passed status as shown above.
You will notice that the staging environment has been deployed. Now you can do some testing and when you are happy with it, you can select the play button which will deploy to production on the pipelines dashboard.
Creating the Tables on Postgres
Before we can interact with our API, we need to provision the postgres tables from the database models that we wrote in our application.
Open up a Python shell on Heroku and initialize the tables:
1234
$ heroku run python -a flask-api-prod
>>> from app import db
>>> db.create_all()>>> exit()
Testing the API:
Now that everything is up and running, its time to test our API.
Please feel free to show support by, sharing this post, making a donation, subscribing or reach out to me if you want me to demo and write up on any specific tech topic.
From our previous post, we went through the setup on setting up a Basic CI Pipeline on Gitlab, in conjunction with Gitlab CI which coordinates your jobs, where we used the Shared Runners, which runs your jobs on Gitlab’s Infrastructure.
In Gitlab, you have Shared Runners and your Own Runners, which is used to run your jobs and send the results back to GitLab.
In this tutorial we will Setup a Server with gitlab-runner and Docker on Ubuntu and then Setup a Basic Pipeline to Utilize your Gitlab Runner.
Register the Runner. The Gitlab-CI Token is available in your CI/CD Settings panel from the UI: https://gitlab.com/<account>/<repo>/settings/ci_cd
123456789101112131415161718192021
$ gitlab-runner register
Please enter the gitlab-ci coordinator URL (e.g. https://gitlab.com/):
https://gitlab.com/

Please enter the gitlab-ci token for this runner:
__masked__

Please enter the gitlab-ci description for this runner:
[my-runner]: my-runner

Please enter the gitlab-ci tags for this runner (comma separated):
my-runner,foobar
Registering runner... succeeded                     runner=66m_339h

Please enter the executor: docker-ssh+machine, docker, docker-ssh, parallels, shell, ssh, virtualbox, docker+machine, kubernetes:
docker

Please enter the default Docker image (e.g. ruby:2.1):
alpine:latest

Runner registered successfully. Feel free to start it, but if it's running already the config should be automatically reloaded!
Verify the Status and check if Docker and Gitlab Runner is enabled on startup:
123456789
$ gitlab-runner status
Runtime platform arch=amd64 os=linux pid=30363revision=7f00c780 version=11.5.1
gitlab-runner: Service is running!
$ systemctl is-enabled gitlab-runner
enabled
$ systemctl is-enabled docker
enabled
Gitlab-CI Config for Shared Runners
If you would like to use the shared runners that Gitlab Offers, the .gitlab-ci.yml config will look like this:
1234567891011121314151617181920212223
stages:-build-testbuild:stage:buildscript:-echo "this is building"-hostname-mkdir builds-touch builds/data.txt-echo "true" > builds/data.txtartifacts:paths:-builds/test:stage:testscript:-echo "this is testing"-hostname-test -f builds/data.txt-grep "true" builds/data.txt
Gitlab-CI Config for your own Gitlab Runner
Gitlab utilizes the tags that was specified on registration to determine where the jobs gets executed on, for more information on this, have a look at their docs
The .gitlab-ci.yml config for using your gitlab runner:
123456789101112131415161718192021222324252627
stages:-build-testbuild:stage:buildtags:-my-runnerscript:-echo "this is building"-hostname-mkdir builds-touch builds/data.txt-echo "true" > builds/data.txtartifacts:paths:-builds/test:stage:testtags:-my-runnerscript:-echo "this is testing"-hostname-test -f builds/data.txt-grep "true" builds/data.txt
Trigger and Check Docker
Commit the config to master, let your pipeline run their jobs upon completion have a look at docker on your server for the containers that the jobs ran on:
12345
$ docker ps -a
CONTAINER ID IMAGE COMMAND CREATED STATUS PORTS NAMES
04292a78de0b c04b8be95e1e "gitlab-runner-cache.." About a minute ago Exited (0) About a minute ago runner-xx-project-xx-concurrent-0-cache-3cxx0
49b1b3c4adf9 c04b8be95e1e "gitlab-runner-cache.." About a minute ago Exited (0) About a minute ago runner-xx-project-xx-concurrent-0-cache-6cxxa
422b23191e8c hello-world "/hello"24 minutes ago Exited (0)24 minutes ago wizardly_meninsky
As we know each job gets executed in different containers, you can see from the output above that there was 2 different containers for the 2 jobs that was specified in our pipeline.
Please feel free to show support by, sharing this post, making a donation, subscribing or reach out to me if you want me to demo and write up on any specific tech topic.
$ docker-compose up
Creating network "wordpress_wordpress" with the default driver
Creating wordpress_mysql_1_3e6e3cfe07b1 ... doneCreating wordpress_wordpress_1_a9cb16f277af ... doneAttaching to wordpress_wordpress_1_9227f3d3e587, wordpress_mysql_1_65cc98d222d0
Accessing Wordpress
You should be able to access Wordpress on http://localhost:80/
The aim for this is every time there is a commit made to the master branch, that the jobs defined by the .gitlab-ci.yml will be executed and will only pass if exit code 0 has been returned on the scripts.
The jobs gets executed on gitlab runners which is hosted with Giltab. Important to note is that every job runs independently from each other.
Our Basic Pipeline
In this pipeline we will have 2 basic jobs, each job execute a set of scripts:
$ echo "this is testing"
$ hostname
$ test -f builds/data.txt
$ grep "true" builds/data.txt
Setup the Pipeline:
From a newly created repository which i’ve cloned to my workspace, create the config:
1
$ touch .gitlab-ci.yml
The config for above yaml file:
1234567891011121314151617181920212223
stages:-build-testbuild:stage:buildscript:-echo "this is building"-hostname-mkdir builds-touch builds/data.txt-echo "false" > builds/data.txtartifacts:paths:-builds/test:stage:testscript:-echo "this is testing"-hostname-test -f builds/data.txt-grep "true" builds/data.txt
Config Explained
We define 2 stages for this pipeline: build and test
We provide context of each job, the stage, the script (commands that will be executed in the lifecycle of the runner) and artifacts (artifacts will be the content that will be transferred, as each job runs in a different runner/container)
Note that I deliberately made a mistake so that my pipeline can fail. I populated the content “false” into the builds/data.txt file from the build job and grep for the word “true” on the test job, so this job will fail.
Push to Github
Save the content to the config file, add, commit and push to master:
From the Gitlab UI, if you head over to CI/CD -> Pipelines, you should see your pipeline running:
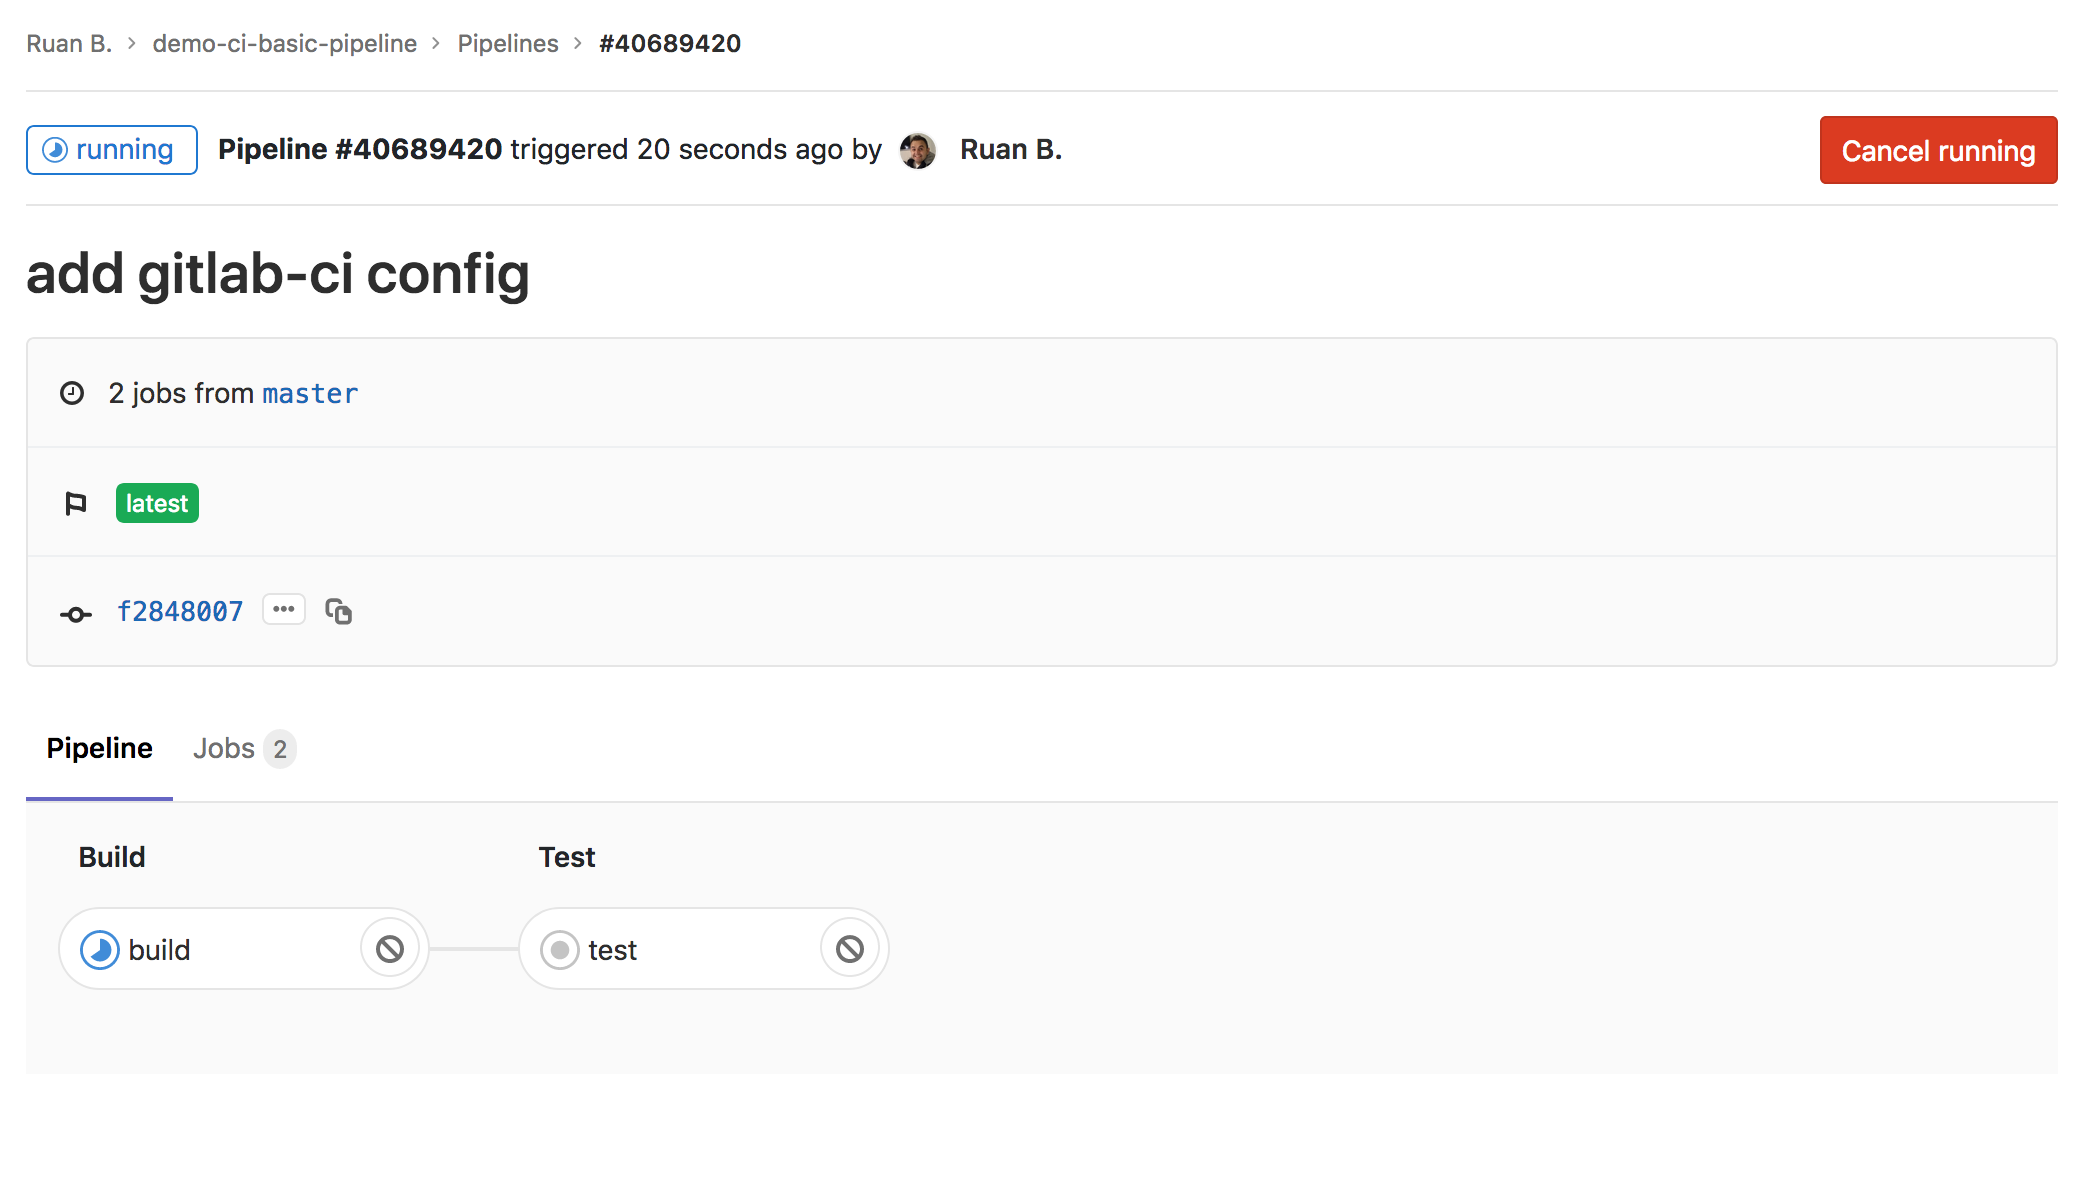
When you select the Pipeline ID, you should be presented with the jobs available in your pipeline:
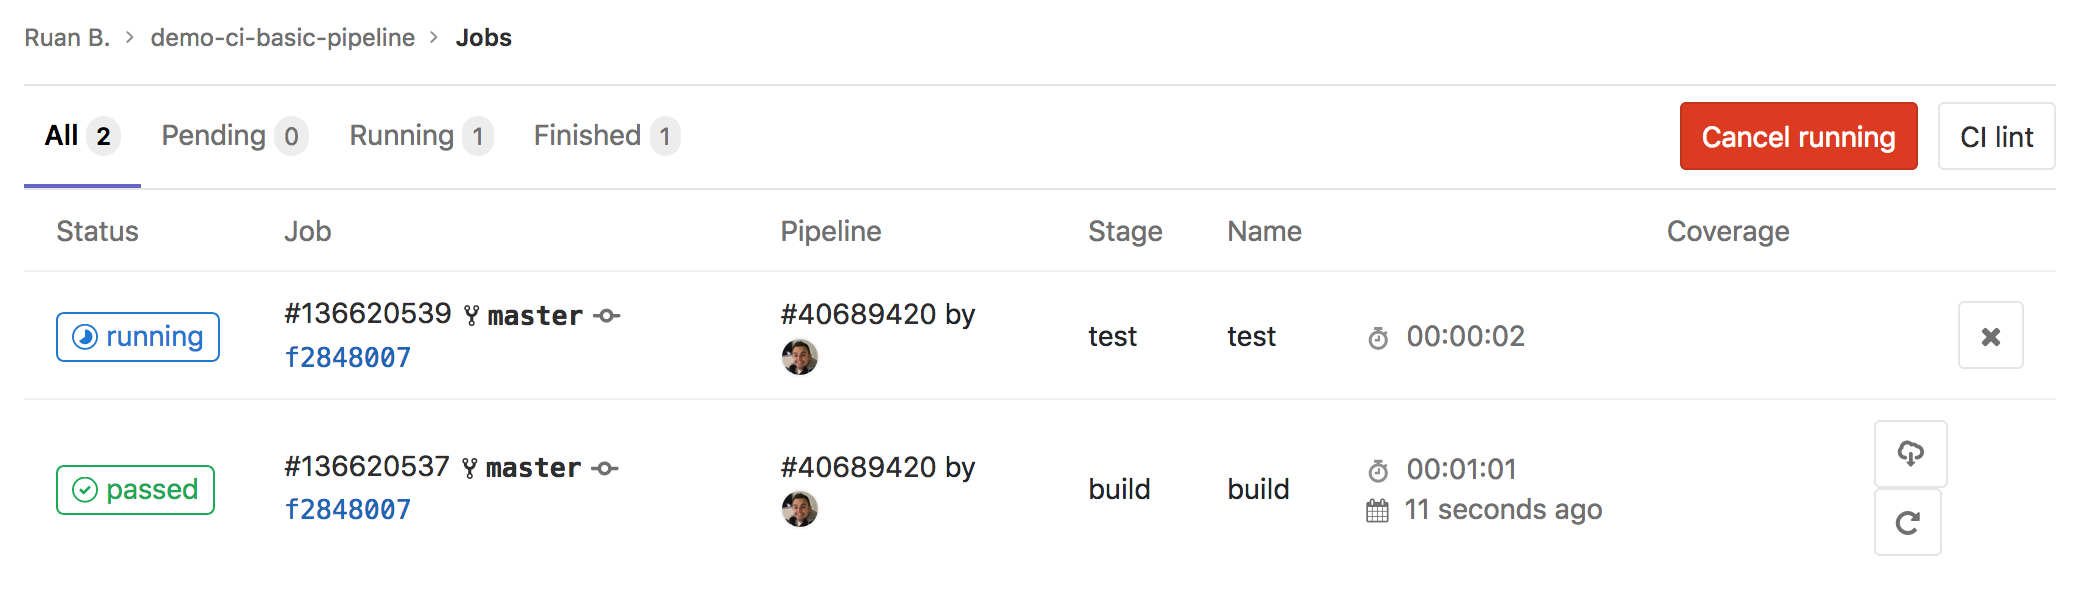
Select Jobs, and you should see an overview of your jobs. At this moment we can see that the build job has completed, and that the test job is busy running:
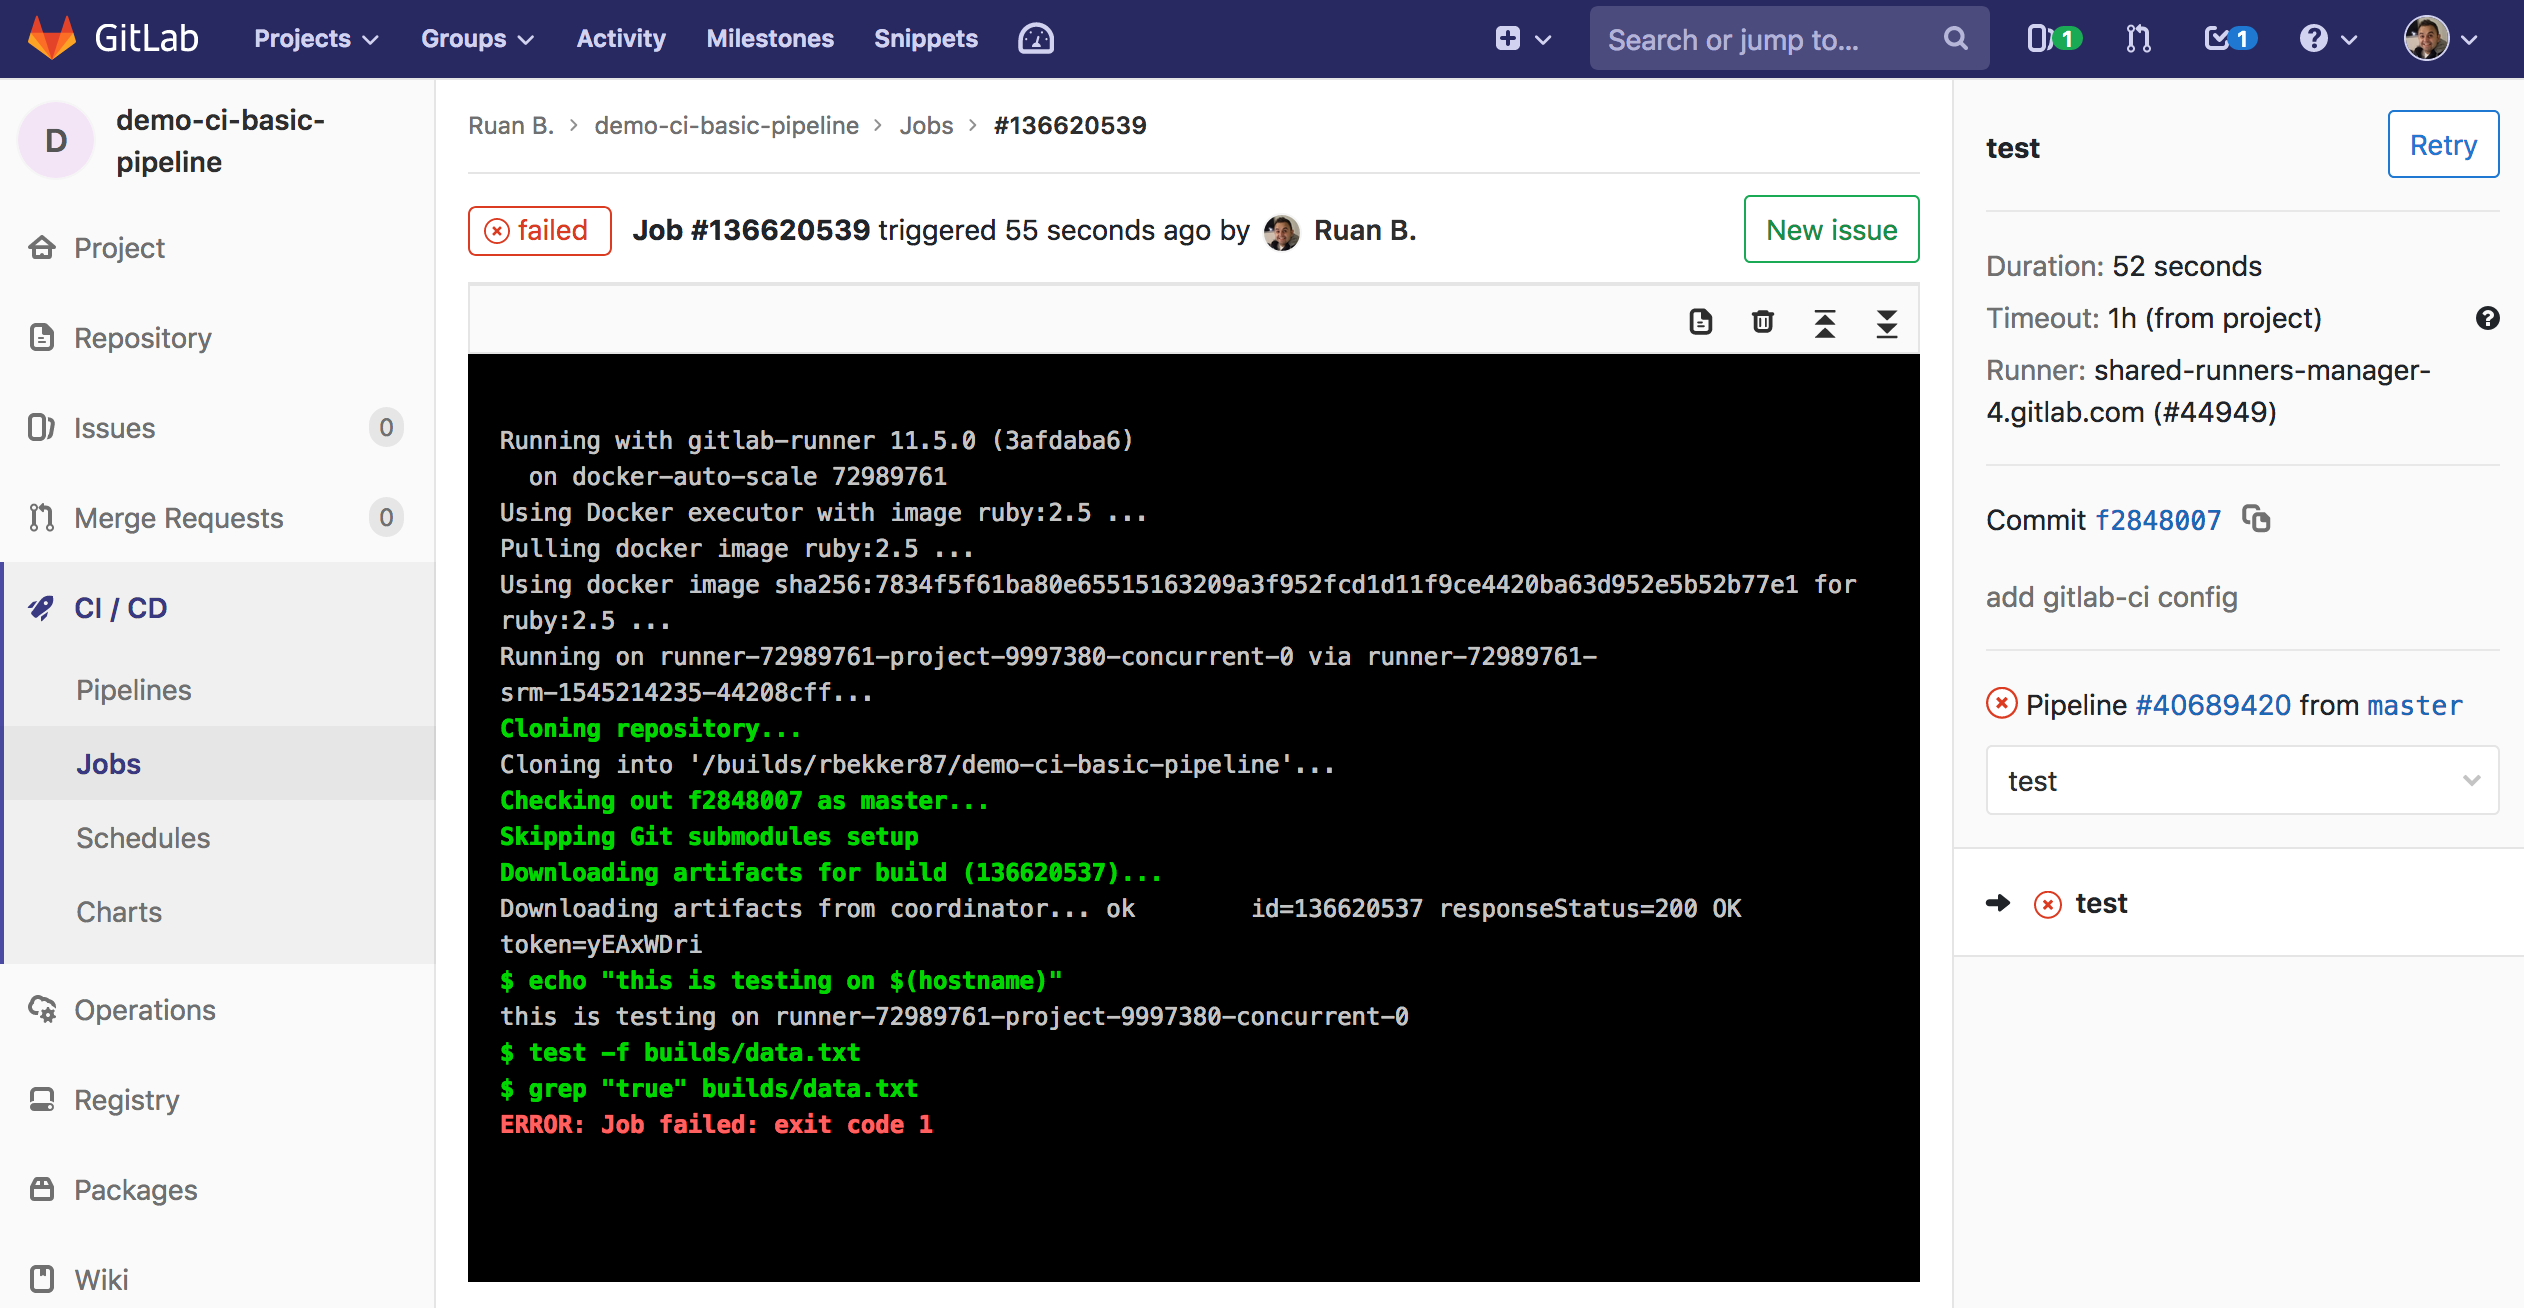
Shortly thereafter the status of the test job should change to failed, select the Job ID and you should see the output:
From the above output it gives you a link to create a new issue, which is quite handy.
Fix the Pipeline Config
Let’s go ahead and change the content in the .gitlab-ci.yml config and push to master:
1
$ vim .gitlab-ci.yml
Change line 12 from - echo "false" > builds/data.txt to - echo "true" > builds/data.txt, the full content of the file:
1234567891011121314151617181920212223
stages:-build-testbuild:stage:buildscript:-echo "this is building"-hostname-mkdir builds-touch builds/data.txt-echo "true" > builds/data.txtartifacts:paths:-builds/test:stage:testscript:-echo "this is testing"-hostname-test -f builds/data.txt-grep "true" builds/data.txt
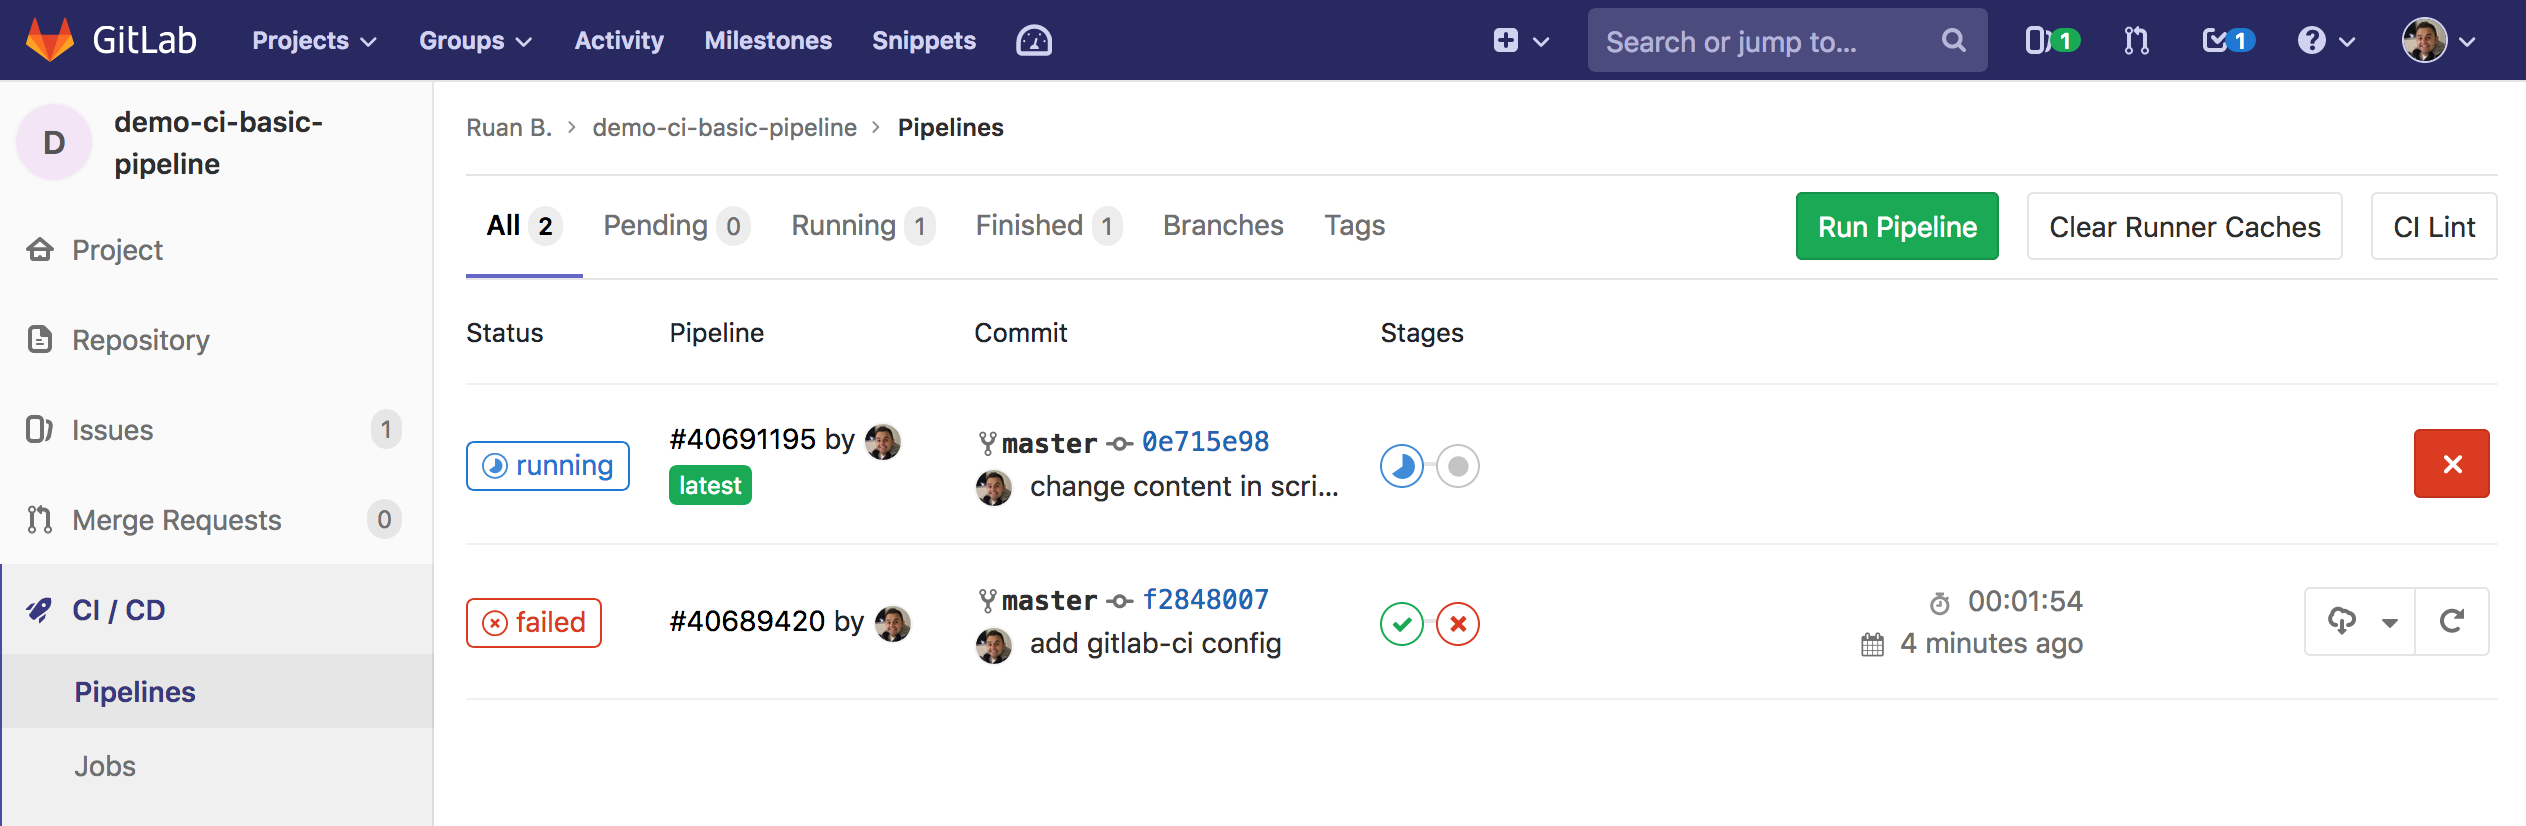
When you head over to Pipelines, you will see that the pipeline is busy running, and on the right the commit that we just made:
Great Success
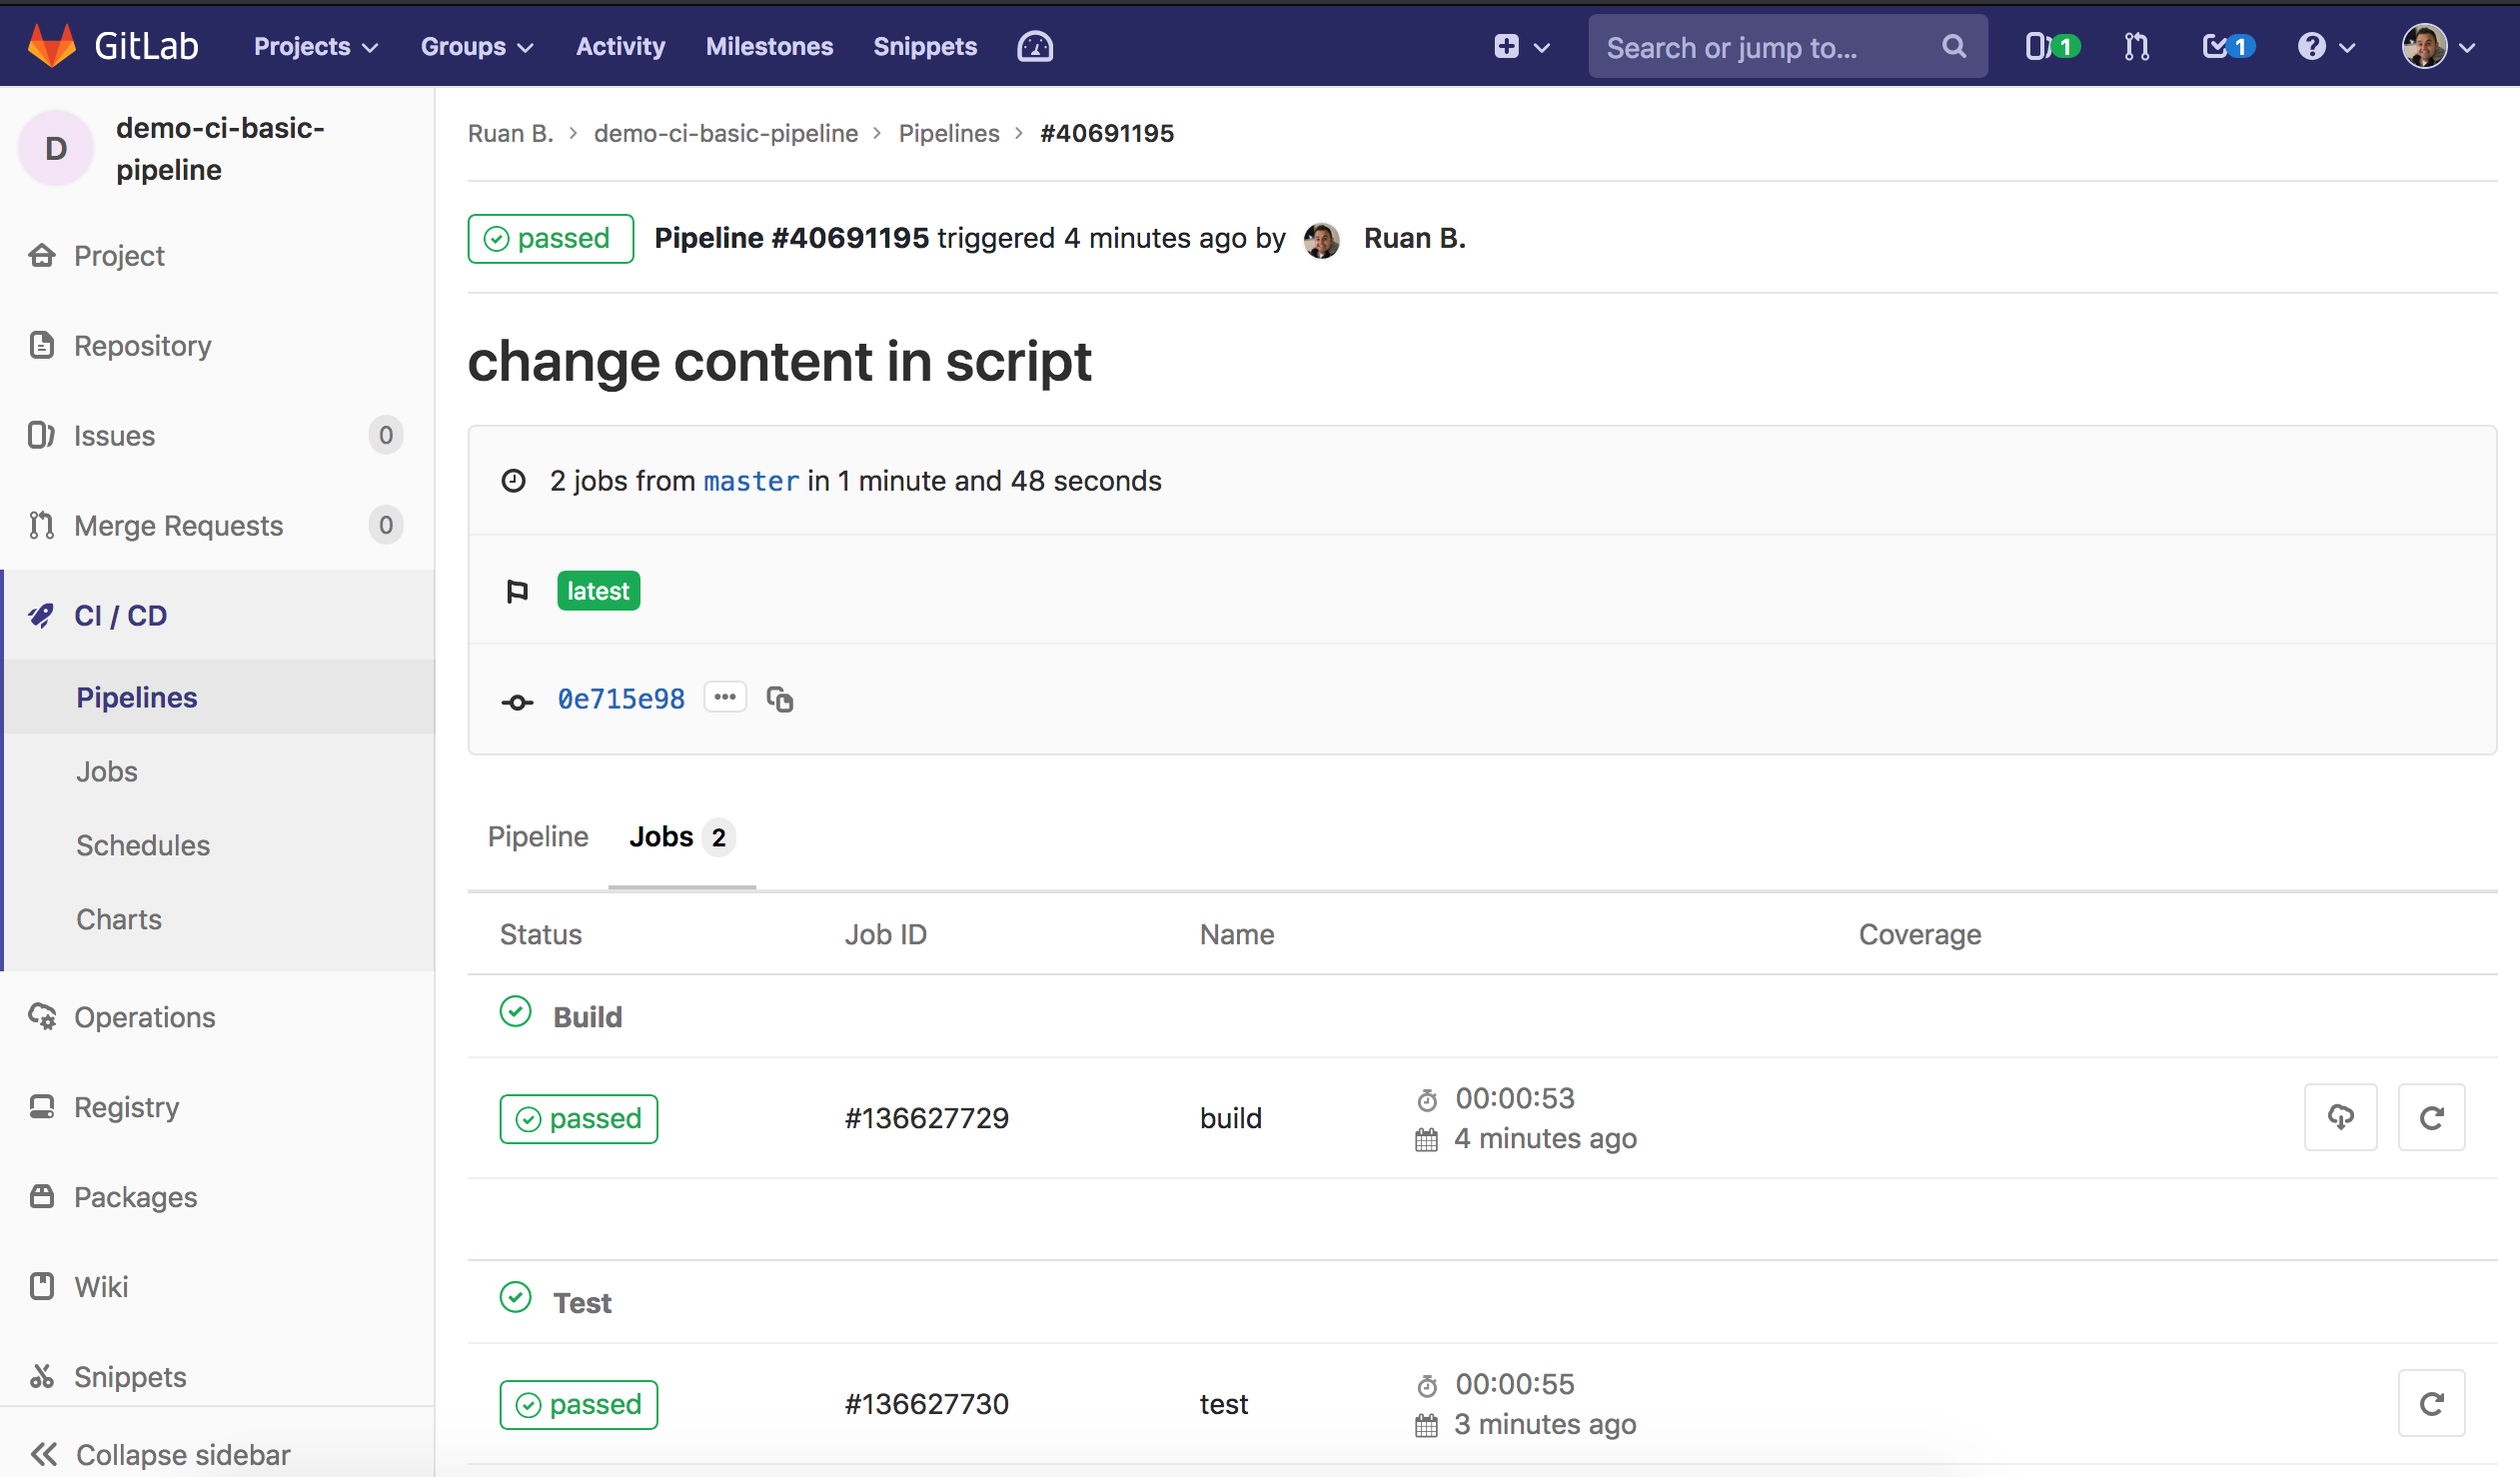
Select the Pipeline ID, then select Jobs, you should see both jobs succeeded:
Select the Job ID of the test job, and from the output you will see that the job succeeded:
From this output you can also confirm from both jobs, that each job ran in a different runner as the hostnames that was returned to stdout was different.
Resources
This was a really basic example to demonstrate Gitlab CI. Some relevant resources to this post:
Please feel free to show support by, sharing this post, making a donation, subscribing or reach out to me if you want me to demo and write up on any specific tech topic.
Today we will be looking into Hetzner’s Cloud Storage Volumes and how you can resize volumes on the fly!
What is Hetzner’s Cloud Storage Volumes
Hetzner Cloud offers a fast, flexible, and cost-effective SSD based Block Storage which can be attach to your Hetzner Cloud Server. At this point in time its available in the Nuremberg and Helsinki regions.
Resizing of Volumes
Volumes can be resized up to 10TB and the console allows you to resize in 1GB increments. You are allowed to increase, but cannot decrease.
Demo through Cloud Volumes
Let’s run through a demo, where we will do the following:
Provision a Server
Provision a Volume (XFS Filesystem / EXT4 is also optional)
Inspect the Volume, do some performance testing
Resize the Volume via Hetzner Cloud Console
Grow the XFS Filesystem
After provisioning a server, which takes less than a minute, you should see that the server is created:
SSH into your server. At this moment, we have not provisioned any volumes, so only the root partition should be mounted. Look at the block allocation:
12345
$ lsblk
NAME   MAJ:MIN RM  SIZE RO TYPE MOUNTPOINT
sda      8:0    0 19.1G  0 disk
--sda1   8:1    0 19.1G  0 part /
sr0     11:0    1 1024M  0 rom
Now, time to provision a Volume. Head over to the Volumes section:
I’m going ahead with creating a volume with 10GB of space and assign it to my server, and yeah that’s right, 10GB of storage is 0,40 EUR per month, epic value for money!
After you volume is created, you should see similar output below:
Head back to your server, and have a look at the output when running the similar commands from earlier:
123456
$ lsblk
NAME   MAJ:MIN RM  SIZE RO TYPE MOUNTPOINT
sda      8:0    0 19.1G  0 disk
--sda1   8:1    0 19.1G  0 part /
sdb      8:16   0   10G  0 disk /mnt/HC_Volume_1497823
sr0     11:0    1 1024M  0 rom
We can see from the output above how easy it is to provision a volume to your Hetzner Cloud Server. And everything gets done for you, the disk is mounted and the /etc/fstab configuration is populated for you.
Time for some performance testing on the volume:
1234
$ dd bs=2M count=256if=/dev/zero of=/mnt/HC_Volume_1497823/test.dd
256+0 records in
256+0 records out
536870912 bytes (537 MB, 512 MiB) copied, 0.911306 s, 589 MB/s
Pretty neat right? :D
Let’s resize the volume via the Hetzner Cloud Console to 20GB and resize the filesystem. From the Console, head over to the volumes section, select the more options and select resize:
After the volume has been resized, head back to your server and resize the filesystem. As we are using XFS Filesystem, we will use xfs_growfs :
123456789101112
$ xfs_growfs /dev/sdb
meta-data=/dev/sdb isize=512agcount=4, agsize=655360blks=sectsz=512attr=2, projid32bit=1=crc=1finobt=1spinodes=0rmapbt=0=reflink=0
data=bsize=4096blocks=2621440, imaxpct=25=sunit=0swidth=0 blks
naming=version 2bsize=4096 ascii-ci=0ftype=1
log=internal bsize=4096blocks=2560, version=2=sectsz=512sunit=0 blks, lazy-count=1
realtime=none extsz=4096blocks=0, rtextents=0
data blocks changed from 2621440 to 5242880
Have a look at the disk layout and see that the filesystem was resized on the fly. If you have applications writing/reading to and from that volume, its better to unmount it first.
I must admit, I am really stoked with Hetzner’s offerings and their performance. I’ve been hosting servers with them for the past 5 months and so far they really impressed me.
Have a look at Hetzner Cloud’s offerings, they have great prices as you can start off with a server from as little as 2.49 EUR per month, which gives you 1vCPU, 2GB of RAM, 20GB disk Space and 20TB of traffic. I mean, thats awesome value for money. They also offer Floating IP’s, Backups, etc.
Please feel free to show support by, sharing this post, making a donation, subscribing or reach out to me if you want me to demo and write up on any specific tech topic.
Note: Although using Python Flask is a Hosted option, you could also use this example to host it as a web page on Amazon S3, for the complete serverless route.
Dependencies:
We need Flask, Gunicorn (optional) and Requests:
1
$ pip install flask gunicorn requests
Application Code:
It’s good practice to use a API Key for some level of security, but if not, you can just remove the headers section of x-api-key.
The application relies on 3 environment variables: APP_TITLE - which is the banner name (defaults to “My URL Shortener” if none is set), TINY_API_URL - which is the URL to create the shortened url and X_API_KEY which is the api key for your API.
After booting the server, access the server on http://localhost:8080/ and the response should look like:
Dockerizing this Application
The source code for this project is available on my github repository
Thank You
Please feel free to show support by, sharing this post, making a donation, subscribing or reach out to me if you want me to demo and write up on any specific tech topic.
It’s promotion time with VULTR! Get a head start with some free credits.
Promotion
VULTR has a promotion running for a limited time, when you sign up with this link below, use the coupon / promo code: VULTRMATCH and you will receive double the deposit in credits for up to $100. This applies to new customers only.
I’m not quite sure how long they will be running this promotion, but you can get $100 free in credits when you sign up. That is basically 20 months free hosting of a Cloud Server with 1CPU, 1GB RAM, 1TB Bandwidth.
Here’s the link:
About VULTR
If you are not familliar with VULTR, they are a Cloud Hosting Company that offers cloud servers, bare-metal servers and storage servers in 16 different regions and they provide a hourly billing model.
Below are some of their features:
16 Locations: Silicon Valley, Seattle, LA, Dallas, Toronto, Miami, New Jersey, Chicago, Atlanta, London, Paris, Frankfurt, Amsterdam, Tokyo, Singapore, Sydney
100% SLA Guaranteed
Solid-State Drives (SSD)
Private Networking
Reserved IP’s
Anti-DDOS Support
Backups
DNS
Startup Scripts
Firewalls
Pretty Slick User Interface
Root Access
Hourly Billing
Deploy Applications Instantly to your Servers with App Deploys
OS Support: Linux, Windows and Custom Uploads
API Support
Great Documentation and Tutorials
They also allow you to submit articles to them that can earn you up to $300 per article, check it out here
VULTR Mission
From their website, their about us section states:
“Vultr, founded in 2014, is on a mission to empower developers and businesses by simplifying the deployment of infrastructure via its advanced cloud platform. Vultr is strategically located in 16 datacenters around the globe and provides frictionless provisioning of public cloud, storage and single-tenant bare metal.”
“Vultr has made it our priority to offer a standardized highly reliable high performance cloud compute environment in all of the cities we serve. Launching a cloud server environment in 16 cities around the globe has never been easier!”
Launching a Server
I decided to deploy a server pre-configured with Docker, and just about a minute I had my server up and running with Docker, ready to go.
Screenshot of the UI:
Screenshot of the root login:
Overall
I’m quite impressed with VULTR and the ease of use. The pricing is really good and like the fact that you can deploy servers with pre-configured software on it.
Thank You
Please feel free to show support by, sharing this post, making a donation, subscribing or reach out to me if you want me to demo and write up on any specific tech topic.
Flask Routing is essentially mapping a URL eg. example.com/pages/test to a view function within your code. For example having /contact-us displaying a page about contact details.
The route() decorator in Flask is used to bind the URL to a function.
Some basic examples:
This is a basic web app that shows on which page you are:
1234567891011121314
fromflaskimportFlaskapp=Flask(__name__)@app.route('/home')defhome():return'<h2>You are on the Home Page</h2>@app.route('/about-us')defabout():return'<h2>You are on the About Us Page</h2>'if__main__=='__name__':app.run()
With app.run() we have passed no arguments, so it will use the defaults, which is:
Host: 127.0.0.1
Port: 5000
Debug: False
To set your own values, you could do something like: app.run(host='0.0.0.0', port=8080, debug=True). Note: Never use debug mode in production.
So when you do a GET Request on http://localhost:5000/home you will be presented with the response that you are on the home page.
This is all good and well, but its static, so lets look how we can set this up in a dynamic way.
URL Variables:
We can use variables in the route() decorator which we can parse through to the function. In this next example we will use a name variable, and depending on what name is passed in the GET request, will be provided in the response.
So with the above example, <name> will be used as a placeholder or variable, and then passed through to our function and then returned in our response, for example:
12345
$ curl -XGET http://localhost:5000/user/James
Welcome, James

$ curl -XGET http://localhost:5000/user/Frank
Welcome, Frank
So this can be really useful when dealing with dynamic data. You can also go deeper into this, like the following:
$ curl -XGET http://localhost:5000/user
Ruan B likes Python
This is a very simple example, but you could use it in many ways.
Data Types in URL Routing:
You could also explicitly set your datatypes, like string or integer etc in your route decorators.
Example for Strings:
123456789
fromflaskimportFlaskapp=Flask(__name__)@app.route('/city/<string:cityname>')defuser(cityname):return'Selected City is: {}'.format(cityname)if__main__=='__name__':app.run()
Example for Integers:
123456789
fromflaskimportFlaskapp=Flask(__name__)@app.route('/user/<integer:age>')defuser(age):return'Selected age is: {}'.format(age)if__main__=='__name__':app.run()
And now because the datatype is an integer, when you try to pass a string, you will be faced with an error. So the value that you will need to pass would then be strictly set to the type of integer.
Example with if statements:
You could also use if statements in your functions, like determining the age group, for example:
123456789101112
fromflaskimportFlaskapp=Flask(__name__)@app.route('/user/<integer:age>')defuser(age):ifage>=28:return'Your selected age is {}, so you are in the 28 and older group'.format(age)else:return'Your selected age is {}, so you are in the younger then 28 group'.format(age)if__main__=='__name__':app.run()
So with the above example:
12345
$ curl -XGET http://127.0.0.1:5000/user/12
Your selected age is 12, so you are in the younger then28 group
$ curl -XGET http://127.0.0.1:5000/user/30
Your selected age is 30, so you are in the 28 and older group
Example with Floats:
1
@app.route('/myfloat/<float:floatnum>')
Example with Path Types:
We can also pass accept the URL Path, that is passed by using the path type:
123456789
fromflaskimportFlaskapp=Flask(__name__)@app.route('/path/<path:mypath>')defuser(mypath):return'Your selected path is: /{}'.format(mypath)if__main__=='__name__':app.run()
So with the above example:
12
$ curl -XGET http://127.0.0.1:5000/path/apps/data/my/app
Your selected path is: /apps/data/my/app
I hope this was useful, next up in our Python Flask Tutorial-Series will be rendering templates in flask with the jinja2 templating engine.