After a year or two spending quite a lot of time into docker and more specifically docker swarm, I found it quite tedious to write up docker-compose files for specific stacks that you are working on. I also felt the need for a docker swarm compose package manager.
Fair enough, you store them on a central repository and then you can reuse them as you go, and that is exactly what I did, but I felt that perhaps other people have the same problem.
The Main Idea
So the main idea is to have a central repository with docker swarm stacks, that you can pick and choose what you want, pull down the repository and use environment variables to override the default configuration and use the deploy script to deploy the stack that you want.
Future Ideas
In the future I would like to create a cli tool that you can use to list stacks, as example:
$ bstacks deploy --stack traefik --stack-name proxy --env-file ./stack.env
Username for Traefik UI: ruan
Password for Traefik UI: deploying traefik stack in http mode
Creating network public
Creating config proxy_traefik_htpasswd
Creating service proxy_traefik
Traefik UI is available at:
- http://traefik.localhost
At the time of writing the cli tool is not available yet, but the list of available templated docker stack repositories are availabe at github.com/bekkerstacks
What are we doing today
In this tutorial we will deploy a Traefik proxy on Docker Swarm. I will be demonstrating the deployment on my Mac, and currently I have only docker installed, without a swarm being initialized.
If you already have a swarm initialized and running this on servers, you can skip the local dev section.
Local Dev
We will be initializing a 3 node docker swarm on a mac using docker-in-docker. Get the repository:
$ bash deploy.sh

ID                            HOSTNAME            STATUS              AVAILABILITY        MANAGER STATUS      ENGINE VERSION
lkyjkvuc5uobzgps4m7e98l0u *   docker-desktop      Ready               Active              Leader              19.03.1
6djgz804emj89rs8icd53wfgn     worker-1            Ready               Active                                  18.06.3-ce
gcz6ou0s5p8kxve63ihnky7ai     worker-2            Ready               Active                                  18.06.3-ce
ll8zfvuaek8q4x9nlijib0dfa     worker-3            Ready               Active                                  18.06.3-ce
As you can see we have a 4 node docker swarm running on our local dev environment to continue.
Deploy Traefik
To deploy traefik in HTTPS mode, we need to set 3 environment variables: EMAIL, DOMAIN, PROTOCOL. We also need to setup our DNS to direct traefik to our swarm. In my case I will be using 1.2.3.4 as the IP of my Manager node and using the domain mydomain.com
The DNS setup will look like this:
12
A Record: mydomain.com -> 1.1.1.1
A Record: *.mydomain.com -> 1.1.1.1
And if you are using this locally, you can setup your /etc/hosts to 127.0.0.1 traefik.mydomain.com
So your application need to store secrets and you are looking for a home for them. In this tutorial we will see how we can use Python, S3 and KMS to build our own solution for managing secrets.
There is SSM and Secrets Manager that probably does a better job, but my mind got curious :D
High Level Goal
From a High-Level we want to store secrets encrypted on S3 with KMS, namespaced with team/application/environment/value in json format so that our application receives the json dictionary of configured key/value pairs.
We can leverage IAM to delegate permissions on the namespacing that we decide on, for my example the namespace will look like this on S3:
We will apply IAM permissions for our user to only Put and Get on secrets/engineering*. So with this idea we can apply IAM permissions on groups for different departments, or even let users manage their own secrets such as:
First we will create our S3 Bucket, head over to Amazon S3 create a new s3 bucket, make sure that the bucket is NOT public, by using the default configuration, you should be good.
Once your S3 Bucket is provisioned, head over to Amazon IAM and create a IAM User, enable programmatic access, and keep your access key and secret key safe. For now we will not apply any permissions as we will come back to this step.
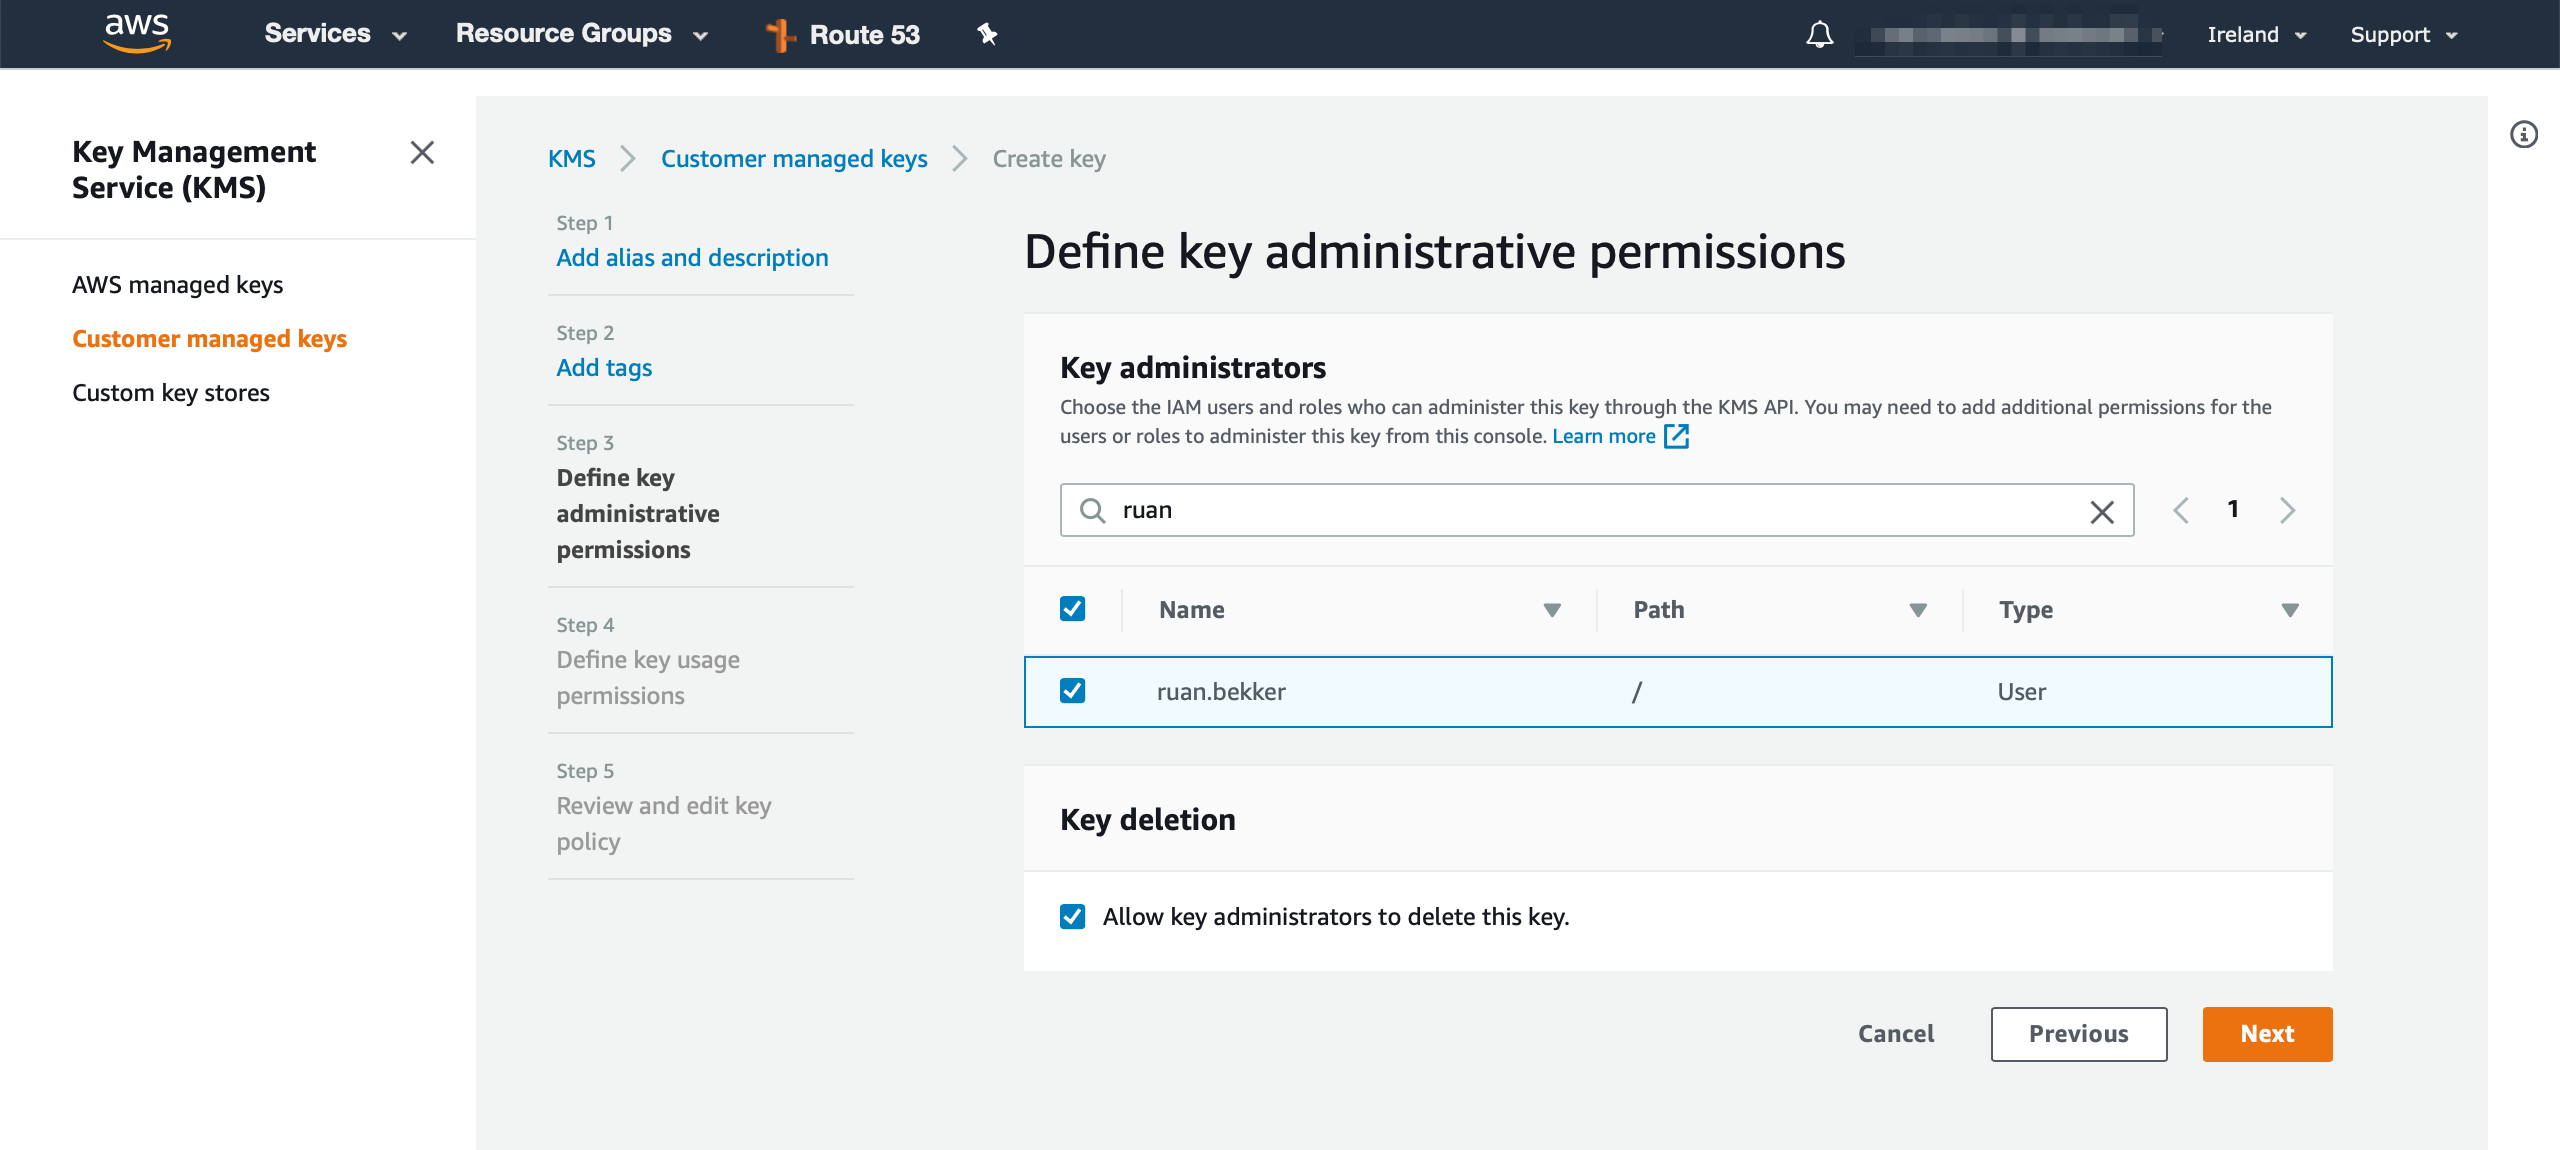
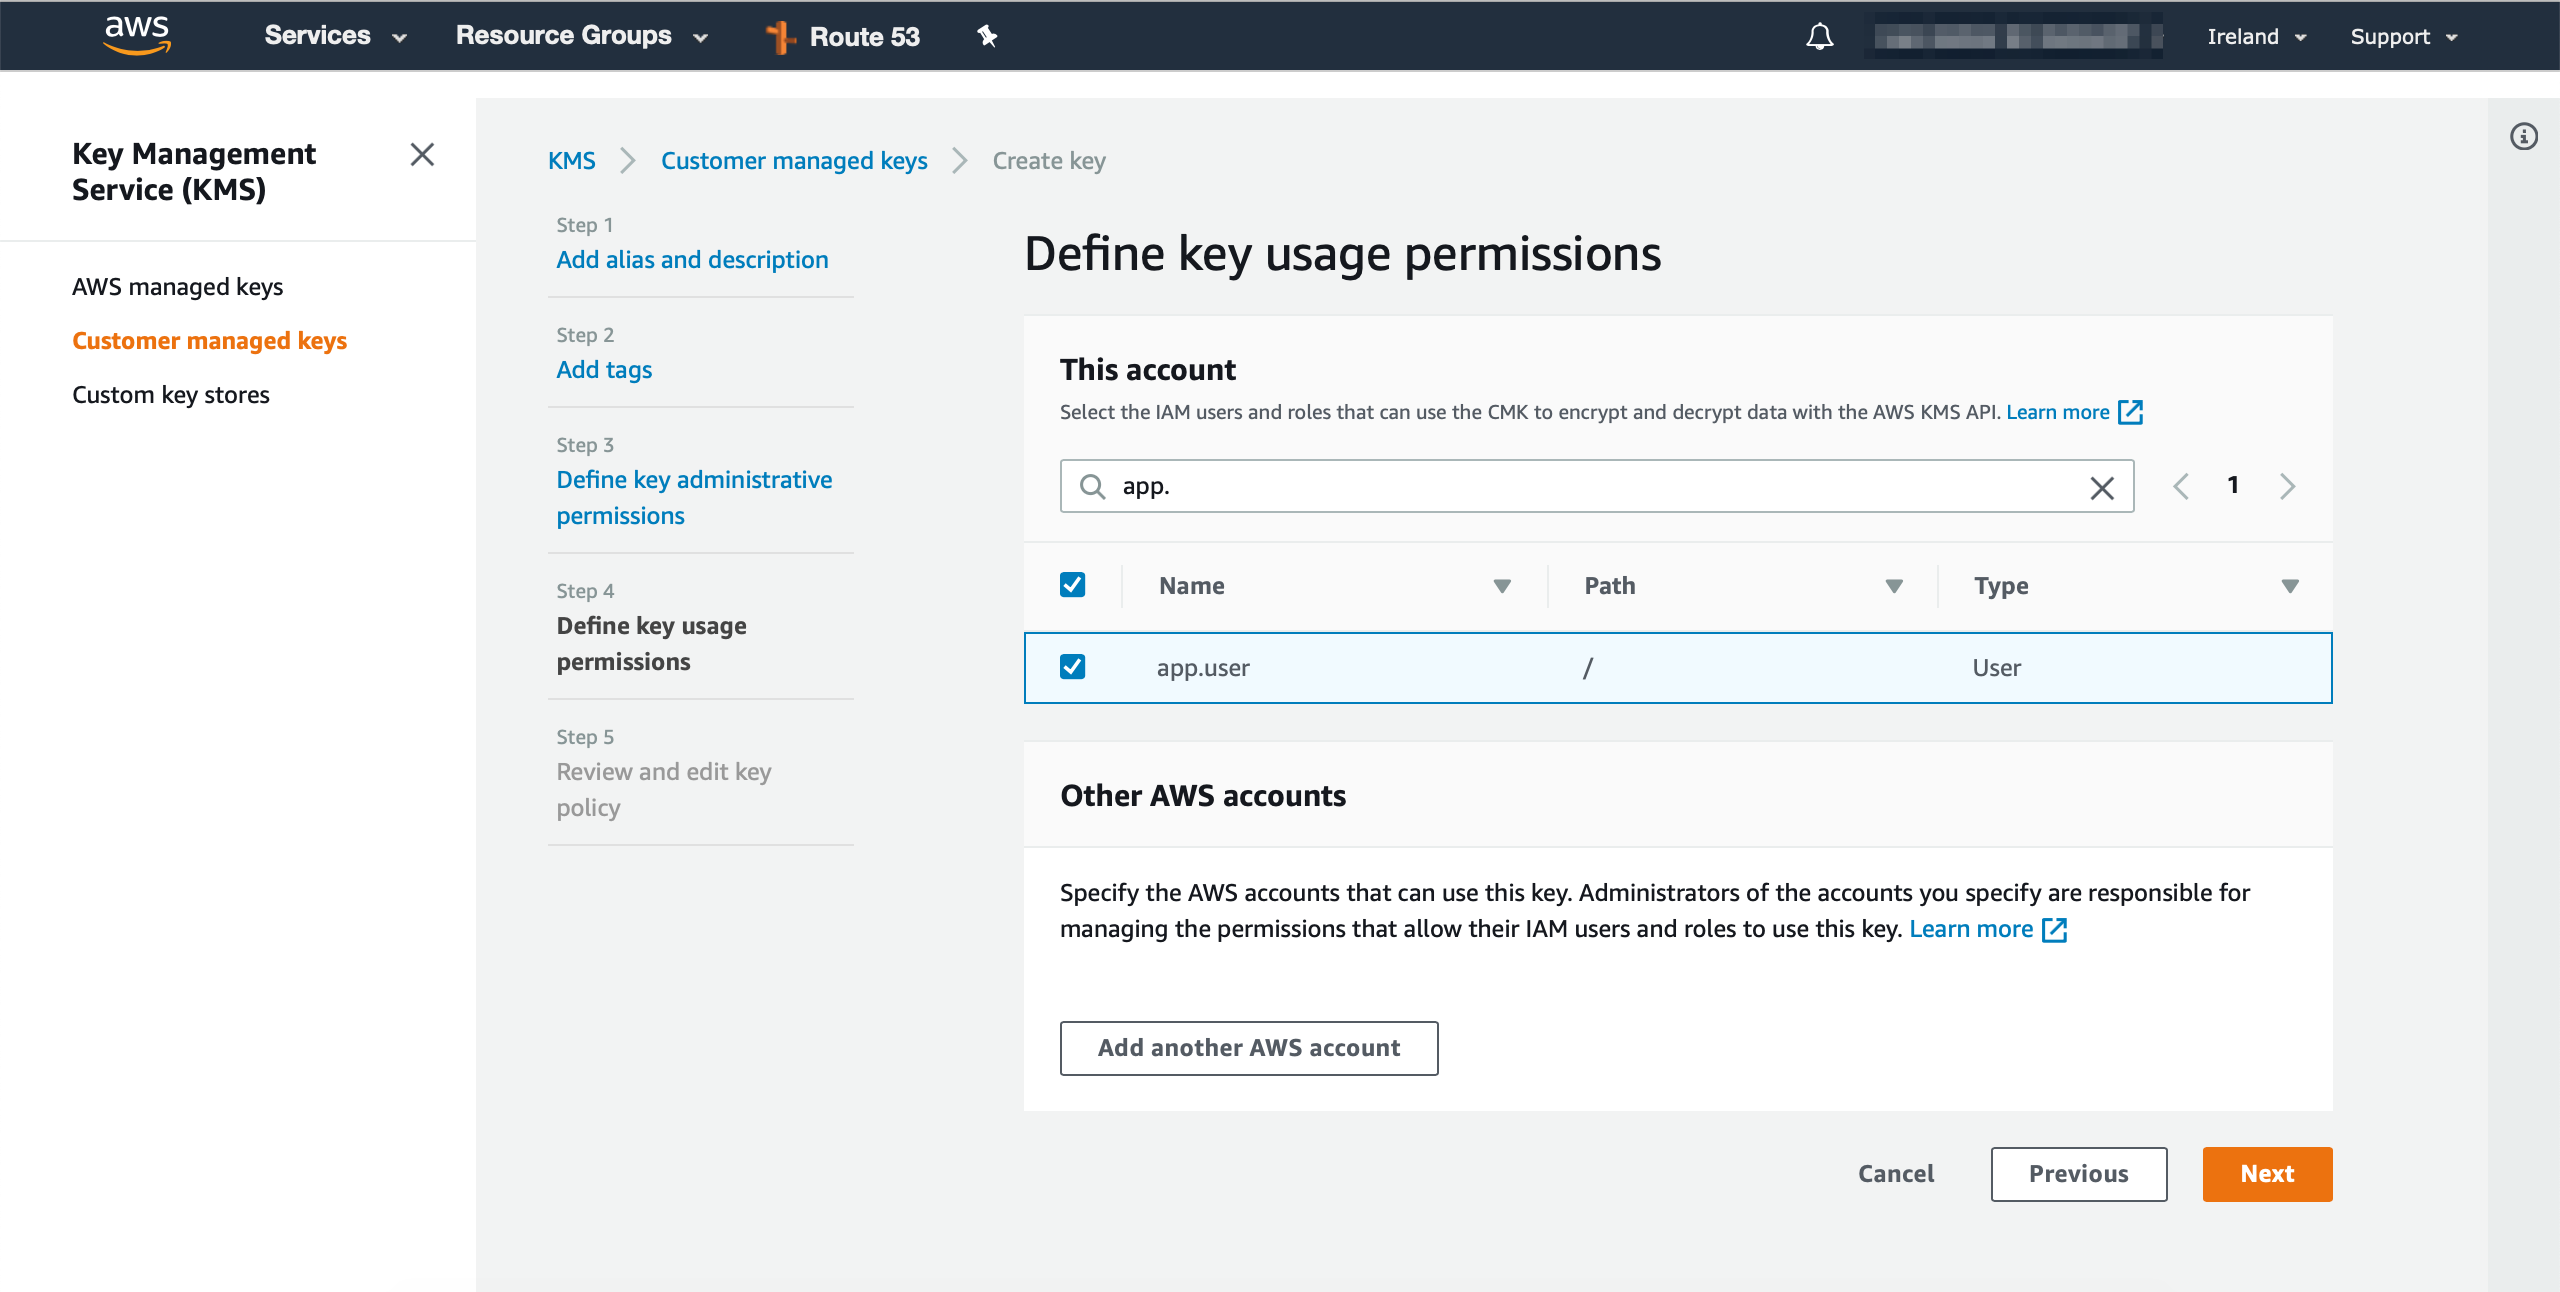
Head over to Amazon KMS and create a KMS Key, we will define the key administrator, which will be my user (ruan.bekker in this case) with more privileged permissions:
and then we will define the key usage permissions (app.user in this case), which will be the user that we provisioned from the previous step, this will be the user that will encrypt and decrypt the data:
Next, review the policy generated from the previous selected sections:
Once you select finish, you will be returned to the section where your KMS Key information will be displayed, keep note of your KMS Key Alias, as we will need it later:
Create a IAM Policy for our App User
Next we will create the IAM Policy for the user that will encrypt/decrypt and store data in S3
After the policy has been saved, associate the policy to the IAM User
Encrypt and Put to S3
Now we will use Python to define the data that we want to store in S3, we will then encrypt the data with KMS, use base64 to encode the ciphertext and push the encrypted value to S3, with Server Side Encryption enabled, which we will also use our KMS key.
Install boto3 in Python:
1
$ pip install boto3
Enter the Python REPL and import the required packages, we will also save the access key and secret key as variables so that we can use it with boto3. You can also save it to the credential provider and utilise the profile name:
Next we will use KMS to encrypt the data and use base64 to encode the ciphertext:
123456789101112
>>>kms=boto3.Session(aws_access_key_id=aws_access_key_id,aws_secret_access_key=aws_secret_access_key).client('kms')>>>ciphertext=kms.encrypt(KeyId='alias/secrets-key',Plaintext=json.dumps(mydata))>>>encoded_ciphertext=base64.b64encode(ciphertext["CiphertextBlob"])# preview the data>>>encoded_ciphertext'AQICAHiKOz...42720nCleoI26UW7P89lPdwvV8Q=='
Next we will use S3 to push the encrypted data onto S3 in our name spaced key: secrets/engineering/app1/production/appconfig.json
Let’s say you are using Docker and you want to bootstrap your application configs to your environment that you are retrieving from S3.
We will use a get_secrets.py python script that will read the data into memory, decrypt and write the values in plaintext to disk, then we will use the boot.sh script to read the values into the environment and remove the temp file that was written to disk, then start the application since we have the values stored in our environment.
Our “application” in this example will just be a line of echo to return the values for demonstration.
I recently discovered that the faas-cli allows you to append your function’s yaml to an existing file when generating a new function. And that faas-cli up does the build, push and deploy for you.
The way I always did it:
Usually, I will go through this flow: create, build, push, deploy, when creating 2 functions that will be in the same stack:
So recently I discovered that you can append the yaml definition of your function to an existing yaml file, and use faas-cli up to build, push and deploy your functions:
Now, when using faas-cli up it expects by default that the filename is stack.yml which we can change with -f but to keep this as easy as possible, we will change the filename to stack.yml:
You can use your OpenFaaS functions to store and retrieve data to and from a persistent layer that sits outside the OpenFaaS framework. The database that we will use in this tutorial is Amazon’s DynamoDB.
If you are not familiar with the service, Amazon’s DynamoDB is a fully managed NoSQL database service that provides fast and predictable performance with seamless scalability.
At the end of this tutorial you will be able to invoke your functions to read and write items to DynamoDB with a dedicated IAM User that is only allowed to access DynamoDB, and secrets managed by your OpenFaaS framework.
What we will be doing in this Tutorial
In this tutorial we will cover a couple of things, and a summary on the to do list is:
Create a OpenFaaS IAM User, DynamoDB IAM Policy, associate the Policy to the User using the AWS CLI
Create a AWS Access Key, and save the Access Key and Secret key to file
Create OpenFaaS Secrets of the Access Key and Secret Key, remove the files from disk
Create 3 OpenFaaS Functions: write, lookup and get
Invoke the functions, read and write from DynamoDB
Our 3 functions will do very basic operations for this demonstration, but I believe this is a good starting point.
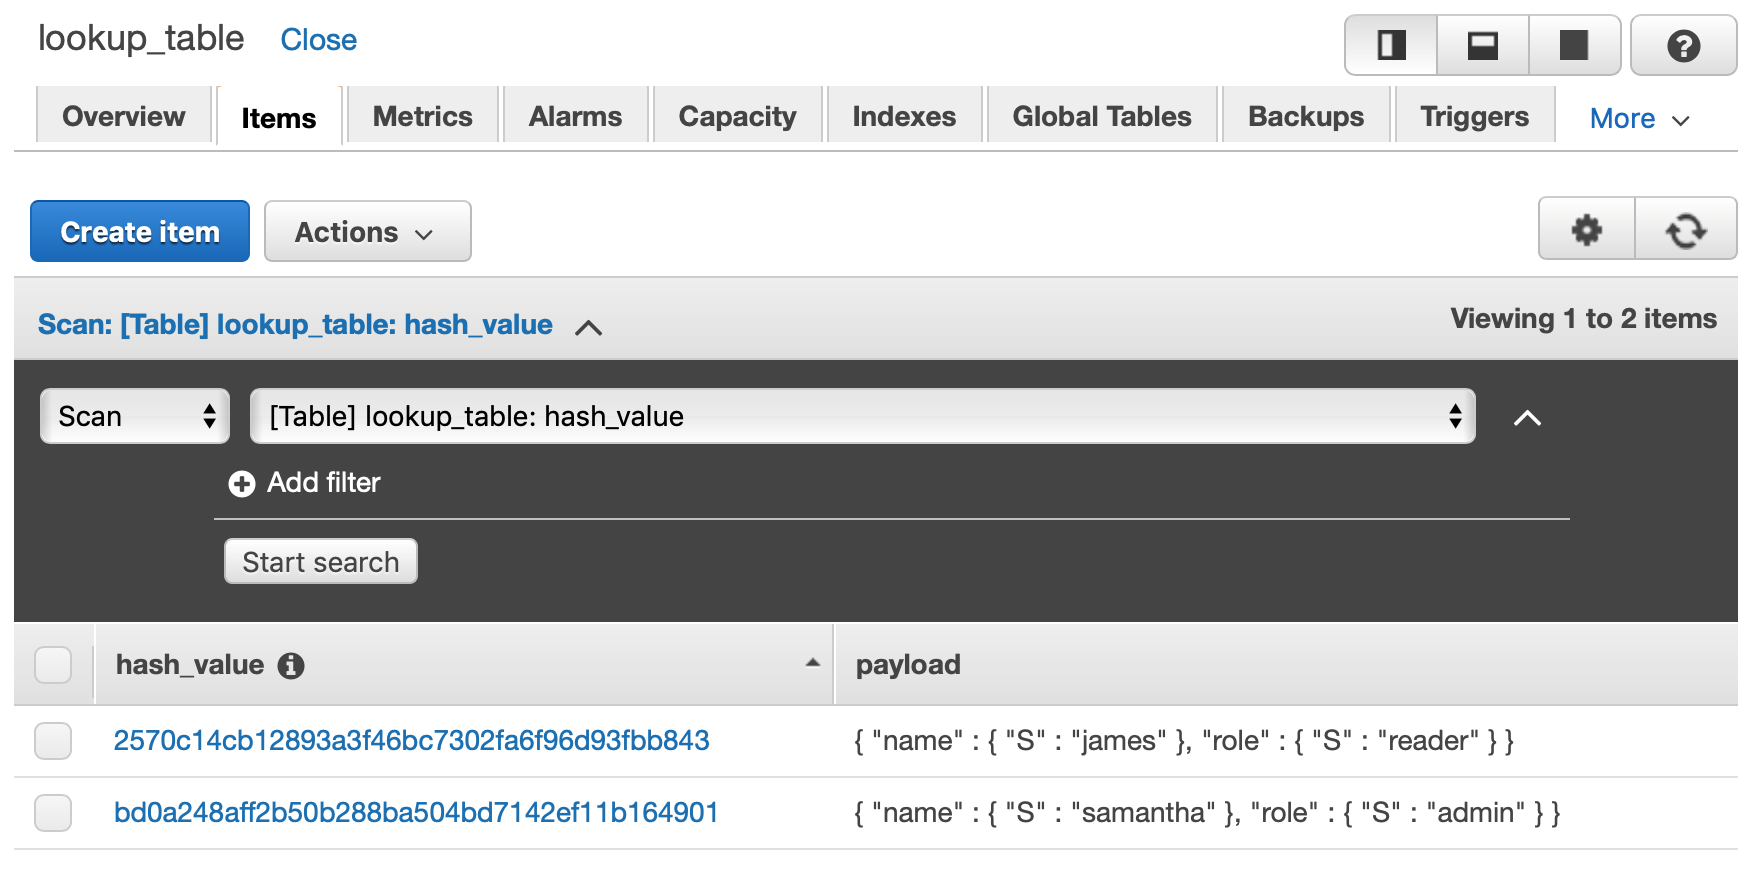
In this scenario we want to store user information into DynamoDB, we will use a hash that we will calculate using the users ID Number + Lastname. So when we have thousands or millions of items, we dont need to search through the entire table, but since we can re-calculate the sha hash, we can do a single GetItem operation to find the entry about the user in question.
Lookup Function:
The lookup function will calculate the hash by passing the users ID Number and Lastname, this will return a hash which will be teh primary key attribute of our table design. This hash value is required to do a GetItem on the user in question.
Get Function:
The Get function will interface with DynamoDB, it reads the AWS access key and secret key from the secrets path to authenticate with AWS and utilizes environment variables for the region and table name. This will do a GetItem on the DynamoDB Table and retrieve the Item. If the item is not found, it will return it in the response.
Write Function:
The write function will also interface with DynamoDB, the ID, Name and Payload will be included in the request body on our POST Request.
Note on Secrets and Environment Variables
I am treating my environment variables and secrets different from each other. The secrets such as my AWS access keys are stored on the cluster and the application reads them and stores the values in memory.
The environment variables such as non-secret information, such as my dynamodb table name and aws region, is defined in my environment variables.
This post and this post goes a bit more into detail on why you should not use environment variables for secret data, which I found from this link
I have a admin IAM account configured on my default profile, using the aws-cli tools generate the cli-skeleton that is required to provision a dynamodb table:
My table name will be lookup-table with the primary key hash_value and provisoned my throughput to 1 Read and Write Capacity Unit. Which will enable us 4KB/s for reads and 1KB/s for writes.
For demonstration purposes, I am sharing my altered ddb.json file:
Create the IAM Policy document which defines the access that we want to grant. You can see that we are only allowing Put and GetItem on the provisioned DynamoDB resource:
Create the Access Key, which will be our API keys for our application to authenticate requests. Save the AccessKeyId and SecretAccessKey temporarily to 2 seperate files, which we will delete after we create our secrets to our cluster:
We will create our first function to generate the yaml definition, then we will rename our generated filename to stack.yml then the next 2 functions, we will use the append flag to append the functions yaml to our stack.yml file, so that we can simply use faas-cli up
Create the Lookup Function:
Create a Python3 Function, and prefix it with your dockerhub user:
1234567
$ faas-cli new \--lang python3 fn-dynamodb-lookup \--prefix=ruanbekker \--gateway https://openfaas.domain.com
Function created in folder: fn-foo
Stack file written: fn-dynamodb-lookup.yml
As we will be using one stack file, rename the generated stack file:
1
$ mv fn-dynamodb-lookup.yml stack.yml
Open the stack file and set the environment variables:
Create a Python3 Function, and prefix it with your dockerhub user, and use the append flag to update our stack file:
12345678
$ faas-cli new \--lang python3 fn-dynamodb-write \--prefix=ruanbekker \--gateway https://openfaas.domain.com
--append stack.yml
Function created in folder: fn-dynamodb-write
Stack file updated: stack.yml
Open the stack file and set the environment variables and include the secrets that was created:
Create a Python3 Function, and prefix it with your dockerhub user, and use the append flag to specify the stack file:
12345678
$ faas-cli new \--lang python3 fn-dynamodb-get \--prefix=ruanbekker \--gateway https://openfaas.domain.com
--append stack.yml
Function created in folder: fn-dynamodb-get
Stack file updated: stack.yml
Open the stack file and set the environment variables and include the secrets that was created:
importboto3importosimportjsonaws_key=open('/var/openfaas/secrets/openfaas-aws-access-key','r').read()aws_secret=open('/var/openfaas/secrets/openfaas-aws-secret-key','r').read()dynamodb_region=os.environ['dynamodb_region']dynamodb_table=os.environ['dynamodb_table']client=boto3.Session(region_name=dynamodb_region).resource('dynamodb',aws_access_key_id=aws_key,aws_secret_access_key=aws_secret)table=client.Table(dynamodb_table)defhandle(req):event=json.loads(req)response=table.get_item(Key={'hash_value':event['hash_value']})if'Item'notinresponse:item_data='Item not found'else:item_data=response['Item']returnitem_data
Build, Push and Deploy:
It’s time to deploy our functions and since we have all our stack info in one file, we can use faas-cli up which will build, push and deploy our functions.
By default it expects the filename to be stack.yml therefore we don’t need to specify the filename, but if you had a different filename, you can overwrite the default behaviour with -f:
Note that the lookup function calculates a hash based on the input that you provide it, for example calculating a hash with userdata that does not exist in our table:
Using that hash value in our request body to read from dynamodb, will show us that the item has not been found:
12
$ curl -XPOST https://openfaas.domain.com/function/fn-dynamodb-get -d '{"hash_value": "c68dc272873140f4ae93bb3a3317772a6bdd9aa1"}'Item not found
You might want to change this behavior but this is just for the demonstration of this post.
When you head over to DynamoDB’s console you will see this in your table:
Thanks
This was a basic example using OpenFaaS with Amazon DynamoDB with Python and secrets managed with OpenFaas. I really like the way OpenFaaS let’s you work with secrets, it works great and don’t need an additional resource to manage your sensitive data.
Although this was basic usage with OpenFaaS and DynamoDB, the sky is the limit what you can do with it.
Misleading title?? Perhaps, depends on how you look at it. Amazon Kinesis is a fully managed, cloud-based service for real-time processing of distributed data streams. So if you’re a curious mad person like me, you want to test out stuff and when you can test stuff out for free, why not.
So before paying for that, why not spin something up locally, such as Kinesisalite which is an implementation of Amazon Kinesis built on top of LevelDB.
Kinesis overview:
What will we be doing?
In this tutorial we will setup a local kinesis instance using docker then do the following:
Create a Kinesis Stream, List, Describe, PutRecord, GetRecords using Python’s Boto3 Interface
Write a Python Producer and Consumer
Write and Read Records from our Local Kinesis Stream
FROM node:8.16.0-stretch-slim

RUN apt update && apt install build-essential python-minimal -y
RUN npm install --unsafe-perm -g kinesalite
RUN apt-get clean

CMD ["kinesalite", "--port", "4567", "--createStreaMs", "5"]
Build:
1
$ docker build -t kinesis-local .
Run and expose port 4567:
1
$ docker run -it -p 4567:4567 kinesis-local:latest
Interact with Kinesis Local:
In this next steps we will setup our environment, which will only require python and boto3. To keep things isolated, I will do this with a docker container:
1
$ docker run -it python:3.7-alpine sh
Now we need to install boto3 and enter the python repl:
123456
$ pip3 install boto3
$ python3
Python 3.7.3 (default, May 11 2019, 02:00:41)
[GCC 8.3.0] on linux
Type "help", "copyright", "credits" or "license" for more information.
>>>
Import boto and create the connection to our kinesis local instance:
Let’s put some data in our kinesis stream, we will push a payload with the body: {"name": "ruan"} to our kinesis stream with partition key: a01 which is used for sharding:
Now that we have data in our stream we need to read data from our kinesis stream. Before data can be read from the stream we need to obtain the shard iterator for the shard we are interested in. A shard iterator represents the position of the stream and shard from which the consumer will read, in this case we will call the get_shard_operator method and passing the stream name, shard id and shard iterator type.
There are 2 comman iterator types:
TRIM_HORIZON: Points to the last untrimmed record in the shard
LATEST: Reads the most recent data in the shard
We will use TRIM_HORIZON in this case, get the shard iterator id:
To loop and parse through the response to make it more readable:
12345
>>> for record in response['Records']:
...     if 'Data' in record:
...         json.loads(record['Data'])
...
{u'name': u'ruan'}
Once we are done, we can delete our stream:
1
>>> client.delete_stream(StreamName='mystream')
Now that we have the basics, lets create our producer and consumer for a demonstration on pushing data to a kinesis stream from one process and consuming it from another process. As this demonstration we will be producing and consuming data from the same laptop, in real use-cases, you will do them from seperate servers and using Amazon Kinesis.
Our Kinesis Producer
The following will create a Kinesis Local Stream and Write 25 JSON Documents to our stream:
importboto3importrandomimportjsonimporttimenames=['james','stefan','pete','tom','frank','peter','ruan']session=boto3.Session(region_name='eu-west-1')client=session.client('kinesis',aws_access_key_id='',aws_secret_access_key='',endpoint_url='http://localhost:4567')list_streams=client.list_streams()if'mystream'notinlist_streams['StreamNames']:client.create_stream(StreamName='mystream',ShardCount=1)time.sleep(1)count=0print("Starting at {}".format(time.strftime("%H:%m:%S")))whilecount!=25:count+=1response=client.put_record(StreamName='mystream',Data=json.dumps({"number":count,"name":random.choice(names),"age":random.randint(20,50)}),PartitionKey='a01')time.sleep(1)print("Finished at {}".format(time.strftime("%H:%m:%S")))
Our Kinesis Local Consumer:
This will read 5 records at a time from our stream, you will notice if you run them on the same time it will only read one at a time as the producer only writes one per second.
If you have not provisioned a Kubernetes Cluster, you can see this tutorial on how to provision a Kubernetes Cluster on Scaleway
What will we be doing
In this tutorial we will setup Traefik as an Ingress Controller on Kubernetes and deploy a logos web app to our Kubernetes Cluster, using frontend rules to map subdomains to specific services.
We will have 3 subdomains, being mapped to containers from the below docker images:
$ git clone https://github.com/ruanbekker/traefik-kubernetes-scaleway-demo
$ cd traefik-kubernetes-scaleway-demo
Provision Traefik as an Ingress Controller
Apply role based access control to authorize Traefik to use the Kubernetes API:
123
$ kubectl apply -f traefik/01-traefik-rbac.yaml
clusterrole.rbac.authorization.k8s.io/traefik-ingress-controller created
clusterrolebinding.rbac.authorization.k8s.io/traefik-ingress-controller created
Consulting Traefik’s documentation, when deploying Traefik, it’s possible to use a deployment or a demonset, not both. More details on why
I will go ahead and apply the Daemon Set:
1234
$ kubectl apply -f traefik/03-traefik-ds.yaml
serviceaccount/traefik-ingress-controller created
daemonset.extensions/traefik-ingress-controller created
service/traefik-ingress-service created
The Traefik UI Service will be associated with a FQDN, remember to set the FQDN for the endpoint, as example:
$ kubectl apply -f logos-app/logos-services.yaml
service/openfaas created
service/rancher created
service/python created
Create the deployment:
1234
$ kubectl apply -f logos-app/logos-deployments.yaml
deployment.extensions/openfaas created
deployment.extensions/rancher created
deployment.extensions/python created
Before creating the ingress for the logo’s applications, we need to set the fqdn endpoints that we want to route traffic to as below as an example:
$ kubectl apply -f logos-app/logos-ingress.yaml
ingress.extensions/logo created
After some time, have a look at the pods to get the status:
12345678
$ kubectl get pods
NAME                                     READY   STATUS    RESTARTS   AGE
openfaas-cffdddc4-lvn5w                  1/1     Running   0          4m6s
openfaas-cffdddc4-wbcl6                  1/1     Running   0          4m6s
python-65ccf9c74b-8kmgp                  1/1     Running   0          4m6s
python-65ccf9c74b-dgnqb                  1/1     Running   0          4m6s
rancher-597b6b8554-mgcjr                 1/1     Running   0          4m6s
rancher-597b6b8554-mpk62                 1/1     Running   0          4m6s
Navigating with Kubectl
Show nodes:
12345
$ kubectl get nodes
NAME                                             STATUS   ROLES    AGE   VERSION
scw-k8s-mystifying-torvald-jovial-mclar-25a942   Ready    node     20h   v1.14.1
scw-k8s-mystifying-torvald-jovial-mclar-eaf1a2   Ready    node     20h   v1.14.1
scw-k8s-mystifying-torvalds-default-7f263aabab   Ready    master   20h   v1.14.1
Show services:
123456
$ kubectl get services
NAME                    TYPE        CLUSTER-IP     EXTERNAL-IP   PORT(S)           AGE
kubernetes              ClusterIP   10.32.0.1      <none>        443/TCP           20h
openfaas                ClusterIP   10.41.47.185   <none>        80/TCP            9h
python                  ClusterIP   10.42.56.141   <none>        80/TCP            9h
rancher                 ClusterIP   10.32.41.218   <none>        80/TCP            9h
Show Pods:
To see pods from the kube-system namespace add -n kube-system
12345678
$ kubectl get pods
NAME                                     READY   STATUS    RESTARTS   AGE
openfaas-cffdddc4-lvn5w                  1/1     Running   0          9h
openfaas-cffdddc4-wbcl6                  1/1     Running   0          9h
python-65ccf9c74b-8kmgp                  1/1     Running   0          9h
python-65ccf9c74b-dgnqb                  1/1     Running   0          9h
rancher-597b6b8554-mgcjr                 1/1     Running   0          9h
rancher-597b6b8554-mpk62                 1/1     Running   0          9h
Show deployments:
12345
$ kubectl get deployments -o wide
NAME                    READY   UP-TO-DATE   AVAILABLE   AGE   CONTAINERS  IMAGES                      SELECTOR
openfaas                2/2     2            2           9h    logo        ruanbekker/logos:openfaas   app=logo,task=openfaas
python                  2/2     2            2           9h    logo        ruanbekker/logos:python     app=logo,task=python
rancher                 2/2     2            2           9h    logo        ruanbekker/logos:rancher    app=logo,task=rancher
Show ingress:
123
$ kubectl get ingress -o wide
NAME      HOSTS                                                          ADDRESS   PORTS   AGE
logo      openfaas.domain.com,rancher.domain.com,python.domain.com       80      9h
Show system ingress:
123
$ kubectl get ingress -o wide -n kube-system
NAME             HOSTS                     ADDRESS   PORTS   AGE
traefik-web-ui   traefik-ui.domain.com               80      9h
Access your Applications
Access the Traefik-UI, and filter for one of the applications. Let’s take OpenFaaS for an example:
At this time of writing (2019.06.10) Scaleway’s Kubernetes as a Service, named Kapsule is in Private Beta and got access and pretty stoked on how easy it is to provision a Kubernetes cluster.
What are we doing today?
In this tutorial I will show you how easy it is to provision a 3 node Kubernetes Cluster on Scaleway. In the upcoming tutorial, I will create traefik as an ingress controller and deploy applications to our cluster. Github Repo Version available for now
Provision a Kapsule Cluster
Head over to Kapsule and provision a Kubernetes Cluster:
At this point in time, I will only create a one node “cluster”, as I want to show how to add pools after the intial creation.
After the cluster has been provisioned, you will get information about your endpoints from the Cluster Infromation Section, which we will need for our ingresses:
Test the connection by getting the info of your nodes in your kubernetes cluster:
123
$ kubectl get node
NAME                                             STATUS    ROLES     AGE       VERSION
scw-k8s-mystifying-torvalds-default-7f263aabab   Ready     <none>    4m        v1.14.1
Add more nodes:
Provision another pool with 2 more nodes in our cluster:
After the pool has been provisioned, verified that they have joined the cluster:
12345
$ kubectl get nodes
NAME                                             STATUS    ROLES     AGE       VERSION
scw-k8s-mystifying-torvald-jovial-mclar-25a942   Ready     <none>    2m        v1.14.1
scw-k8s-mystifying-torvald-jovial-mclar-eaf1a2   Ready     <none>    2m        v1.14.1
scw-k8s-mystifying-torvalds-default-7f263aabab   Ready     <none>    15m       v1.14.1
Master / Node Capabilities
Usually, I will label master nodes as master: node-role.kubernetes.io/master and worker nodes as nodes: node-role.kubernetes.io/node to allow container scheduling only on the worker nodes. But Scaleway manages this on their end and when you list your nodes, the nodes that you see are your “worker” nodes.
The master nodes are managed by Scaleway.
Well Done Scaleway
Just one more reason I really love Kapsule. Simplicity at its best, well done to Scaleway. I hope most of the people got access to private beta, but if not, im pretty sure they will keep the public informed on public release dates.
As many of you might know, when you deploy a ELK stack on Amazon Web Services, you only get E and K in the ELK stack, which is Elasticsearch and Kibana. Here we will be dealing with Logstash on EC2.
What will we be doing
In this tutorial we will setup a Logstash Server on EC2, setup a IAM Role and Autenticate Requests to Elasticsearch with an IAM Role, setup Nginx so that logstash can ship logs to Elasticsearch.
I am not fond of working with access key’s and secret keys, and if I can stay away from handling secret information the better. So instead of creating a access key and secret key for logstash, we will instead create a IAM Policy that will allow the actions to Elasticsearch, associate that policy to an IAM Role, set EC2 as a trusted entity and strap that IAM Role to the EC2 Instance.
Then we will allow the IAM Role ARN to the Elasticsearch Policy, then when Logstash makes requests against Elasticsearch, it will use the IAM Role to assume temporary credentials to authenticate. That way we don’t have to deal with keys. But I mean you can create access keys if that is your preferred method, I’m just not a big fan of keeping secret keys.
The benefit of authenticating with IAM, allows you to remove a reverse proxy that is another hop to the path of your target.
Create the IAM Policy:
Create a IAM Policy that will allow actions to Elasticsearch:
Note that the aws_ directives has been left empty as that seems to be the way it needs to be set when using roles. Authentication will be assumed via the Role which is associated to the EC2 Instance.
If you are using access keys, you can populate them there.
Start Logstash
Start logstash:
1
$ service logstash start
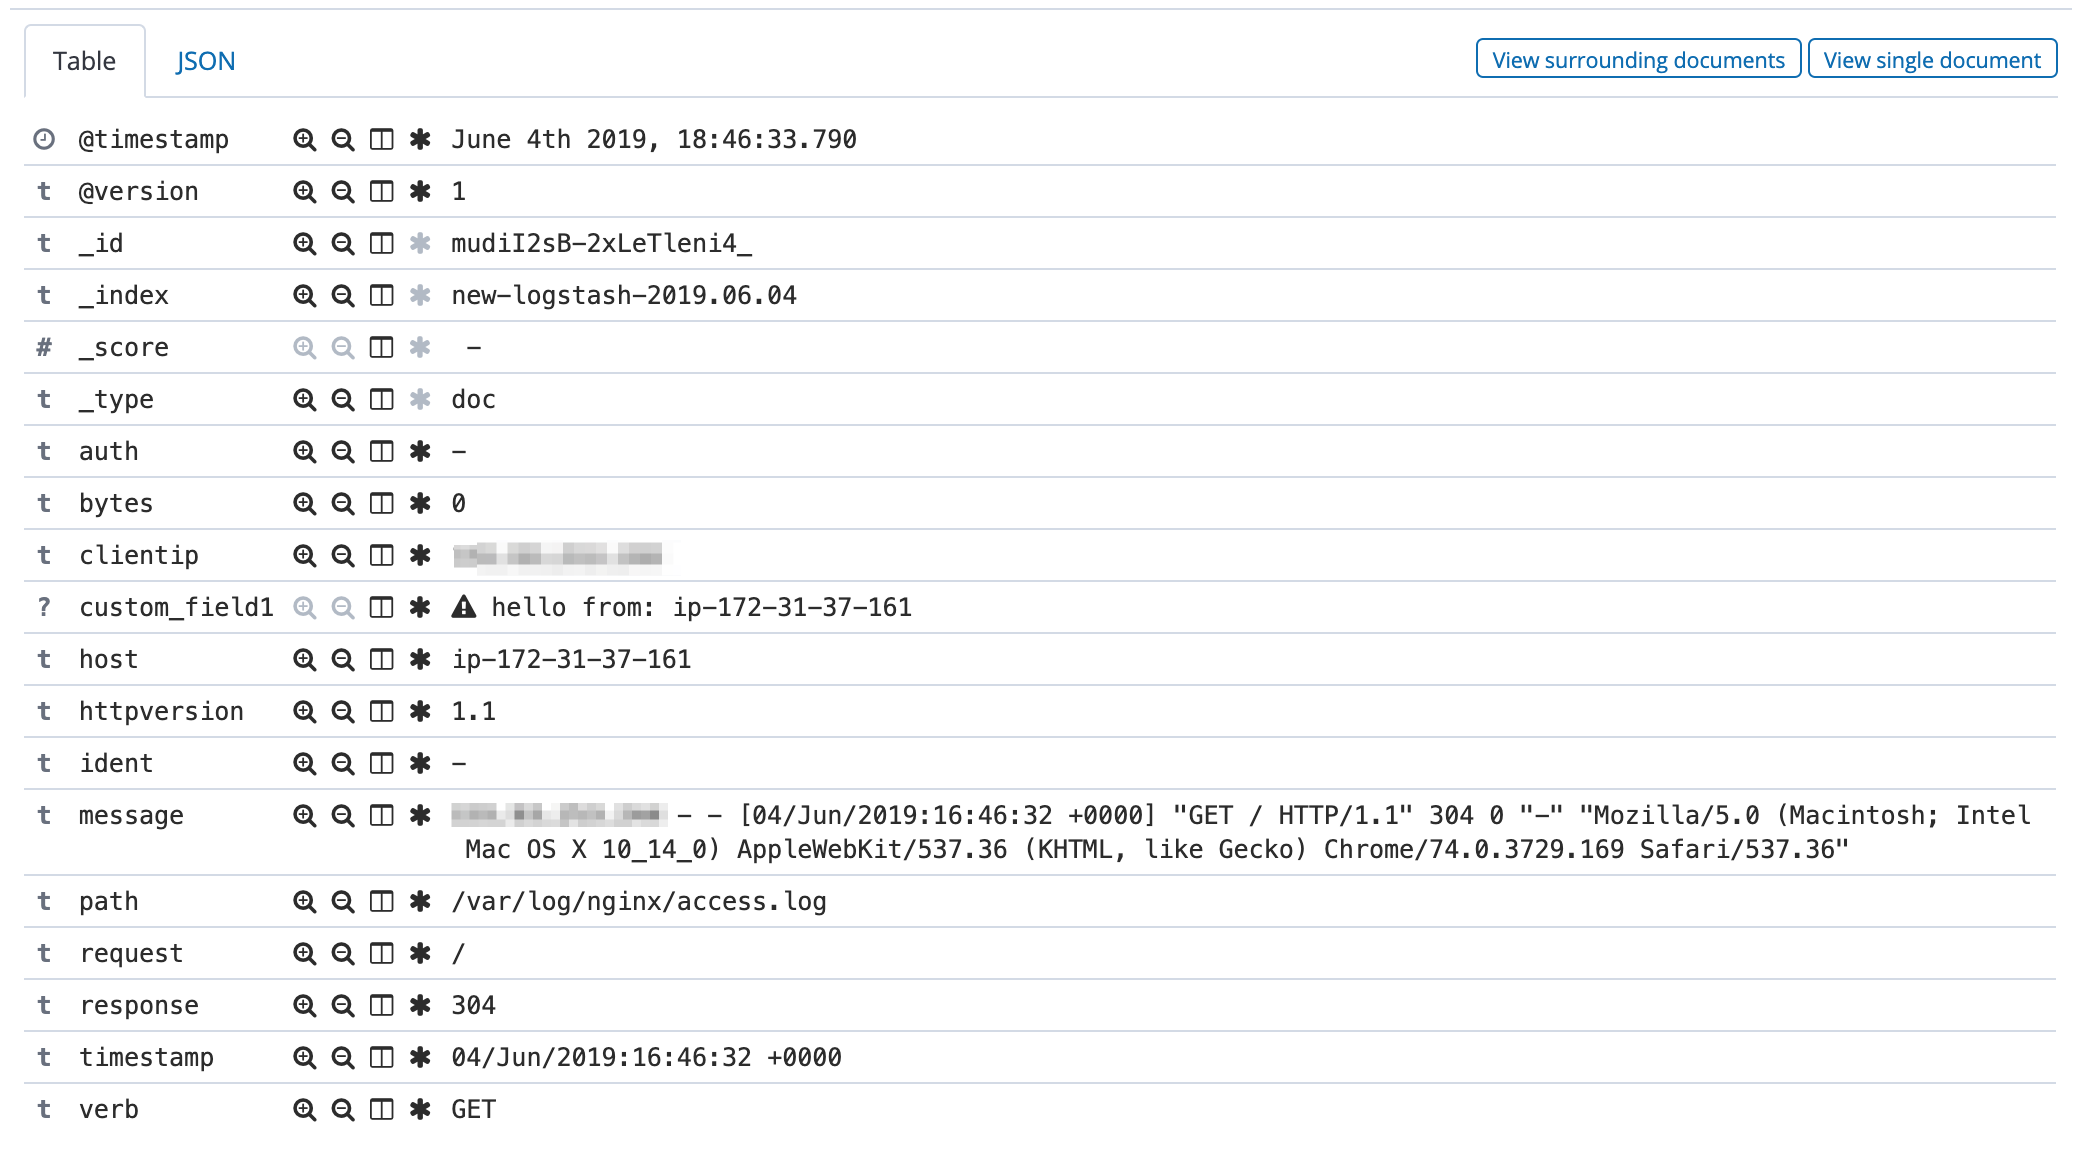
Tail the logs to see if logstash starts up correctly, it should look more or less like this:
123456
$ tail -f /var/log/logstash/logstash-plain.log
[2019-06-04T16:38:12,087][INFO ][logstash.runner ] Starting Logstash {"logstash.version"=>"6.8.0"}
[2019-06-04T16:38:14,480][INFO ][logstash.pipeline ] Starting pipeline {:pipeline_id=>"main", "pipeline.workers"=>2, "pipeline.batch.size"=>125, "pipeline.batch.delay"=>50}
[2019-06-04T16:38:15,226][INFO ][logstash.outputs.elasticsearch] Elasticsearch pool URLs updated {:changes=>{:removed=>[], :added=>[https://search-my-es-domain-xx.eu-west-1.es.amazonaws.com:443/]}}
[2019-06-04T16:38:15,234][INFO ][logstash.outputs.elasticsearch] Running health check to see if an Elasticsearch connection is working {:healthcheck_url=>https://search-my-es-domain-xx.eu-west-1.es.amazonaws.com:443/, :path=>"/"}
Install Nginx
As you noticed, I have specified /var/log/nginx/access.log as my input file for logstash, as we will test logstash by shipping nginx access logs to Elasticsearch Service.
Vagrant makes it really easy to provision virtual servers, which they refer as “boxes”, that enables developers to run their jobs/tasks/applications in a really easy and fast way. Vagrant utilizes a declarative configuration model, so you can describe which OS you want, bootstrap them with installation instructions as soon as it boots, etc.
What are we doing today?
When completing this tutorial, you should be able to launch a Ubuntu Virtual Server locally with Vagrant and using the Virtualbox Provider which will be responsible for running our VM’s.
I am running this on a Ubuntu 19 Desktop, but you can run this on Mac/Windows/Linux. First we will install Virtualbox, then Vagrant, then we will provision a Ubuntu box and I will also show how to inject shell commands into your Vagrantfile so that you can provision software to your VM, and also forward traffic to a web server through your host to the guest.
Head over to Virtualbox’s download page and grab the latest version of virtualbox and install it.
After the installation run vboxconfig to build the kernel modules. If you get the error that I received as seen below:
123456
$ sudo /sbin/vboxconfig
vboxdrv.sh: Building VirtualBox kernel modules
vboxdrv.sh: Starting VirtualBox services
vboxdrv.sh: Building VirtualBox kernel modules
vboxdrv.sh: failed: modprobe vboxdrv failed. Please use 'dmesg' to find out why
This resource on askubuntu.com helped me out. In short, theres a requirement that all the kernel modules must be signed by a key trusted by the UEFI system.
Remember the password, as you will require it when you reboot. You will get the option to “Enroll MOK”, select that, enter the initial password and reboot.
1
$ sudo reboot
You should be able to get a response from the binary:
12
$ VirtualBox -h
Oracle VM VirtualBox VM Selector v6.0.6_Ubuntu
Install Vagrant
Head over to Vagrant’s installation page, get the latest version for your operating system and install it.
After installing it you should get the following response:
12
$ vagrant --version
Vagrant 2.2.4
Provision a Box with Vagrant
When you head over to app.vagrantup.com/boxes/search you can select the pre-packed operating system of your choice. As for this demonstration, I went with: ubuntu/trusty64
First we will need to initialize a new Vagrant environment by creating a Vagrantfile, as we will be passing the name of our operating system, it will be populated in our Vagrantfile:
123456
$ vagrant init ubuntu/trusty64
A `Vagrantfile` has been placed in this directory. You are now
ready to `vagrant up` your first virtual environment! Please read
the comments in the Vagrantfile as well as documentation on
`vagrantup.com` for more information on using Vagrant.
Now since the Vagrantfile has been placed in our current working directory, let’s have a look at it:
As you can see the Vagrantfile has a set of instructions of how we want our VM to be. At this moment you will only see that the image is defined as ubuntu/trusty64.
Let’s start our VM:
12345678910111213141516171819
$ vagrant up
Bringing machine 'default' up with 'virtualbox' provider...
==> default: Importing base box 'ubuntu/trusty64'...
==> default: Matching MAC address for NAT networking...
==> default: Checking if box 'ubuntu/trusty64' version '20190429.0.1' is up to date...
==> default: Setting the name of the VM: vagrant_default_1559238982328_97737
==> default: Clearing any previously set forwarded ports...
default: Adapter 1: nat
==> default: Forwarding ports...
default: 22 (guest) => 2222 (host) (adapter 1)
==> default: Booting VM...
==> default: Waiting for machine to boot. This may take a few minutes...
default: SSH address: 127.0.0.1:2222
default: SSH username: vagrant
default: SSH auth method: private key
default:
default: Vagrant insecure key detected. Vagrant will automatically replace
default: this with a newly generated keypair for better security.
Now that our VM has been booted, we can ssh to our server by simply running:
12
$ vagrant ssh
ubuntu-server $
Making changes to your config
So let’s say we want to edit our Vagrantfile to provide shell commands to install nginx and forward our host port 8080 to our guest port 80, so that we can access our VM’s webserver on localhost using port 8080.
This is a curated list of tutorials of prometheus, from installing prometheus, installing grafana, exporters, docker versions of the prometheus / grafana / node exporter stack, etc.