Ruan Bekker's Blog

From a Curious mind to Posts on Github

How to Read and Write Json Data With Python

This is a short tutorial on how to use python to write and read files.

Example

To write the following json data:

1
{"name": "ruan"}

To a file named /tmp/data.json, we will be using this code:

1
2
3
4
5
import json

data = {"name": "ruan"}
with open('data.json', 'w') as f:
    f.write(json.dumps(data))

When we execute that code, we will find the data inside that file:

1
2
$ cat /tmp/data.json
{"name": "ruan"}

And if we want to use python to read the data:

1
2
3
4
import json

with open('data.json', 'r') as f:
    json.loads(f.read())

When we execute that code, we will see:

1
{'name': 'ruan'}

Thank You

Thanks for reading, feel free to check out my website, read my newsletter or follow me at @ruanbekker on Twitter.

Setup Linkding Bookmarks Manager on Docker

Note: Originally posted on containers.fan

I’ve stumbled upon a great bookmarks manager service called Linkding. What I really like about it, it allows you to save your bookmarks, assign tags to it to search for it later, it has chrome and firefox browser extensions, and comes with an API.

Installing Linkding

We will be using Traefik to do SSL termination and host based routing, if you don’t have Traefik running already, you can follow this post to get that set up:

You can follow the linkding documentation for more detailed information.

The docker-compose.yml that I will be use:

1
2
3
4
5
6
7
8
9
10
11
12
13
14
15
16
17
18
19
20
21
22
23
24
25
26
27
28
29
version: "3.8"

services:
  linkding:
    image: sissbruecker/linkding:latest
    container_name: linkding
    volumes:
      - ./data:/etc/linkding/data
    environment:
      - LD_DISABLE_BACKGROUND_TASKS=False
      - LD_DISABLE_URL_VALIDATION=False
    restart: unless-stopped
    cpus: 0.5
    mem_limit: 512m
    networks:
      - public
    labels:
      - "traefik.enable=true"
      - "traefik.http.routers.linkding-app.rule=Host(`linkding.yourdomain.net`)"
      - "traefik.http.routers.linkding-app.entrypoints=https"
      - "traefik.http.routers.linkding-app.tls.certresolver=letsencrypt"
    logging:
      driver: "json-file"
      options:
        max-size: "1m"

networks:
  public:
    name: public

Make sure to replace the FQDN of your choice, as I used linkding.yourdomain.net as an example.

Once everything is in place, boot the stack:

1
docker-compose up -d

Admin Account Registration

Once your linkding container has booted, you can create a admin user with the following command (ensure to replace where needed):

1
docker-compose exec linkding python manage.py createsuperuser --username=admin --email=root@localhost

Once you head over to the linkding url that you provided and you logon, you should be able to see something like this:

linkding

Creating Bookmarks

When you select “Add Bookmark” and you provide the URL, linkding will retrieve the title and the description and populate it for you, and you can provide the tags (seperated by spaces):

linkding-bookmark

Browser Extensions

To add a browser extension, select “Settings”, then “Integrations”, then you will find the link to the browser extension for Chrome and Firefox:

linkding-browser-extension

After you install the browser extension and click on it for the first time, it will ask you to set the Linkding Base URL and API Authentication Token:

linkding-configuration

You can find that at the bottom of the “Integrations” section:

linkding-rest-api-access

REST API

You can follow the API Docs for more information, using an example to search for bookmarks with the term “docker”:

1
curl -sL -H "Authorization: Token ${LINKDING_API_TOKEN}" "https://linkding.${DOMAIN}/api/bookmarks?q=docker" | python3 -m json.tool

In my case returns a response like the following:

1
2
3
4
5
6
7
8
9
10
11
12
13
14
15
16
17
18
19
20
21
22
{
    "count": 1,
    "next": null,
    "previous": null,
    "results": [
        {
            "id": 6,
            "url": "https://www.docker.com/blog/deploying-web-applications-quicker-and-easier-with-caddy-2/",
            "title": "",
            "description": "",
            "website_title": "Deploying Web Applications Quicker and Easier with Caddy 2 - Docker",
            "website_description": "Deploying web apps can be tough, even with leading server technologies. Learn how you can use Caddy 2 and Docker simplify this process.",
            "is_archived": false,
            "tag_names": [
                "caddy",
                "docker"
            ],
            "date_added": "2022-05-31T19:11:53.739002Z",
            "date_modified": "2022-05-31T19:11:53.739016Z"
        }
    ]
}

Thank You

Thanks for reading, feel free to check out my website, read my newsletter or follow me at @ruanbekker on Twitter.

Python Flask Forms With Jinja Templating

ruanbekker-blog

In this tutorial, we will demonstrate how to use Python Flask and render_template to use Jinja Templating with our Form. The example is just a ui that accepts a firstname, lastname and email address and when we submit the form data, it renders on a table.

Install Flask

Create a virtual environment and install python flask

1
2
3
python3 -m pip install virtualenv
python3 -m virtualenv -p python3 .venv
source .venv/bin/activate

The Code

First we will create our application code in app.py:

1
2
3
4
5
6
7
8
9
10
11
12
13
14
15
16
17
18
19
20
from flask import Flask, render_template, request

app_version = '1.1.0'

app = Flask(__name__)

@app.route('/')
def root():
    return render_template('form.html')

@app.route('/result',methods = ['POST', 'GET'])
def result():
    if request.method == 'POST':
        result = request.form
        json_result = dict(result)
        print(json_result)
        return render_template("result.html", result=result, app_version=app_version)

if __name__ == '__main__':
    app.run(debug = True)

As you can see our first route / will render the template in form.html. Our second route /result a couple of things are happening:

  • If we received a POST method, we will capture the form data
  • We are then casting it to a dictionary data type
  • Print the results out of our form data (for debugging)
  • Then we are passing the result object and the app_version variable to our template where it will be parsed.

When using render_template all html files resides under the templates directory, so let’s first create our base.html file that we will use as a starting point in templates/base.html:

1
mkdir templates

Then in your templates/base.html:

In our templates/form.html we have our form template, and you can see we are referencing our base.html in our template to include the first bit:

Then our last template templates/result.html is used when we click on submit, when the form data is displayed in our table:

So our directory structure should look like this:

1
2
3
4
5
6
7
├── app.py
└── templates
    ├── base.html
    ├── form.html
    └── result.html

1 directory, 4 files

Then run the server:

1
python app.py

Screenshots

It should look like the following when you access http://localhost:5000/

python-flask-forms

After entering your form data, select “Submit”, then you should see the following:

python-flask-forms

So you can see that our request data was parsed through the template and our app version variable as well.

Thank You

Thanks for reading, if you like my content, check out my website, read my newsletter or follow me at @ruanbekker on Twitter.

ruanbekker-cheatsheets

Prometheus Relabel Config Examples

This is a quick demonstration on how to use prometheus relabel configs, when you have scenarios for when example, you want to use a part of your hostname and assign it to a prometheus label.

Prometheus Relabling

Using a standard prometheus config to scrape two targets: - ip-192-168-64-29.multipass:9100 - ip-192-168-64-30.multipass:9100

1
2
3
4
5
6
7
8
9
10
11
12
13
14
15
16
17
18
19
20
global:
  scrape_interval:     15s
  evaluation_interval: 15s
  external_labels:
    cluster: 'local'

scrape_configs:
  - job_name: 'prometheus'
    scrape_interval: 15s
    static_configs:
    - targets: ['localhost:9090']

  - job_name: 'multipass-nodes'
    static_configs:
    - targets: ['ip-192-168-64-29.multipass:9100']
      labels:
        test: 1
    - targets: ['ip-192-168-64-30.multipass:9100']
      labels:
        test: 1

The Result:

image

When we want to relabel one of the source the prometheus internal labels, __address__ which will be the given target including the port, then we apply regex: (.*) to catch everything from the source label, and since there is only one group we use the replacement as ${1}-randomtext and use that value to apply it as the value of the given target_label which in this case is for randomlabel, which will be in this case:

1
2
3
4
5
6
7
8
9
10
11
12
13
14
15
16
17
18
19
20
21
22
23
24
25
global:
  scrape_interval:     15s
  evaluation_interval: 15s
  external_labels:
    cluster: 'local'

scrape_configs:
  - job_name: 'prometheus'
    scrape_interval: 15s
    static_configs:
    - targets: ['localhost:9090']

  - job_name: 'multipass-nodes'
    static_configs:
    - targets: ['ip-192-168-64-29.multipass:9100']
      labels:
        test: 3
    - targets: ['ip-192-168-64-30.multipass:9100']
      labels:
        test: 3
    relabel_configs:
    - source_labels: [__address__]
      regex: '(.+)'
      replacement: '${1}-randomtext'
      target_label: randomlabel

The Result:

image

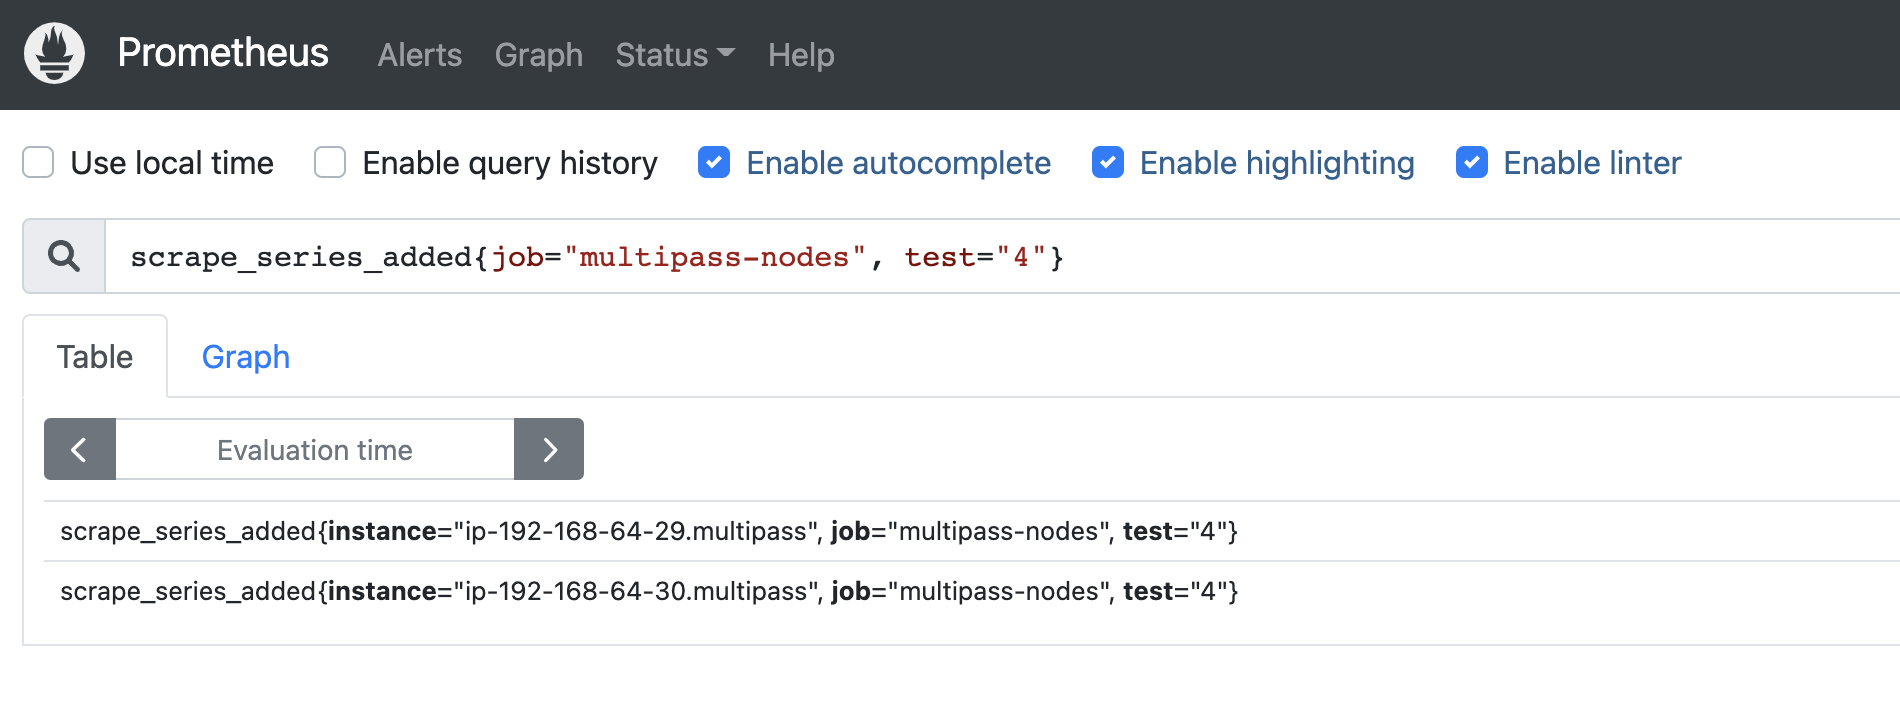
In this case we want to relabel the __address__ and apply the value to the instance label, but we want to exclude the :9100 from the __address__ label:

1
2
3
4
5
6
7
8
9
10
11
12
13
14
15
16
17
18
19
20
21
22
23
24
25
26
27
# Config: https://github.com/prometheus/prometheus/blob/release-2.36/config/testdata/conf.good.yml
global:
  scrape_interval:     15s
  evaluation_interval: 15s
  external_labels:
    cluster: 'local'

scrape_configs:
  - job_name: 'prometheus'
    scrape_interval: 15s
    static_configs:
    - targets: ['localhost:9090']

  - job_name: 'multipass-nodes'
    static_configs:
    - targets: ['ip-192-168-64-29.multipass:9100']
      labels:
        test: 4
    - targets: ['ip-192-168-64-30.multipass:9100']
      labels:
        test: 4
    relabel_configs:
    - source_labels: [__address__]
      separator: ':'
      regex: '(.*):(.*)'
      replacement: '${1}'
      target_label: instance

The Result:

image

AWS EC2 SD Configs

On AWS EC2 you can make use of the ec2_sd_config where you can make use of EC2 Tags, to set the values of your tags to prometheus label values.

In this scenario, on my EC2 instances I have 3 tags: - Key: PrometheusScrape, Value: Enabled - Key: Name, Value: pdn-server-1 - Key: Environment, Value: dev

In our config, we only apply a node-exporter scrape config to instances which are tagged PrometheusScrape=Enabled, then we use the Name tag, and assign it’s value to the instance tag, and the similarly we assign the Environment tag value to the environment promtheus label value.

Because this prometheus instance resides in the same VPC, I am using the __meta_ec2_private_ip which is the private ip address of the EC2 instance to assign it to the address where it needs to scrape the node exporter metrics endpoint:

1
2
3
4
5
6
7
8
9
10
11
12
13
14
15
16
17
18
scrape_configs:
  - job_name: node-exporter
    scrape_interval: 15s
    ec2_sd_configs:
    - region: eu-west-1
      port: 9100
      filters:
        - name: tag:PrometheusScrape
          values:
            - Enabled
    relabel_configs:
    - source_labels: [__meta_ec2_private_ip]
      replacement: '${1}:9100'
      target_label: __address__
    - source_labels: [__meta_ec2_tag_Name]
      target_label: instance
    - source_labels: [__meta_ec2_tag_Environment]
      target_label: environment

You will need a EC2 Ready Only instance role (or access keys on the configuration) in order for prometheus to read the EC2 tags on your account.

See their documentation for more info.

Stack

The docker-compose used:

1
2
3
4
5
6
7
8
9
10
11
12
13
14
15
16
17
18
19
20
21
22
23
24
25
26
27
28
29
30
31
32
33
version: '3.8'

services:
  prometheus:
    image: prom/prometheus
    container_name: 'prometheus'
    user: root
    restart: unless-stopped
    volumes:
      - ./prometheus.yml:/etc/prometheus/prometheus.yml
      - prometheus-data:/prometheus
    command:
      - '--config.file=/etc/prometheus/prometheus.yml'
      - '--storage.tsdb.path=/prometheus'
      - '--storage.tsdb.retention=14d'
      - '--web.console.libraries=/etc/prometheus/console_libraries'
      - '--web.console.templates=/etc/prometheus/consoles'
      - '--web.external-url=http://prometheus.127.0.0.1.nip.io'
    ports:
      - 9090:9090
    networks:
      - public
    logging:
      driver: "json-file"
      options:
        max-size: "1m"

networks:
  public:
    name: public

volumes:
  prometheus-data: {}

References

Usful docs:

Thank You

Thanks for reading, if you like my content, check out my website, read my newsletter or follow me at @ruanbekker on Twitter.

Create a AWS Lambda Layer With Docker

In this tutorial we will be creating a AWS Lambda Python Layer that will include the Python Requests package and we will compile the package with Docker and the LambCI image.

Getting Started

First we will create the directory where we will store the intermediate data:

1
2
$ mkdir lambda-layers
$ cd lambda-layers

Then we will create the directory structure, as you can see I will be using the python 3.8 runtime:

1
2
$ mkdir -p requests/python/lib/python3.8
$ cd requests

Write the dependencies to the requirements file:

1
$ echo "requests" > requirements.txt

Install dependencies locally using docker, where we will be using the lambci/lambda:build-python3.8 iamge and we are mounting our current working directory to /var/task inside the container, and then we will be running the command pip install -r requirements.txt -t python/lib/python3.7/site-packages/; exit inside the container, which will essentially dump the content to our working directory:

1
2
3
$ docker run -v $PWD:/var/task \
   lambci/lambda:build-python3.8 \
   sh -c "pip install -r requirements.txt -t python/lib/python3.8/site-packages/; exit"

Zip up the deployment package that we will push to AWS Lambda Layers:

1
$ zip -r package.zip python > /dev/null

Publish the layer using the aws cli tools, by specifying the deployment package, the compatible runtime and a identifier:

1
2
3
4
5
$ aws --profile dev lambda \
   publish-layer-version --layer-name python-requests \
   --description "Python Requests using 3.8 Runtime" \
   --zip-file fileb://package.zip \
   --compatible-runtime "python3.8"

Then when you want to reference the layer on the functio that you want to create, you can do it like this:

1
2
3
4
5
$ aws lambda create-function --function-name test-requests \
   --runtime python3.8 \
   --handler lambda_function.lambda_handler \
   --role "" --layers "arn:aws:lambda:eu-west-1:xxxxxxxxxxxx:layer:test-requests" \
   --code "S3Bucket=string,S3Key=string"

Thank You

Thanks for reading, if you like my content, check out my website, read my newsletter or follow me at @ruanbekker on Twitter.

Credit to oznetnerd.com.

Customize VIM Editor With a Brand New Look

In this tutorial we will customize the vim editor, by adding the molokai color scheme, change a couple of basic settings (more suited for my preference - not too much) and add a couple of plugins that will change the look to something like this:

image

About Vim

vim has always been my favorite linux text editor, which is super powerful and highly customizable

Install Vim

Update indexes:

1
sudo apt update

Install vim:

1
sudo apt install vim -y

Color Scheme

To find all existing vim color schemes installed:

1
find /usr/share/vim/vim*/colors/ -type f -name "*.vim"

The output on mine shows:

1
2
3
4
/usr/share/vim/vim81/colors/desert.vim
/usr/share/vim/vim81/colors/default.vim
/usr/share/vim/vim81/colors/murphy.vim
...

I will be opting for molokai, so first create the directory where we will download our color scheme:

1
mkdir -p ~/.vim/colors

Then download the color scheme:

1
curl -o ~/.vim/colors/molokai.vim https://raw.githubusercontent.com/tomasr/molokai/master/colors/molokai.vim

By default our color scheme will look like this when we create foo.py:

image

When we hit the “esc” button, and enter :colorscheme molokai we can change the colorscheme to molokai, and then we should have the following:

image

To persist these changes, open up ~/.vimrc and paste the following as a starter:

1
2
colorscheme molokai
syntax on

Now when we open up foo.py we will see that it defaults to the molokai color scheme.

Vim Configuration

Everyone has their own personal preference on vim configs, but I like to keep mine basic, and this is the content of my ~/.vimrc:

1
2
3
4
5
6
7
8
9
10
11
12
13
14
15
colorscheme molokai
syntax on
set mouse-=a

filetype on
filetype indent plugin on
set noexpandtab " tabs ftw
set smarttab " tab respects 'tabstop', 'shiftwidth', and 'softtabstop'
set tabstop=4 " the visible width of tabs
set softtabstop=4 " edit as if the tabs are 4 characters wide
set shiftwidth=4 " number of spaces to use for indent and unindent
set shiftround " round indent to a multiple of 'shiftwidth'

autocmd FileType yml setlocal ts=2 sts=2 sw=2 expandtab
autocmd FileType yaml setlocal ts=2 sts=2 sw=2 expandtab

Plugins

The ~/.vimrc:

1
2
3
4
5
6
7
8
9
10
11
12
13
14
15
16
17
18
19
20
21
22
23
24
25
26
27
28
29
30
31
32
33
34
35
36
37
38
39
40
41
42
43
44
45
46
47
48
49
50
51
52
53
54
55
56
57
58
59
60
61
62
63
64
65
66
67
68
69
70
71
72
73
74
75
76
77
78
79
80
81
82
83
84
85
86
87
88
89
90
91
92
93
94
95
96
97
98
99
100
101
102
103
104
105
106
107
108
109
110
111
112
113
114
115
116
117
118
119
120
121
122
123
124
125
126
127
128
129
130
131
132
133
134
135
136
137
138
"" https://github.com/VundleVim/Vundle.vim
set nocompatible
filetype off
" set the runtime path to include Vundle and initialize
set rtp+=~/.vim/bundle/Vundle.vim
call vundle#begin()
" alternatively, pass a path where Vundle should install plugins
"call vundle#begin('~/some/path/here')

" let Vundle manage Vundle, required
Plugin 'VundleVim/Vundle.vim'

" The following are examples of different formats supported.
" Keep Plugin commands between vundle#begin/end.
" plugin on GitHub repo
Plugin 'tpope/vim-fugitive'
" plugin from http://vim-scripts.org/vim/scripts.html
" Plugin 'L9'
" Git plugin not hosted on GitHub
Plugin 'git://git.wincent.com/command-t.git'
" git repos on your local machine (i.e. when working on your own plugin)
" Plugin 'file:///home/gmarik/path/to/plugin'
" The sparkup vim script is in a subdirectory of this repo called vim.
" Pass the path to set the runtimepath properly.
Plugin 'rstacruz/sparkup', {'rtp': 'vim/'}
" Install L9 and avoid a Naming conflict if you've already installed a
" different version somewhere else.
" Plugin 'ascenator/L9', {'name': 'newL9'}

" All of your Plugins must be added before the following line
call vundle#end()            " required
filetype plugin indent on    " required
" To ignore plugin indent changes, instead use:
"filetype plugin on
"
" Brief help
" :PluginList       - lists configured plugins
" :PluginInstall    - installs plugins; append `!` to update or just :PluginUpdate
" :PluginSearch foo - searches for foo; append `!` to refresh local cache
" :PluginClean      - confirms removal of unused plugins; append `!` to auto-approve removal
"
" see :h vundle for more details or wiki for FAQ
" Put your non-Plugin stuff after this line

" colorscheme duo-mini
" sets color themes
colorscheme molokai
syntax on

" sets the filename at the bottom
set laststatus=2
" https://github.com/itchyny/lightline.vim
Plugin 'itchyny/lightline.vim'

" https://github.com/Shougo/neobundle.vim
" Note: Skip initialization for vim-tiny or vim-small.
if 0 | endif

if &compatible
  set nocompatible               " Be iMproved
endif

" Required:
set runtimepath+=~/.vim/bundle/neobundle.vim/

" Required:
call neobundle#begin(expand('~/.vim/bundle/'))

" Let NeoBundle manage NeoBundle
" Required:
NeoBundleFetch 'Shougo/neobundle.vim'

" My Bundles here:
" Refer to |:NeoBundle-examples|.
" Note: You don't set neobundle setting in .gvimrc!
NeoBundle 'itchyny/lightline.vim'
call neobundle#end()

" Required:
filetype plugin indent on

" If there are uninstalled bundles found on startup,
" this will conveniently prompt you to install them.
NeoBundleCheck

" https://github.com/junegunn/vim-plug
" Specify a directory for plugins
" - For Neovim: stdpath('data') . '/plugged'
" - Avoid using standard Vim directory names like 'plugin'
call plug#begin('~/.vim/plugged')

" Make sure you use single quotes

" Shorthand notation; fetches https://github.com/junegunn/vim-easy-align
Plug 'junegunn/vim-easy-align'

" Any valid git URL is allowed
Plug 'https://github.com/junegunn/vim-github-dashboard.git'

" Multiple Plug commands can be written in a single line using | separators
"Plug 'SirVer/ultisnips' | Plug 'honza/vim-snippets'

" On-demand loading
Plug 'scrooloose/nerdtree', { 'on':  'NERDTreeToggle' }
Plug 'tpope/vim-fireplace', { 'for': 'clojure' }

" Using a non-master branch
Plug 'rdnetto/YCM-Generator', { 'branch': 'stable' }

" Using a tagged release; wildcard allowed (requires git 1.9.2 or above)
Plug 'fatih/vim-go', { 'tag': '*' }

" Plugin options
Plug 'nsf/gocode', { 'tag': 'v.20150303', 'rtp': 'vim' }

" Plugin outside ~/.vim/plugged with post-update hook
Plug 'junegunn/fzf', { 'dir': '~/.fzf', 'do': './install --all' }

" Unmanaged plugin (manually installed and updated)
Plug '~/my-prototype-plugin'

Plug 'itchyny/lightline.vim'

" Initialize plugin system
call plug#end()

" sets the filename as the title up top
" set title
" let g:airline#extensions#tabline#enabled = 1

set noexpandtab " tabs ftw
set smarttab " tab respects 'tabstop', 'shiftwidth', and 'softtabstop'
set tabstop=4 " the visible width of tabs
set softtabstop=4 " edit as if the tabs are 4 characters wide
set shiftwidth=4 " number of spaces to use for indent and unindent
set shiftround " round indent to a multiple of 'shiftwidth'
autocmd FileType yml setlocal ts=2 sts=2 sw=2 expandtab
autocmd FileType yaml setlocal ts=2 sts=2 sw=2 expandtab

Install the dependencies:

1
2
3
git clone https://github.com/Shougo/neobundle.vim ~/.vim/bundle/neobundle.vim
curl -fLo ~/.vim/autoload/plug.vim --create-dirs https://raw.githubusercontent.com/junegunn/vim-plug/master/plug.vim
git clone https://github.com/VundleVim/Vundle.vim.git ~/.vim/bundle/Vundle.vim

Install the plugins:

1
2
vim +NeoBundleInstall +qall
vim +PluginInstall +qall

Your vim editor should look like this:

image

Thank You

Thanks for reading, if you like my content, check out my website, read my newsletter or follow me at @ruanbekker on Twitter.

Create a Discord Bot in Python

discord-logo

In this tutorial we will develop our own Discord bot using Python.

The source code for this bot will be stored in my github repository

About the bot

First we will create a basic discord bot that will greet the message sender, and then we will create a Minecraft Bot, that will enable us to do the following:

1
2
3
4
5
:: Bot Usage ::
!mc help          : shows help
!mc serverusage   : shows system load in percentage
!mc serverstatus  : shows if the server is online or offline
!mc whoisonline   : shows who is online at the moment

Let’s get into it.

Dependencies

Create a python virtual environment and install the dependent packages:

1
2
3
4
$ python3 -m virtualenv .venv
$ source .venv/bin/activate
$ pip install discord
$ pip install python-dotenv

Create the Discord Application

We first need to create the application on discord and retrieve a token that our python app will require.

Create a application on discord:

You should see:

image

Click “New Application” and provide it a name:

image

Once you create the application you will get a screen to upload a logo, provide a description and most importantly get your application id as well as your public key:

image

Then select the Bot section:

image

Then select “Add Bot”:

image

Select OAuth2 and select the “bot” scope:

image

At the bottom of the page it will provide you with a URL that looks something like:

1
https://discord.com/api/oauth2/authorize?client_id=xxxxxxxxxxx&permissions=0&scope=bot

Paste the link in your browser and authorize the bot to your server of choice:

image

Then click authorize, and you should see your bot appearing on Discord:

image

Developing the Discord Bot

Now we will be building our python discord bot, head back to the “Bot” section and select “Reset Token”, then copy and store the token value to a file .env:

1
DISCORD_TOKEN=xxxxxxxxx

So in our current working directory, we should have a file .env with the following content:

1
2
$ cat .env
DISCORD_TOKEN=your-unique-token-value-will-be-here

For this demonstration, I will create a private channel in discord called minecraft-test and add the bot MinecraftBot to the channel (this is only for testing, after testing you can add your bot to your other channels for other people to use):

image

For our first test, a basic bot, where we would like to type hello and the bot should greet us by our username, in our mc_discord_bot.py file we will have:

1
2
3
4
5
6
7
8
9
10
11
12
13
14
15
16
17
18
19
20
21
22
23
24
25
import discord
import os
from dotenv import load_dotenv

BOT_NAME = "MinecraftBot"

load_dotenv()
DISCORD_TOKEN = os.getenv("DISCORD_TOKEN")

bot = discord.Client()

@bot.event
async def on_ready():
    print(f'{bot.user} has logged in.')

@bot.event
async def on_message(message):
    if message.author == bot.user:
        return
    if message.content == 'hello':
        await message.channel.send(f'Hey {message.author}')
    if message.content == 'goodbye':
        await message.channel.send(f'Goodbye {message.author}')

bot.run(DISCORD_TOKEN)

Then run the bot:

1
2
$ python mc_discord_bot.py
MinecraftBot has logged in.

And when we type hello and goodbye you can see our bot responds on those values:

image

Now that we tested our bot, we can clear the mc_discord_bot.py and write our minecraft bot, the requirements of this bot is simple, but we would like the following:

  • use the command !mc to trigger our bot and subcommands for what we want
  • able to see who is playing minecraft on our server at the moment
  • able to get the status if the minecraft server is online
  • able to get the server load percentage (as the bot runs on the minecraft server)

This is our complete mc_discord_bot.py:

1
2
3
4
5
6
7
8
9
10
11
12
13
14
15
16
17
18
19
20
21
22
23
24
25
26
27
28
29
30
31
32
33
34
35
36
37
38
39
40
41
42
43
44
45
46
47
48
49
50
51
52
53
54
55
56
57
58
59
60
61
62
63
64
65
66
67
68
69
70
71
72
73
74
75
76
77
78
79
80
81
82
83
import discord
from discord.ext import commands
import requests
import os
from dotenv import load_dotenv
import random
import multiprocessing

# Variables
BOT_NAME = "MinecraftBot"
load_dotenv()
DISCORD_TOKEN = os.getenv("DISCORD_TOKEN")

minecraft_server_url = "lightmc.fun" # this is just an example, and you should use your own minecraft server

bot_help_message = """
:: Bot Usage ::
`!mc help`                   : shows help
`!mc serverusage`   : shows system load in percentage
`!mc serverstatus` : shows if the server is online or offline
`!mc whoisonline`   : shows who is online at the moment
"""

available_commands = ['help', 'serverusage', 'serverstatus', 'whoisonline']

# Set the bot command prefix
bot = commands.Bot(command_prefix="!")

# Executes when the bot is ready
@bot.event
async def on_ready():
    print(f'{bot.user} succesfully logged in!')

# Executes whenever there is an incoming message event
@bot.event
async def on_message(message):
    print(f'Guild: {message.guild.name}, User: {message.author}, Message: {message.content}')
    if message.author == bot.user:
        return

    if message.content == '!mc':
        await message.channel.send(bot_help_message)

    if 'whosonline' in message.content:
        print(f'{message.author} used {message.content}')
    await bot.process_commands(message)

# Executes when the command mc is used and we trigger specific functions
# when specific arguments are caught in our if statements
@bot.command()
async def mc(ctx, arg):
    if arg == 'help':
        await ctx.send(bot_help_message)

    if arg == 'serverusage':
        cpu_count = multiprocessing.cpu_count()
        one, five, fifteen = os.getloadavg()
        load_percentage = int(five / cpu_count * 100)
        await ctx.send(f'Server load is at {load_percentage}%')

    if arg == 'serverstatus':
        response = requests.get(f'https://api.mcsrvstat.us/2/{minecraft_server_url}').json()
        server_status = response['online']
        if server_status == True:
            server_status = 'online'
        await ctx.send(f'Server is {server_status}')

    if arg == 'whoisonline':
        response = requests.get('https://api.mcsrvstat.us/2/{minecraft_server_url}').json()
        players_status = response['players']
        if players_status['online'] == 0:
            players_online_message = 'No one is online'
        if players_status['online'] == 1:
            players_online_username = players_status['list'][0]
            players_online_message = f'1 player is online: {players_online_username}'
        if players_status['online'] > 1:
            po = players_status['online']
            players_online_usernames = players_status['list']
            joined_usernames = ", ".join(players_online_usernames)
            players_online_message = f'{po} players are online: {joined_usernames}'
        await ctx.send(f'{players_online_message}')

bot.run(DISCORD_TOKEN)

And now we can start our bot:

1
$ python mc_discord_bot.py

And we can run our help command:

1
!mc help

Which will prompt our help message, and then test out the others:

image

Resources

Thank you to the following authors, which really helped me doing this:

Thank You

Thanks for reading, if you like my content, check out my website, read my newsletter or follow me at @ruanbekker on Twitter.

The source code for this bot will be stored in my github repository: - https://github.com/ruanbekker/discord-minecraft-python-bot

I’ve started a brand new Discord server, not much happening at the moment, but planning to share and distribute tech content and a place for like minded people to hang out. If that’s something you are interested in, feel free to join on this link

Publish and Use Your Ansible Role From Git

In this tutorial we will be creating a ansible role, publish our ansible role to github, then we will install the role locally and create a ansible playbook to use the ansible role.

The source code for this blog post will be available on my github repository.

Ansible Installation

Create a virtual environment with Python:

1
2
$ virtualenv .venv -p python3
$ source .venv/bin/activate

Install ansible with pip:

1
$ pip install ansible==4.4.0

Now that we have ansible installed, we can create our role.

Initialize Ansible Role

A Ansible Role consists of a couple of files, and using ansible-galaxy makes it easy initializing a boilerplate structure to begin with::

1
2
$ ansible-galaxy init --init-path roles ssh_config
- Role ssh_config was created successfully

The role that we created is named ssh_config and will be placed under the directory roles under our current working directory.

Define Role Tasks

Create the dummy task under roles/ssh_config/tasks/main.yml:

Then define the defaults environment values in the file roles/ssh_config/defaults/main.yml:

1
2
3
---
# defaults file for ssh_config
ssh_port: 22

The value of ssh_port will default to 22 if we don’t define it in our variables.

Commit to Git

The assumption is made here that you already created a git repository and that your access is sorted. Add the files and commit it to git:

1
2
3
$ git add .
$ git commit -m "Your message"
$ git push origin main

Now your ansible role should be commited and visible in git.

SSH Config Client Side

I will be referencing the git source url via SSH, and since I am using my default ssh key, the ssh config isn’t really needed, but if you are using a different version control system, with different ports or different ssh keys, the following ssh config snippet may be useful:

1
2
3
4
5
$ cat ~/.ssh/config
Host github.com
    User git
    Port 22
    IdentityFile ~/.ssh/id_rsa

If you won’t be using SSH as the source url in your ansible setup for your role, you can skip the SSH setup.

Installing the Ansible Role from Git

When installing roles, ansible installs them by default under: ~/.ansible/roles, /usr/share/ansible/roles or /etc/ansible/roles.

From our previous steps, we still have the ansible role content locally (not under the default installed directory), so by saying installing the role kinda sounds like we are doing double the work. But the intention is that you have your ansible role centralized and versioned on git, and on new servers or workstations where you want to consume the role from, that specific role, won’t be present on that source.

To install the role from Git, we need to populate the requirements.yml file:

1
2
$ mkdir ~/my-project
$ cd ~/my-project

The requirements file is used to define where our role is located, which version and the type of version control, the requirements.yml:

1
2
3
4
5
6
---
roles:
  - name: ssh_config
    src: ssh://git@github.com/ruanbekker/ansible-demo-role.git
    version: main
    scm: git

For other variations of using the requirements file, you can have a look at their documentation

Then install the ansible role from our requirements file (I have used --force to overwrite my current one while testing):

1
2
3
4
5
$ ansible-galaxy install -r requirements.yml --force
Starting galaxy role install process
- changing role ssh_config from main to main
- extracting ssh_config to /Users/ruan/.ansible/roles/ssh_config
- ssh_config (main) was installed successfully

Ansible Playbook

Define the ansible playbook to use the role that we installed from git, in a file called playbook.yml:

1
2
3
4
5
6
---
- hosts: localhost
  roles:
    - ssh_config
  vars:
    ssh_port: 2202

Run the ansible playbook:

1
2
3
4
5
6
7
8
9
10
11
12
13
$ ansible-playbook playbook.yml
PLAY [localhost] *********************************************************************************************

TASK [Gathering Facts] ***************************************************************************************
ok: [localhost]

TASK [ssh_config : Dummy task] *******************************************************************************
ok: [localhost] => {
    "msg": "This is a dummy task changing ssh port to 2202."
}

PLAY RECAP ***************************************************************************************************
localhost                  : ok=2    changed=0    unreachable=0    failed=0    skipped=0    rescued=0    ignored=0

Thank You

Thanks for reading, if you like my content, check out my website, read my newsletter or follow me at @ruanbekker on Twitter.

Provision a AWS EC2 Instance With Terraform

In this tutorial I will demonstrate how to use Terraform (a Infrastructure as Code Tool), to provision a AWS EC2 Instance and the source code that we will be using in this tutorial will be published to my terraformfiles github repository.

Requirements

To follow along this tutorial, you will need an AWS Account and Terraform installed

Terraform

To install Terraform for your operating system, you can follow Terraform Installation Documentation, I am using Mac OSx, so for me it will be:

1
2
brew tap hashicorp/tap
brew install hashicorp/tap/terraform

To verify the installation, we can run terraform version and my output shows:

1
2
Terraform v1.1.8
on darwin_amd64

Terraform Project Structure

Create the directory:

1
2
mkdir terraform-aws-ec2
cd terraform-aws-ec2

Create the following files: main.tf, providers.tf, variables.tf, outputs.tf, locals.tf and terraform.tfvars:

1
touch main.tf providers.tf variables.tf outputs.tf locals.tf terraform.tfvars

Define Terraform Configuration Code

First we need to define the aws provider, which we will do in providers.tf:

1
2
3
4
5
6
7
8
9
10
11
12
13
14
terraform {
  required_providers {
    aws = {
      version = "~> 3.27"
      source = "hashicorp/aws"
    }
  }
}

provider "aws" {
  region  = "eu-west-1"
  profile = "default"
  shared_credentials_file = "~/.aws/credentials"
}

You will notice that I am defining my profile name default from the ~/.aws/credentials credential provider in order for terraform to authenticate with AWS.

Next I am defining the main.tf which will be the file where we define our aws resources:

1
2
3
4
5
6
7
8
9
10
11
12
13
14
15
16
17
18
19
20
21
22
23
24
25
26
27
28
29
30
31
32
33
34
35
36
37
38
39
40
41
42
43
44
45
46
47
48
49
50
51
52
53
54
55
56
57
58
59
60
61
62
63
64
65
66
67
68
69
70
71
72
73
74
75
76
77
78
79
80
81
82
83
84
85
86
87
88
89
90
91
92
93
94
95
96
97
98
99
100
101
102
103
104
105
106
107
108
109
110
111
112
113
114
115
116
117
118
data "aws_ami" "latest_ubuntu" {
  most_recent = true
  owners = ["099720109477"]

  filter {
    name   = "name"
    values = ["ubuntu/images/hvm-ssd/ubuntu-focal-20.04-*-server-*"]
  }

  filter {
    name   = "virtualization-type"
    values = ["hvm"]
  }

  filter {
    name   = "root-device-type"
    values = ["ebs"]
  }

  filter {
    name   = "architecture"
    values = ["x86_64"]
  }

}

data "aws_iam_policy_document" "assume_role_policy" {
  statement {
    actions = ["sts:AssumeRole"]
    principals {
      type        = "Service"
      identifiers = ["ec2.amazonaws.com"]
    }
  }
}

data "aws_iam_policy" "ec2_read_only_access" {
  arn = "arn:aws:iam::aws:policy/AmazonEC2ReadOnlyAccess"
}

resource "aws_iam_role" "ec2_access_role" {
  name               = "${local.project_name}-ec2-role"
  assume_role_policy = data.aws_iam_policy_document.assume_role_policy.json
}

resource "aws_iam_policy_attachment" "readonly_role_policy_attach" {
  name       = "${local.project_name}-ec2-role-attachment"
  roles      = [aws_iam_role.ec2_access_role.name]
  policy_arn = data.aws_iam_policy.ec2_read_only_access.arn
}

resource "aws_iam_instance_profile" "instance_profile" {
  name  = "${local.project_name}-ec2-instance-profile"
  role = aws_iam_role.ec2_access_role.name
}

resource "aws_security_group" "ec2" {
    name        = "${local.project_name}-ec2-sg"
    description = "${local.project_name}-ec2-sg"
    vpc_id      = var.vpc_id

    tags = merge(
      var.default_tags,
      {
       Name = "${local.project_name}-ec2-sg"
      },
    )
}

resource "aws_security_group_rule" "ssh" {
    description       = "allows public ssh access to ec2"
    security_group_id = aws_security_group.ec2.id
    type              = "ingress"
    protocol          = "tcp"
    from_port         = 22
    to_port           = 22
    cidr_blocks       = ["0.0.0.0/0"]
}

resource "aws_security_group_rule" "egress" {
    description       = "allows egress"
    security_group_id = aws_security_group.ec2.id
    type              = "egress"
    protocol          = "-1"
    from_port         = 0
    to_port           = 0
    cidr_blocks       = ["0.0.0.0/0"]
}

resource "aws_instance" "ec2" {
  ami                         = data.aws_ami.latest_ubuntu.id
  instance_type               = var.instance_type
  subnet_id                   = var.subnet_id
  key_name                    = var.ssh_keyname
  vpc_security_group_ids      = [aws_security_group.ec2.id]
  associate_public_ip_address = true
  monitoring                  = true
  iam_instance_profile        = aws_iam_instance_profile.instance_profile.name

  lifecycle {
    ignore_changes            = [subnet_id, ami]
  }

  root_block_device {
      volume_type           = "gp2"
      volume_size           = var.ebs_root_size_in_gb
      encrypted             = false
      delete_on_termination = true
  }

  tags = merge(
    var.default_tags,
    {
     Name = "${local.project_name}"
    },
  )

}

A couple of things are defined here:

  • A data resource to fetch the latest Ubuntu 20.04 AMI
  • The IAM Role and Policy that we will use to associate to our EC2 Instance Profile
  • The EC2 Security Group
  • The EC2 Instance
  • The VPC ID and Subnet ID are required variables which we will set in terraform.tfvars

The next file will be our variables.tf file where we will define all our variable definitions:

1
2
3
4
5
6
7
8
9
10
11
12
13
14
15
16
17
18
19
20
21
22
23
24
25
26
27
28
29
30
31
32
33
34
35
36
37
38
39
40
41
42
43
44
45
46
47
48
49
50
51
52
53
54
variable "default_tags" {
  default = {
    Environment = "test"
    Owner       = "ruan.bekker"
    Project     = "terraform-blogpost"
    CostCenter  = "engineering"
    ManagedBy   = "terraform"
  }
}

variable "aws_region" {
  type        = string
  default     = "eu-west-1"
  description = "the region to use in aws"
}

variable "vpc_id" {
  type        = string
  description = "the vpc to use"
}

variable "ssh_keyname" {
  type        = string
  description = "ssh key to use"
}

variable "subnet_id" {
  type        = string
  description = "the subnet id where the ec2 instance needs to be placed in"
}

variable "instance_type" {
  type        = string
  default     = "t3.nano"
  description = "the instance type to use"
}

variable "project_id" {
  type        = string
  default     = "terraform-blogpost"
  description = "the project name"
}

variable "ebs_root_size_in_gb" {
  type        = number
  default     = 10
  description = "the size in GB for the root disk"
}

variable "environment_name" {
   type    = string
   default = "dev"
   description = "the environment this resource will go to (assumption being made theres one account)"
}

The next file is our locals.tf which just concatenates our project id and environment name:

1
2
3
locals {
  project_name = "${var.project_id}-${var.environment_name}"
}

Then our outputs.tf for the values that terraform should output:

1
2
3
4
5
6
7
8
9
10
11
12
13
14
15
16
17
output "id" {
  description = "The ec2 instance id"
  value       = aws_instance.ec2.id
  sensitive   = false
}

output "ip" {
  description = "The ec2 instance public ip address"
  value       = aws_instance.ec2.public_ip
  sensitive   = false
}

output "subnet_id" {
  description = "the subnet id which will be used"
  value       = var.subnet_id
  sensitive   = false
}

Then lastly our terraform.tfvars, which you will need to supply your own values to match your AWS Account:

1
2
3
4
# required
vpc_id = "vpc-063d7xxxxxxxxxxxx"
ssh_keyname = "ireland-key"
subnet_id = "subnet-04b3xxxxxxxxxxxxx"

Deploy EC2 Instance

Now that all our configuration is in place, we need to intialize terraform by downloading the providers:

1
terraform init

Once the terraform init has completed, we can run a terraform plan which will show us what terraform will do. Since the terraform.tfvars are the default file for variables, we don’t have to specify the name of the file, but since I want to be excplicit, I will include it (should you want to change the file name):

1
terraform plan -var-file="terraform.tfvars"

Now it’s a good time to review what terraform wants to action by viewing the plan output, once you are happy you can deploy the changes by running a terraform apply:

1
terraform apply -var-file="terraform.tfvars"

Optional: You can override variables by either updating the terraform.tfvars or you can append them with terraform apply -var-file="terraform.tfvars" -var="ssh_key=default_key", a successful output should show something like this:

1
2
3
4
Outputs:
id = "i-0dgacxxxxxxxxxxxx"
ip = "18.26.xxx.92"
subnet = "subnet-04b3xxxxxxxxxxxxx"

Access your EC2 Instance

You can access the instance by SSH'ing to the IP that was returned by the output as well as the SSH key name that you provided, or you can make use of the terraform output to access the output value:

1
ssh -i ~/.ssh/id_rsa ubuntu@$(terraform output -raw ip)

Cleanup

To delete the infrastructure that Terraform provisioned:

1
terraform destroy

Thank You

Thanks for reading, if you like my content, check out my website, read my newsletter or follow me at @ruanbekker on Twitter.

Matrix Bot Using SimpleMatrixBotlib in Python

In this tutorial we will setup a python bot for our matrix chat server. We will only do a couple of basic commands, so that you have a solid base to build from.

Matrix Server

In our previous post we’ve setup a matrix and element server, so if you are following along, head over to that post to setup your matrix server before continuing.

Matrix Python Bot

We will be using simple-matrix-bot-lib as our bot, so first we need to install it:

1
2
python3 -m pip install simplematrixbotlib
python3 -m pip install requests

We will need to authenticate with a user, so I will create a dedicated bot user:

1
2
3
4
5
6
7
8
9
$ docker exec -it matrix_synapse_1 bash
> register_new_matrix_user -c /data/homeserver.yaml http://localhost:8008

New user localpart [root]: bot
Password:
Confirm password:
Make admin [no]: no
Sending registration request...
Success!

The most basic bot is the echo bot, which just returns your message:

1
2
3
4
5
6
7
8
9
10
11
12
13
14
15
16
17
18
19
20
21
22
23
24
25
26
27
28
29
30
31
32
33
34
35
36
37
38
39
40
41
42
import subprocess
import simplematrixbotlib as botlib
from urllib.request import ssl, socket
import datetime, smtplib

MATRIX_URL="https://matrix.foodmain.co.za"
MATRIX_USER="@foobot:matrix.foodmain.co.za"
MATRIX_PASS="foo"

creds = botlib.Creds(MATRIX_URL, MATRIX_USER, MATRIX_PASS)
bot = botlib.Bot(creds)

PREFIX = '!'

# Help
@bot.listener.on_message_event
async def help(room, message):
    match = botlib.MessageMatch(room, message, bot, PREFIX)
    if match.is_not_from_this_bot() and match.prefix() and match.command("help"):
        help_message = """
        Help:
         - !help
        Echo
         - !echo your message
        """
        await bot.api.send_markdown_message(room.room_id, help_message)

# Echo
@bot.listener.on_message_event
async def echo(room, message):
    """
    Example function that "echoes" arguements.
    Usage:
    user:  !echo say something
    bot:   say something
    """
    match = botlib.MessageMatch(room, message, bot, PREFIX)
    if match.is_not_from_this_bot() and match.prefix() and match.command("echo"):
        print("Room: {r}, User: {u}, Message: {m}".format(r=room.room_id, u=str(message).split(':')[0], m=str(message).split(':')[-1].strip()))
        await bot.api.send_text_message(room.room_id, " ".join(arg for arg in match.args()))

bot.run()

Run the bot, invite the bot user to a room and test it with !echo hi

For a bot having to use the requests library, such as getting a quote from an api, we can use the following:

1
2
3
4
5
6
7
8
9
10
11
12
13
14
15
16
17
18
19
20
21
22
23
24
25
26
27
28
29
30
31
32
33
34
35
36
37
38
39
40
41
42
43
44
45
46
47
48
49
50
51
52
53
54
55
56
57
58
59
60
61
62
63
64
65
66
67
68
69
70
71
72
73
74
import random
import subprocess
import simplematrixbotlib as botlib
import requests
from urllib.request import ssl, socket
import datetime, smtplib

MATRIX_URL="https://matrix.foodmain.co.za"
MATRIX_USER="@foobot:matrix.foodmain.co.za"
MATRIX_PASS="foo"

creds = botlib.Creds(MATRIX_URL, MATRIX_USER, MATRIX_PASS)
bot = botlib.Bot(creds)

PREFIX = '!'

# Help
@bot.listener.on_message_event
async def help(room, message):
    match = botlib.MessageMatch(room, message, bot, PREFIX)
    if match.is_not_from_this_bot() and match.prefix() and match.command("help"):
        help_message = """
        Help:
         - !help
        Echo
         - !echo msg
        Fortune:
         - !fortune
        Quote:
         - !quote
        """
        await bot.api.send_markdown_message(room.room_id, help_message)

# Echo
@bot.listener.on_message_event
async def echo(room, message):
    """
    Example function that "echoes" arguements.
    Usage:
    user: !echo say something
    bot:  say something
    """
    match = botlib.MessageMatch(room, message, bot, PREFIX)
    if match.is_not_from_this_bot() and match.prefix() and match.command("echo"):
        print("Room: {r}, User: {u}, Message: {m}".format(r=room.room_id, u=str(message).split(':')[0], m=str(message).split(':')[-1].strip()))
        await bot.api.send_text_message(room.room_id, " ".join(arg for arg in match.args()))

# Fortune
@bot.listener.on_message_event
async def fortune(room, message):
    match = botlib.MessageMatch(room, message, bot)
    if match.is_not_from_this_bot and match.command('!fortune'):
        fortune = subprocess.run(['/usr/games/fortune'], capture_output=True).stdout.decode('UTF-8')
        print(fortune)
        await bot.api.send_text_message(room.room_id, fortune)

# Quotes
@bot.listener.on_message_event
async def quote(room, message):
    match = botlib.MessageMatch(room, message, bot, PREFIX)
    if match.is_not_from_this_bot() and match.prefix() and (
            match.command("quote") or match.command("q")):

        response = requests.get('https://goquotes-api.herokuapp.com/api/v1/random?count=1').json()['quotes'][0]
        quote = response['text']
        author = response['author']
        tag = response['tag']
        formatted_message = f"""{quote}
        - {author}
        """
        #await bot.api.send_text_message(room.room_id, formatted_message)
        await bot.api.send_markdown_message(room.room_id,  formatted_message)

bot.run()

Resources

For more information, have a look at their documentation

Thank You

Thanks for reading, if you like my content, check out my website, read my newsletter or follow me at @ruanbekker on Twitter.