GlusterFS is a Awesome Scalable Networked Filesystem, which makes it Easy to Create Large and Scalable Storage Solutions on Commodity Hardware.

Basic Concepts of GlusterFS:
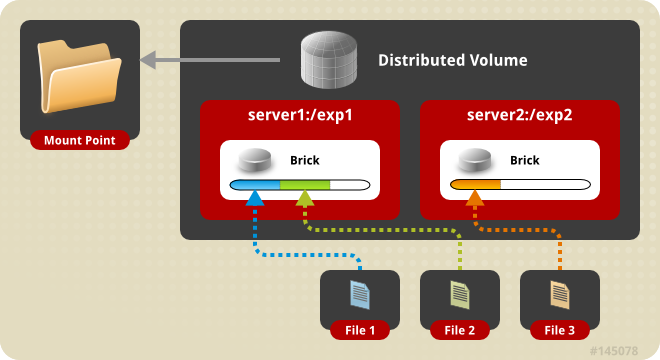
Brick: * In GlusterFS, a brick is the basic unit of storage, represented by a directory on the server in the trusted storage pool.
Gluster Volume: * A Gluster volume is a Logical Collection of Bricks.
Distributed Filesystem: * The concept is to enable multiple clients to concurrently access data which is spread across multple servers in a trusted storage pool. This is also a great solution to prevent data corruption, enable highly available storage systems, etc.
More concepts can be retrieved from their documentation.
Different GlusterFS Volume Types:
With GlusterFS you can create the following types of Gluster Volumes:
- Distributed Volumes: (Ideal for Scalable Storage, No Data Redundancy)
- Replicated Volumes: (Better reliability and data redundancy)
- Distributed-Replicated Volumes: (HA of Data due to Redundancy and Scaling Storage)
- More detail on GlusterFS Architecture
Setup a Distributed Gluster Volume:
In this guide we will setup a 3 Node Distributed GlusterFS Volume on Ubuntu 16.04.
For this use case we would like to achieve a storage solution to scale the size of our storage, and not really worried about redundancy as, with a Distributed Setup we can increase the size of our volume, the more bricks we add to our GlusterFS Volume.
Setup: Our Environment
Each node has 2 disks, /dev/xvda for the Operating System wich is 20GB and /dev/xvdb which has 100GB. After we have created our GlusterFS Volume, we will have a Gluster Volume of 300GB.
Having a look at our disks:
1 2 3 4 5 | |
If you don’t have DNS setup for your nodes, you can use your /etc/hosts file for all 3 nodes, which I will be using in this demonstration:
1 2 3 4 5 | |
Install GlusterFS from the Package Manager:
Note that all the steps below needs to be performed on all 3 nodes, unless specified otherwise:
1 2 | |
Format and Prepare the Gluster Disks:
We will create a XFS Filesystem for our 100GB disk, create the directory path where we will mount our disk onto, and also load it into /etc/fstab:
1 2 3 4 | |
After we mounted the disk, we should see that our disk is mounted to /gluster:
1 2 3 4 | |
After our disk is mounted, we can proceed by creating the brick directory on our disk that we mounted, from the step above:
1
| |
Start GlusterFS Service:
Enable GlusterFS on startup, start the service and make sure that the service is running:
1 2 3 4 | |
Discover All the Nodes for our Cluster:
The following will only be done on one of the nodes. First we need to discover our other nodes.
The node that you are currently on, will be discovered by default and only needs the other 2 nodes to be discovered:
1 2 | |
Let’s verify this by listing all the nodes in our cluster:
1 2 3 4 5 | |
Create the Distributed GlusterFS Volume:
We will create a Distributed GlusterFS Volume across 3 nodes, and we will name the volume gfs:
1 2 3 4 5 6 | |
Start the GlusterFS Volume:
Now start the gfs GlusterFS Volume:
1 2 | |
To get information about the volume:
1 2 3 4 5 6 7 8 9 10 11 12 13 14 | |
Status information about our Volume:
1 2 3 4 5 6 7 8 9 10 11 12 13 14 15 | |
Mounting our GlusterFS Volume:
On all the clients, in this case our 3 nodes, load the mount information into /etc/fstab and then mount the GlusterFS Volume:
1 2 | |
Now that the volume is mounted, have a look at your disk info, and you will find that you have a 300GB GlusterFS Volume mounted:
1 2 3 4 5 | |
As mentioned before, this is most probably for a scenario where you would like to achieve a high storage size and not really concerned about data availability.
In the next couple of weeks I will also go through the Replicated, Distributed-Replicated and GlusterFS with ZFS setups.